 Rui Carmo
…and enjoy doing it.
Update: revisions for 2017. You may also want to visit my Switch page, which tries to list suitable macOS replacements for common Windows applications.
Introduction
When I started this document in February 2007 (a full decade ago), a lot of people were moving to the Mac, so I thought I’d jot down a few notes about my experience during the decade before that. This page was updated on a yearly basis for a while (usually around the holiday season, which is when I get the most visits from new Mac owners or people pondering the switch), but in 2017 I noticed that five years had gone by, and decided to revise it a fair bit because it is still one of the most popular pages on this site, and circumstances have changed in numerous ways:
- The Mac is now Apple’s secondary platform. iOS receives most of their attention these days, and I am one of the many people who increasingly rely on iOS devices rather than conventional computers for what we used to call “personal computing”.
- Together with the shift towards mobile, the popularity of web applications and services made the local operating system rather irrelevant (up to a point, people will be more upset if you change their browser than their OS).
- Both macOS and Windows have changed substantially over the past few years, following the shifts in the application landscape. As such, most critical applications are now available on either platform.
- I joined Microsoft in 2015, which means that I “switch” to and fro on a daily basis (although I still prefer this side of that particular fence).
But the basics are still the same – motives for anyone switching will not be discussed here, since discussing relative merits of computer platforms is very much like discussing cars, and therefore largely unimportant if you are getting what you want.
My main point is therefore that quasi-religious beliefs that any platform is better than another are not just irrelevant, but plain childish and stupid. Before maligning the Mac, Windows or Linux, make sure you know what you are talking about – most people in the IT business have “pet hatreds” towards one platform or another out of sheer ignorance, and more than two decades in the business has shown me that anyone who only has bad things to say about any given platform probably doesn’t know what (s)he’s talking about.
So if you know you want a Mac, you’ve come to the right place for a few basic hints that might just save you a lot of time.
Foundational Aspects
The major “under-the-hood” issue for non-Mac users is the underlying UNIX foundation1 of macOS – it not being Windows makes some people nervous, but, in the end, what matters is the user interface and the way it makes most simple tasks a lot easier to accomplish.
The second (and quite frequent) issue is compatibility. Which, by the way, has long ceased to be an issue at all.
Now that Macs are also Intel based, that usually comes in two flavors – document compatibility (not really an issue these days – see my software replacements page for more info on specific apps), and the ability to run other operating systems, like Windows.
The bottom line on that is: You can do anything on a Mac, period. Most relevant applications are available for both Windows and the Mac, and there are several working Virtualization solutions to run another operating system in a sandbox.
There are currently four main options for doing that: The first to appear was Parallels, which has been around since roughly mid-2006, and VMware’s Fusion, which reached public beta on December 2006 and was soon after released commercially. The third alternative, VirtualBox, has also been around for a while and is free for personal use. The fourth alternative is the hypervisor now built into macOS, which that can be used via xhyve, Docker and other front-ends.
And, of course, you can always dual boot Windows or Linux using Boot Camp.
These will not be discussed here at length, since the main point of this document is to ensure you feel at home in macOS as quickly as possible. But they are recommended if you need to ensure a smooth transition where it regards specific applications that may not be available on the Mac – you’ll be able to keep all your old applications running alongside the new ones.
As to the bulk of this guide, the target is non-technical folk. However, I do throw in a few hints for people who are coming to macOS with some computing experience and expect some “best practices”, so don’t worry if some points are a bit too technical.
Buying
Buying a Mac is not a normal experience anywhere. It’s a local thing, best done with local people (pun intended). In Portugal, where I live, that was problematic for a long time due lack of “real” Apple stores, the recurring problems of the local retail chain and the quasi-underground nature of most user groups.
We got a few premium retailers the last few years, but in September of 2017, there still isn’t a single “normal” Apple store in Portugal for some reason.
However, picking which Mac to buy (and when) is pretty straightforward. It’s mostly a matter of visiting the Apple site, reading the Macrumors Buyers’ Guide to figure out how recent each model is relative to the full lineup (taking the predictions there with a fairly large dollop of salt), and then finding a store that stocks it (some people order theirs online – others, like me, want to go out, get it, and come back again without all that waiting around nonsense).
If you happen to buy a second-hand machine (which is common given the flurry of upgrades brought upon by frequent updates to the portfolio), you should check the CPU type. Most machines beefier than a Core 2 Duo should be able to run Sierra or High Sierra, but “plain” Core Duo and Core 2 Duo machines (as well as ancient PowerPC gear) are pretty much dead in the water these days given that Apple is phasing support for both.
In any case, when buying second-hand make sure you plan for an upgrade to at least 8GB of RAM (or more), since macOS has become somewhat more demanding in terms of resources and RAM is the easiest, cheapest way to breathe new life into an old machine.
Although the MacBook Air has profoundly changed the game was far as form factors are concerned, this MacWorld piece (dated 2008, but amazingly still applicable in terms of scenarios) provides good food for thought – and a quick look at Apple’s site will give you all the details you could possibly want.
I will not go into warranties, support or suchlike – this is, again, a local affair, invariably dealt with by local people and legislation, and stuff like AppleCare isn’t available everywhere. So far, I’ve been lucky – a problem one of my Macs had (an original 15” flat panel iMac, which I started out in and since gave to my parents) was fixed within three weeks2. It had a power supply failure, and fixing it required shipping a replacement part to Portugal. A similar thing happened to my iBook a good while ago, and the experience was mostly the same.
Unpacking & Testing
- While unpacking, look at the packaging. It is an art form in itself, and there are often neat graphical hints of how to unpack every Mac printed on the box. Do leaf through the booklets and such, but (here’s the important bit) don’t rush it. There are a few important things to know about each new model or accessory, even if you’ve had a Mac before.
- If you’re getting a laptop or iMac, I recommend you have a good look at the screen during the first few days to look for “dead” (i.e., stuck) pixels that won’t change color – manufacturing processes still aren’t perfect, and this is the most annoying kind of hardware problem possible – a minuscule thing that will stay with the machine for ever.
There is some controversy as to what amount of dead pixels warrants a replacement – search the Net for more info – but this is the kind of thing you want to check for right away to take advantage of any “immediate return” policies.
If you bought a second-hand machine with an optical disk drive, you can often boot the Hardware Test off the first install CD (insert the CD and hold down Alt – or Option, as it is called in older keyboards - while the machine boots).
Amongst other things, it performs a display test – which is fundamental for picking up “dead” pixels before you start installing stuff (I used to use ScreenQuery, a simple app that filled the screen with solid colors, but it seems to have vanished). As usual, the smaller the screen, the less likely you are to have dead pixels.
Setting up macOS
- The default behavior these days is for the Mac to prompt you for
an installation language the first time it boots from the hard disk
and, after installing a few files (a few minutes’ worth) configure
your locale settings. If your Mac boots straight to the Finder
or to the login panel, then someone else has used it before (sadly,
this was a thing with Portuguese retailers, who like to play
around with their customers’ gear). If so, I recommend using recovery mode (hold down
Commandand theRkey during reboot) to wipe the disk withDisk Utilityand reinstall (via the Internet) it to a factory-fresh configuration (old models shipped with restore DVDs, and you can also use another Mac to build a bootable USB pen drive). - After setting up your keyboard, language and whatnot, the installer
creates the first user account. This is the important bit: it is
an administration account – call it “Administrator” or something
like that and create another for yourself afterwards (if you’re a
UNIX head, this is not root, which is disabled, but it is an account that can use
sudo). Mind that this sets the computer name toAdministrator's computer, something you should change in theSharingpreference pane.
You can create a “regular” user account in System Preferences after
setup ends. This will not prevent you from making all the silly
mistakes people do when using a Mac for the first few months, but it
will significantly decrease the odds of you breaking something (you will
be asked to authenticate as an administrator before any significant
changes are made). Not to mention that it prevents unwanted changes to
your system…
Many people think this is unnecessary until they discover (the hard way) that they threw some important system file into the Trash, or that some application took advantage of their latent administrative privileges. Yes, there are warnings and elevation prompts, but using the machine as an administrator tends to make people oblivious to them and years of using all my machines as a “regular” user bestowed upon me painless system updates, zero trouble with the core system and no software instability whatsoever. In the end, it’s your call – I’m just providing time-proven advice…
(Yes, you can break a macOS install – or files that make subsequent upgrades fail – by mistake when you use the machine every day as an admin user. And yes, I will be repeating this advice several times).
- Network configuration is usually trivial. Macs use DHCP by
default, and visible Wi-Fi access points will show up on the
Wi-Fi menu (to connect to a hidden Wi-Fi network, choose the
Other...option). For those having to deal with ancient broadband connections, PPPoE support is built-in, and your card’s physical Ethernet address can be looked up in theEthernetsection of theNetworkpreference pane inSystem Preferences. - The firewall is configured in the
Securitytab inSystem Preferences. The defaults are usually sensible for most cases (and macOS is very secure3), but it’s best to ensure it’s on if you’re directly connected to the Net.
An Aside On Firewalls
The firewall is deceptively simple, but quite sophisticated – for instance, you can set access permissions on a per-application base (very useful if you have to run things that keep checking for updates without a way to disable them). If you want something better that tracks individual inbound and outbound connections as they are established, I personally recommend installing Little Snitch, which will not only let you control what each individual application tries to do and define rules for several typical scenarios.
Best Practices
What not to do:
- Don’t use the administration account for anything other than setting up the machine and applications or changing “permanent” settings (if you want to, say, change network settings as a normal user you’ll be prompted for the admin password, and since you’ll do configuration changes less and less often as time progresses, this isn’t a problem).
- Don’t install “toy” applications as the admin user until you’re sure
you’re going to use them. Most applications will run just fine from
an
Applicationsfolder under your user directory, although macOS may restrict some functionality for unsigned applications. - Don’t open files or mail attachments that come from unknown sources.
This is a basic security measure that is valid for any kind of
machine, even for a Mac – no operating system can protect your
machine from your mistakes. A good way to improve your odds is to
open Safari preferences and uncheck the
Open "safe" files after downloadingoption, which for some reason is still on by default in 2017. There is no such thing as a “safe” file – you have to be sure of what you download. - Never, ever move Apple applications (such as Mail.app) to other folders. macOS updates aren’t very clever at updating built-in apps, so you’ll end up with either two copies of your apps or a single broken one (this also valid for App Store downloads).
- If you’re a Windows user: Don’t get into the habit of moving a folder on top of another with the same name – older versions of the Finder would replace the entire folder, i.e., it did not merge both folder’s contents and caused you to lose your data. This was a very significant difference between the Finder and Windows Explorer that most people were (painfully) caught by at least once until the behavior was tweaked to display a sane warning dialog with (limited) merging options. To avoid confusion, drag the folder contents, not the folder itself.
- If you’re a UNIX user: Don’t fiddle with the system startup
scripts unless you’re sure you know what you’re doing (which
includes reading this and a bit more about [
launchd] and the startup files themselves). macOS doesn’t use runlevels in the same way as “classic” UNIX systems, and things like network configuration, system services, and whatnot are not (necessarily) stored under/etc. You’ll figure it out after a while, but don’t go in thinking this is “just like any other UNIX system”. It both is and isn’t like other UNIXes, and like other UNIXes, fiddling under the hood is not to be done lightly until you’ve read the documentation. - Do not install stuff that messes with Apple’s defaults, including UI “skins”, funky plugins, low-level UNIX tools that overwrite (as opposed to coexist with) the supplied ones and other nonsense – that is a sure way to break the OS upon the next system update.
Things You should do:
- Did you read the bit above about setting up your own user account? Go back and read it then.
- Disable Safari’s
Open Safe Files After Downloadingpreference. I have no idea why it still exists since there is no such thing as a safe file anymore, and like e-mail attachments, you should only download and open files from trusted sources. Yes, I am repeating this again, just to make sure you get it. - Tweak Safari preferences. Me, I disable Top Sites, make sure links from applications open in a new tab and choose a blank page as the default – it feels a little snappier and has less visual clutter.
- If you’re installing software that’s not from the App Store, you can
create your own
Applicationsfolder inside your home directory (macOS will change the icon accordingly) and try out new stuff in there. If it breaks, you won’t break the machine for other people (and if a macOS app breaks while running under an unprivileged account, it’s badly written for sure). - Put things you want to share among users in the
/Users/Sharedfolder. You may have to tweak file and folder permissions a bit, but it’s the easiest way (see my Address Book, iPhoto and iTunes pages for ways to share these applications’ data). - Consider using a separate user account for playing around (yes, another one, besides your own and the administration one). Fast User Switching makes it very easy to try out new software like this.
- Set up separate accounts for kids. Use the
Parental Controlspreference pane to define things such as restricting which applications specific users can access to, and more, including bedtime, web access, etc. It has the advantage that (unlike Windows10 parental controls) you don’t need to give your kids an e-mail address and have their usage patterns processed outside your home, but you won’t be able to change settings remotely (only on that machine or from a Mac inside your home). - Use Mission Control. Learn how to use the function keys to invoke it and how to switch spaces using swipe gestures and hotkeys. That goes double if you’re using a trackpad, where gestures like triple-finger drag can make a significant difference.
- If you mess around under the hood, be mentally prepared to reinstall your Mac from scratch after a month or so of heavy fiddling. This is mostly applicable to the UNIX heads who will ignore every other warning so far – “normal” users can disregard this hint, especially if you follow my main recommendation and don’t use the administration account for everyday work.
- Get as much RAM as you can possibly afford – these days 8GB is pretty much the baseline, but 16GB is far more comfortable.
- If your Mac didn’t come with a Magic Mouse (as late 2009 models do), then get a proper mouse – or, even better, a Magic Trackpad. I used to say that macOS with a single button mouse is like rowing with a single oar, and I mean it: macOS supports multiple-button mice, scroll wheels, etc. – you can use pretty much anything you want.
- If you got a modern laptop, check the
Trackpadpreferences pane for the visual tutorials explaining how to use gestures to do all sorts of things with the trackpad – once you’re used to that, a mouse is often unnecessary, but you can use both at once. - Drag Terminal.app to your dock as soon as possible (it’s in
Applications/Utilities). UNIX won’t bite you, and some things are best done at a terminal, given appropriate care. - During the transition period, you may want to use Microsoft’s great Remote Desktop Client to access your Windows boxes. VNC is good, but the RDP protocol is much faster and also allows you to transfer files across.
- Know your way around the Apple Knowledge Base. For instance, the Startup key combinations for Intel-based Macs is very useful when you need to troubleshoot the boot process, remove a stuck CD or DVD from an older machine’s maw, etc., and things like Resetting the System Management Controller can come in very, very handy indeed.
Keyboard Tips
These started piling up a bit, so I decided to group them together in a single section.
- If you have a 2016 MacBook Pro with a Touch Bar, consider remapping
Caps LocktoEsc: go intoSystem Preferences,Keyboard,Modifier Keys...and for theCaps Lockkey, chooseEscapeand clickOK. - If
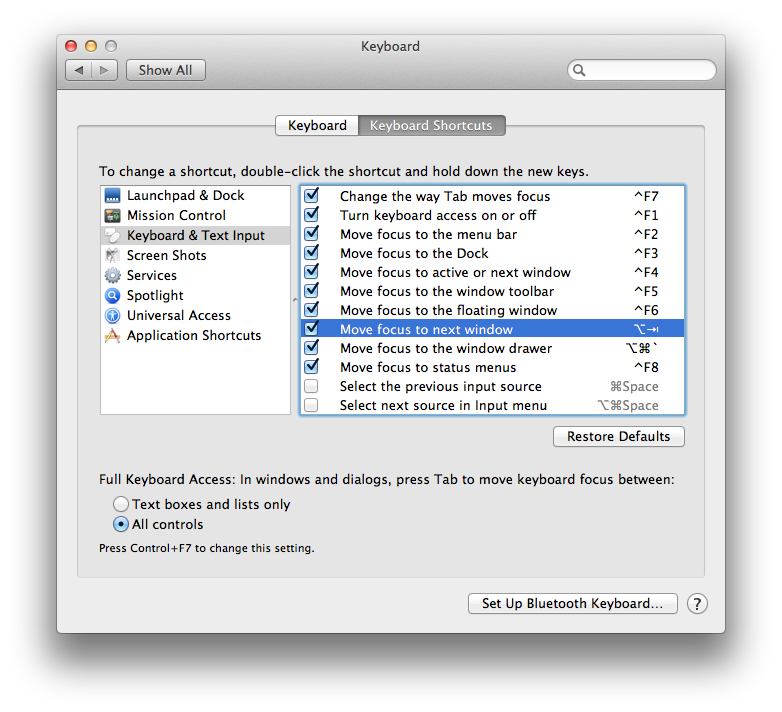
Alt-Tabis essential to your sanity, go intoSystem Preferences,Keyboard Shortcutsand changeMove focus to next window in application(in theKeyboard and text inputsection) to useAlt-Tab(see screenshot in next section). That way you can useCommand-Tabto change between apps andAlt-Tabto switch between windows in the same app, which is a decent enough compromise (some people like to do this withMove focus to active/next window, but it doesn’t work well in some instances). - The
Command-Tabkey combo doesn’t just let you switch between applications – you can also select an application and quit it immediately by keeping theCommandkey down and doingCommand-Q. - Spend some time getting used to the accelerator and “special” keys.
They make sense after a while, but having the extra
Commandmodifier key and a different meaning forHomeandEndplays havoc with some people’s reflexes. (See below for a way to change this if you really want to, but I recommend opening a text editor and playing around for a while to get used to the way things work on a Mac). - If you’re keyboard-oriented, go into
System Preferences,Keyboard and MouseKeyboard PreferencesandTurn on full keyboard access. Now you can deal with dialog boxes the way you’re used to, as well as accessing menus and toolbars with the keyboard. - Instead of digging through
Applicationsto find what you want, hitCommand-Spaceto invoke Spotlight and start typing the name of the app. If that isn’t flexible enough for you, consider getting something like Quicksilver or Alfred. Think of any of these as a keyboard-based application launcher. The last two are much, much more, but it takes a while for their power to sink in. - Windows users will like to know that
Alt-Command-Escwill display the “Force Quit Applications” dialog. You can also force quit an application by clicking on its dock icon while holding downCtrl+Alt. - Remember that
Command-Hwill “hide” applications (i.e., there’s more to life than minimizing windows), and that clicking and holding on an docked application icon will zoom out to an Exposé view of all that app’s windows. - The screenshot key combos are mostly well-known, but here’s a brief
summary:
Command-Shift-3captures the whole screen (the snapshot will be saved to the desktop) andCommand-Shift-4gives you a selection cursor. In this mode you can select a region at will, or hitSpaceto snapshot a specific window (this will include a drop shadow – you can use theGrabutility to take screenshots without it). You can also Hold downControlwhen clicking to save the snapshot to the clipboard (instead of the desktop), ready to paste into any application. - There is a set of startup key combinations here that you might find useful. Some are obsolete by now, but most are still valid and may be very useful to folk getting second-hand Macs.
- If you’re using a Mac with an external non-US keyboard, the screen
brightness control is often unmarked – try the function keys above
the
helpkey. - Older MacBook users will also want to know about
Command-F1to toggle between mirrored and extended desktop modes (a lifesaver when you have a bum LCD screen) andCtrl-Alt-Command-8to toggle ‘white on black’ display in low-light situations. (Command-Alt-8will also toggle zooming). But those who really want to get to know their laptop keyboards will want to look at this 15-inch PowerBook G4 Developer Note, which is still mostly applicable to modern MacBooks. - If you use Remote Desktop with a Portuguese keyboard layout at
both ends, the
Alt Grkey can be emulated by usingCtrl+Alt(so the@symbol is onCtrl+Alt+2, etc.) - If you use “VNC”:protocols/VNC and non-US keyboards, I’ve found Jump Desktop to have excellent international keyboard support when connecting to other machines.
- People using a Mac mini with standard PC keyboards are likely to have trouble with the way keys are mapped (especially non-US layouts, which swap accent and symbol keys), so I strongly recommend getting an Apple keyboard.
- See this gist for helpful tips on typing diacritics (accented chars) on US/UK keyboards. This is ancient lore that keeps getting rediscovered by expats who move to the US, and dates back to the very first Macs.
- Can’t stand the apparently useless extra
enterkey that Apple put whereAlt Grought to be on older laptops? Try usingSystem Preferencesor fKeys to remap it to something more sensible.
If you’re a hard-core Windows user and the Mac’s way of dealing
with Home and End really bugs you, here’s a tip from Aaron Adams
(the original link vanished, so this seems to be the only remaining copy
of this tip on the Net):
To change the Mac's home and end keys to behave like Windows in all applications, create a text file named/Library/KeyBindings/DefaultKeyBinding.dict(if the folder doesn't exist, go ahead and create it) and add these lines:/* Home/End keys like Windows */ { "\UF729" = "moveToBeginningOfLine:"; /*home*/ "\UF72B" = "moveToEndOfLine:"; /*end*/ "$\UF729" = "moveToBeginningOfLineAndModifySelection:"; /*shift + home*/ "$\UF72B" = "moveToEndOfLineAndModifySelection:"; /*shift + end*/ }Logout and login, and the home and end keys will work like Windows.
Alternatively, you can use something like DoubleCommand to change
global key bindings that System Preferences would ordinarly not let you tweak. But if the Terminal is the only place where the
default behavior annoys you, the terminal preferences themselves allow you to customize key bindings and the relevant escape codes.
Finally, there are plenty of resources out there regarding using external PC keyboards on the Mac and re-mapping keys in a straightforward fashion. The Windows-to-Mac Key Switching at Ars Technica is one such example.
Windows-centric tips:
As mentioned above, these won’t cover Boot Camp, Parallels or Fusion. Think of this as a list of things that are different in macOS and that you will need to get accustomed to.
One of the first things I recommend you do is to go into Keyboard Preferences and:
- Set up
Alt-Tabto switch between an application’s windows (that way you can both get used toCommand+Taband gestures to switch between apps and make good use of your muscle memory for switching between an apps’ own windows) - Turn on
full keyboard accessfor navigating dialog boxes the way you’re used to.
It should look something like this:
Besides that, you should keep these tips in mind:
- Remember that moving files risks replacing the whole folder, not just its contents (the Finder now prompts you regarding what to do, but older versions didn’t).
- No, there isn’t a
Startbutton. You can drag applications to the Dock for quick access, or even drag the entireApplicationsfolder to the right-hand side of the Dock, forming what Apple calls a “stack”. Click on it, and you’ll get a graphical menu of the contents that you can customize on a per-stack basis. - Check the Keyboard Tips section above for ways to force-quit applications. You won’t use them much, but you’ll feel better knowing they’re there.
- Applications can be started upon login by going to
AccountsinSystem Preferences, clickingStartup Itemsand adding them to the list. - File shares can be browsed via the Network icon in the Finder. macOS works a little differently than the standard Windows network browser, but it’s all there.
- File shares are mounted directly by pressing
Cmd-Kin the Finder and entering a Samba like so:smb://server/share(do not even think about using the Windows backslash (“\“) for anything other than authenticating asdomain\user, that is not the UNIX way to do things). - macOS will mount network file shares automatically on most circumstances, although there might be some issues in corporate environments (i.e., some file servers will always ask your Mac for your password, even if you check the “save this password” option).
- Windows shares (the
\\domain\pathtype) are not directly accessible to macOS. You need to either figure out the real pathname to the share (smb://server/share) or spend a good while figuring out how to integrate your Mac with Active Directory. I have some notes on the first option here for those of you in corporate environments. - Non-App Store installers don’t work the same way – most applications
can be installed by just dragging and dropping them into your
Applicationsfolder (applications can ultimately reside anywhere on your hard disk, but it pays to be tidy). Installers are mostly used when it’s necessary to set up large volumes of files or application resources (fonts, libraries, etc.). - Properly written installers will run from a non-administrative account, ask you for the administrative password, and go about their business. If an installer fails in a non-administrative account, contact the developer and have them fix it – their installer is broken and not performing up to specs (Adobe was a notorious offender in this regard for over a decade).
- Modern versions of the OS have very good Exchange integration built-in if your organization is running the 2007 edition – check with your IT staff, it’s worked well enough for me for years.
- Office 365 just works, and includes everything you’re used to except for Publisher and Access. Outlook is a little different, but on par.
NTFS Disks
One of the things people ask about the most is how to access external hard disks formatted in NTFS. macOS has built-in read-only support for NTFS, so you can access your data just fine in most cases (the only exception is if you use NTFS encryption, which is not completely supported by anything other than Windows right now).
If you really need to write to NTFS volumes, there are currently two main options:
- A commercial driver from Paragon, which has full support for compressed files and folders and excellent performance. That’s what I use.
- The Open Source driver, which is slower and has a few more limitations, but which is free and relatively easy to install.
UNIX-centric Tips:
Alt-clicking on a command line prompt will move the cursor to that position.- Go into Terminal preferences and check
Use option
    as meta key
to be able to use Alt-B and Alt-F in the shell (note that this may interfere with being able to type diacritics). - Set the Terminal to open
/bin/bashinstead oflogin, otherwise it may slow down opening new windows/tabs over time due to log files in/private/var/log/asl/*.asl(this was still a thing in 2016, but should be gone soon). - All disks (file shares, external hard disks, etc.) are mounted under
the
/Volumesdirectory (which is hidden, but accessible via the Terminal). - Disks with identical names (such as file shares) will be mounted as
/Volumes/name,/Volumes/name_1, etc. -
SSH integrates with the login keychain and worked beautifully until Apple broke it in Sierra, so you now need to add this to
~/.ssh/config:Host * AddKeysToAgent yes UseKeychain yes IdentityFile ~/.ssh/id_rsa -
Mail.app had, over the years, a tendency to not use the SOCKS proxy settings in System Preferences properly – it did name resolution wrong, and SMTP over SOCKS didn’t work. It’s actually improved a bit, earlier versions would not work at all. If you need to access remote mailboxes via a SOCKS or SSH tunnel and it still doesn’t work for you, try Thunderbird.
- Safari, however, does honor SOCKS settings, and seems to be fully SOCKS 5 compliant – which means it will perform hostname lookups remotely through the SOCKS proxy.
- X11 on the Mac is currently deprecated, but you can use XQuartz, which provides all you need.
- X11 might have some issues with your keyboard layout (check my
HOWTO section for more hints on that) and X display permissions,
but will work perfectly via
ssh -Xor-Y. - For third-party packages and tools, I personally recommend Homebrew these days instead of MacPorts.
However, you may want to check out Fink if you’re a Debian purist. It’s not really Debian, but your
apt-getaddiction will get a quick fix. Fink is especially nice since it does not, ever, mess around with your macOS system directories (it hangs off/sw,/sw/bin, etc.). Be prepared, however, for some packages not being the same versions you’re used to in Linux. - If you’re a BSD guy, MacPorts is your thing. It hangs off
/optby default, and the available packages also seem to be well maintained. - Need PHP and mySQL? Here’s a howto/Enable PHP on macOS, which needs updating but should be enough to get you started. mySQL now publishes an excellent set of native installers and management tools, so head on over to their site.
Other Stuff
- When installing or upgrading macOS, hit
Cmd+Lto see the installer log, it’s vastly more informative than the single progress bar we usually get. - Read John Gruber’s piece on Software Update, and his more recent
one on why
Repair Permissions(one of the most common – and stupid – troubleshooting suggestions in Mac forums) is voodoo. Both are ancient but have a number of good tips, and, more importantly, banish some of the most common misconceptions about either process. - Resetting a macOS password on older machines can be done by rebooting from the install CD and using the “Reset Password” option in the installer (but do note that this will not change your keychain password and you’ll need to change the password again after you login)
- Resetting an Open Firmware password requires zapping the PRAM three times (restart holding Cmd-Alt-P-R three times) – some folk say you should change the Mac’s configuration as well (removing or adding RAM), but I fail to see the logic in that.
- You can secure all your data using FileVault (although at the expense of some battery life in older machines without hardware acceleration).
- There is now a recovery option that you should read about, especially if you use FileVault. On newer machines, you can even restore the OS to a fully working state over the Internet.
Essential Applications
I now have an entire page devoted to apps that switchers may be interested in, but the following summarizes my own experience and may be of general interest:
I originally went out and bought a copy of Microsoft 2004 – I now use Office 365, but many people will probably be OK with iWork for home use.
Since the move to Intel, the only other “essential” was some form of virtualization to let me use some odd Windows application or tool every couple of months or so. I currently use Parallels, but you may want to look at alternatives.
Besides those and some of the utilities I mentioned above, my current list of “essentials” is:
- 1Password for keeping track of all my passwords (on desktop and mobile)
- Dropbox and OneDrive for sharing files transparently across all of my Macs and PCs.
- OneNote for syncing my notes not just across all of my Macs, but also to my iPhone and other devices.
- VLC for occasional video playback.
- MenuMeters to keep track of network traffic and CPU usage - they’re simple, unobtrusive and very, very effective.
- Pixelmator for image editing. There are plenty of similarly-priced alternatives out there, but I happen to like its feature set.
- Chrome as an alternate browser. I use Safari for everything (and it is my default browser), but Chrome is a necessity these days.
- Little Snitch to keep track of what apps are doing.
- Jump Desktop for remote desktop to Windows machines and VMs.
- Colloquy (if you happen to hate IRC as much as I do, this makes it bearable).
- Skype for the occasional conference call and file transfer (Adium works too, but IM is mostly dead these days).
- Textastic as an all-singing, all-dancing text editor with a
built-in mini- IDE. Visual Studio Code is amazing, but sometimes I want something faster that isn’t
vim. - ExpanDrive for mounting remote file systems over FTP and SSH.
And that’s it, really. I hope that this guide proves useful to get you started. Feel free to drop me an e-mail if you have any suggestions for improvements, and consider donating to the site.
But, most importantly, enjoy your new Mac.
-
If you are a UNIX geek, bookmark Amit Singh’s now and go read it after you finish this (it doesn’t cover the latest version of macOS but it provides excellent info on its background and origins). ↩︎
-
Three weeks is unacceptable in the rest of the civilized world, but a couple of issues in three years (and, incidentally, seven Macs) is pretty good. Although Apple really should consider improving their presence in Portugal, there are now not just premium retailers but also service centers, so we’re on our way to parity with the rest of Europe ↩︎
-
But, like any computer, it is only as secure as you make it. I have never had any need for anti-virus applications and the usual paraphernalia that security vendors peddle to Windows users, but that is largely due to the fact that I don’t run any weird apps, keep my system updated, and use a non-administrative account daily. The less privileges your apps have when running, the less likely you’ll have problems. ↩︎