 Rui Carmo
It’s been a long while since I last posted about my new site engine, so I thought I’d make amends in a big way – and, in the process, outline a training session on deployment models that’s been on the back of my mind for a while.
In case you’re just tuning in, this site has been running on a classical, object-oriented Python wiki (called Yaki) for the better part of a decade. It works (demonstrably so, since you’re reading this page on it), but it has become unwieldy and cumbersome to tweak.
So I decided to rewrite it, first in a more modern fashion, then (as I started looking into cloud services) for Google App Engine, and again in Clojure, at which point I had definitely switched over to the LISP mindset.
I had also decided to make it smaller – my intention is for the core to stop at around 1000 lines of code (as of this writing, it is a little over 700 LOC, excluding templates), and a prime goal of the rewrite is turning it into tight, readable code through a functional programming approach.
Despite being set on using Clojure, I soon realised that none of the Java libraries for Markdown and Textile supported all the features I use1, to the extent that a lot of my content would have to be re-written or tweaked by hand. I seriously considered shaving that particular yak by dint of coding my own, but then Hy came along, and I realised I could have my cake and eat it too.
So this is the story of what I’ve been doing with Hy, Dokku and New Relic.
What is Hy, anyway?
Unless you’re a regular visitor, you’re unlikely to have heard of Hy, formally called Hylang.
In a nutshell, it is a LISP that compiles to the Python AST (and hence to bytecode) that you can run atop just about any Python runtime2 with full, symmetrical interoperability with the sprawling Python ecosystem.
During the past year it’s completely replaced “normal” Python as far as I’m concerned, and like any LISP, it’s an extremely powerful and expressive tool.
For instance, here’s how I walk the filesystem to produce a sequence of wiki page items (all the functions below are Python generators):
(defn gen-pages [root-path]
    ; the -> macro handles each step to the first arg of the next
    (-> root-path
        (walk-folders)
        (with-index root-path)))
And, on the front-end side, here’s how a page is rendered as a series of incremental transforms:
(defn apply-transforms [html pagename]
    (-> html
        (HTML)
        (interwiki-links)
        (base-href pagename)
        (include-sources pagename)
        (image-sources pagename)
        (syntax-highlight)))
But this is not about Hy in and of itself – it’s about developing, deploying and monitoring an app (which, in the end, runs atop the Python runtime) with the least possible hassle.
Interlude: The Long Lost Art Of The Makefile
Something worth mentioning before we dive in is that since I deal with entirely too many runtimes3 and it is impossible to memorize all the irritating little variations of command line options to build, run or debug stuff, all my modern projects have a Makefile with at least three commands:
make deps  # fetches and installs deps
make serve # runs whatever HTTP server is adequate
make clean # resets the tree to a sane state
This saves me hours when trying to figure out, for instance, which of the latest dozen JavaScript build tools I’m using, or when setting up a fresh checkout4 on a new machine (which in my case happens every week or so, since I rely mostly on cloud services to code these days).
The Twelve Factor Approach
Using a Makefile also pays off handsomely when you follow the 12 Factor Approach to development.
A lot of what follows in this post hinges on it, so I encourage you to read through it first and come back here. But here’s the gist of it, in a nutshell:
- Codebase – One codebase tracked in revision control, many deploys
- Dependencies – Explicitly declare and isolate dependencies
- Config – Store config in the environment
- Backing Services – Treat backing services as attached resources
- Build, release, run – Strictly separate build and run stages
- Processes – Execute the app as one or more stateless processes
- Port binding – Export services via port binding
- Concurrency – Scale out via the process model
- Disposability – Maximize robustness with fast startup and graceful shutdown
- Dev/prod parity – Keep development, staging, and production as similar as possible
- Logs – Treat logs as event streams
- Admin processes – Run admin/management tasks as one-off processes
Got it? Good. So onwards for a practical example of the configuration aspect of things – here’s the beginning of my Makefile:
export BIND_ADDRESS?=0.0.0.0
export PORT?=8080
export DEBUG?=False
export PROFILER?=False
export CONTENT_PATH?=pages
export THEME_PATH?=themes/wiki
...
See the conditional assignments? They will only happen if the specific environment variable isn’t set by the parent process, and provide a number of sane defaults which I then use in my code:
; in my app setup module

(def *bind-address* (.get environ "BIND_ADDRESS" "127.0.0.1"))
(def *http-port* (.get environ "PORT" "8080"))
(def *store-path* (.get environ "CONTENT_PATH" "pages"))
(def *profiler* (= (.lower (.get environ "PROFILER" "false")) "true"))

; this sets the logging level and formatting
(if *debug-mode*
    (apply basicConfig [] {"level" *debug* "format" "%(asctime)s %(levelname)s %(process)d %(filename)s:%(funcName)s:%(lineno)d %(message)s"})
    (apply basicConfig [] {"level" *info* "format" "%(levelname)s:%(process)d:%(funcName)s %(message)s"}))

; ... and in the indexing worker ...

(defmain [&rest args]
    (let [[p (Profile)]]
        (if *profiler*
            (.enable p))
        (init-db)
        (perform-indexing *store-path*)
        (.info log "Indexing done.")
        (if *profiler*
            (do
                (.disable p)
                (.info log "dumping stats")
                (.dump_stats (Stats p) "indexer.pstats")))

    (if (in "watch" args)
        (do
            (.info log "Starting watcher...")
            (observer *store-path*)))))
This means it’s trivial to satisfy my usual obsessiveness and profile the bejesus out of my code with different sets of articles.
Whenever I change the indexing logic, I just do:
PROFILE=true CONTENT_PATH=/mnt/tao/space make index
... # time passes
make profile # generates the actual profile diagrams
And get something like this, which clearly highlights the Python Textile library as a major time sink in page rendering:

Using the other environment variables, I can switch between normal and debug mode, change the network settings, etc. We’ll see why this matters as we go along.
Deploying on Dokku-Alt
Following the 12 Factor approach pays off handsomely when deploying an app on pretty much every current Platform-as-a-Service provider.
I spent a good portion of the past couple of years dealing with Google App Engine, Docker and a few Cloud Foundry-compliant PaaS, and over time I had a good look at various solutions I could deploy on my own: AppScale, Deis, OctoHost and, of course, Dokku.
Dokku turned out to be my first choice, both because it’s shockingly small (203 lines of bash as of this writing) and I’ve always been intrigued by the Heroku/Cloud Foundry approach to deployment, so I decided to dive in and use it for a while. Two weeks in, I upgraded to Dokku-alt (a fork that adds a number of extra features, including support for “bare” Docker containers) and have been pretty happy with it for the past three months or so.
If you’ve never used anything like it, the gist of things is that your development cycle becomes something like this:
- Develop and commit to your git repo as usual
- Add another git remote for deployment:
git remote add my-paas dokku@server:hostname - Just do
git push my-paas masterto deploy
Once you do that, Dokku will (ideally) detect your app runtime and dependencies, build a Docker container to hold the lot and set up nginx with the correct virtual host – with the build step fetching and compiling any dependencies required.
I’ve been meaning to write a lot more about Python deployments, but suffice it to say at this point that I would never dream of deploying a Python web app without uWSGI with gevent workers.
Dokku automates away the entire setup for me – the build pack looks at requirements.txt and builds uWSGI and gevent for me automatically, only doing so again when I specify a new version.
Server and Worker Processes
To specify your entry points, you use a Procfile that tells the PaaS how to start your web service and any background workers you might have. Here’s mine, which (of course) relies on my Makefile:
web: make uwsgi
worker: sleep 30; make index-watch
…but here’s another for a Clojure project that might make more sense to you:
web: java $JVM_OPTS -cp target/standalone.jar clojure.main -m ink-clj.main -p $PORT
And before you ask, yes, $PORT is set by the PaaS for me.
Buildpacks vs Containers
Given that I’ve been using Docker for a good while now, the trade-off between my server having to do the pre-deploy build and my not having to manage a Docker registry or fiddle with Docker itself to set up things is a bargain, and it’s been working fine for all my Hy and Clojure stuff5.
Furthermore, Dokku-alt also makes it trivial to change app configuration on the fly.
Here’s how I enable debug mode by setting the DEBUG environment variable on it:
# dokku config sushy
=== sushy config vars ===
NEW_RELIC_LICENSE_KEY:  :redacted:

# dokku config:set sushy DEBUG=true
-----> Setting config vars and restarting sushy
DEBUG:  true
Cloning into '/tmp/tmp.yqRvqOuOWv'...
done.
HEAD is now at 0d22c2e... forgot base redirect
-----> Building sushy using buildstep...
-----> Installing ENV in build environment ...
-----> Python app detected
-----> Installing dependencies with pip
       Cleaning up...
-----> Discovering process types
       Procfile declares types -> web, worker
-----> Injecting git revision
-----> Releasing sushy ...
-----> Deploying sushy ...
-----> Shutting down old containers
=====> Application deployed:
       http://sushy.no-bolso.com
-----> Cleaning up ...

# dokku config sushy
=== sushy config vars ===
DEBUG:  true
NEW_RELIC_LICENSE_KEY:  :redacted:
This, despite being somewhat verbose, is almost instant since no actual rebuild is necessary.
Hy on New Relic
If you’ve never come across New Relic, the simplest way to explain what it does is this – it provides real-time performance indicators of your live app deployments at the server, application and user level.
It does so by instrumenting your application code and reporting data to their service, which provides you with a wealth of online tools for making sense of the data.
Making it work with Hy was trivial, since it’s essentially Python and I use Bottle, which is one of the supported WSGI frameworks.
So New Relic was able to figure out my WSGI routes, database calls, the works – all I had to do was add newrelic to my dependencies, set the right environment variables, and presto, it worked with zero hassle.
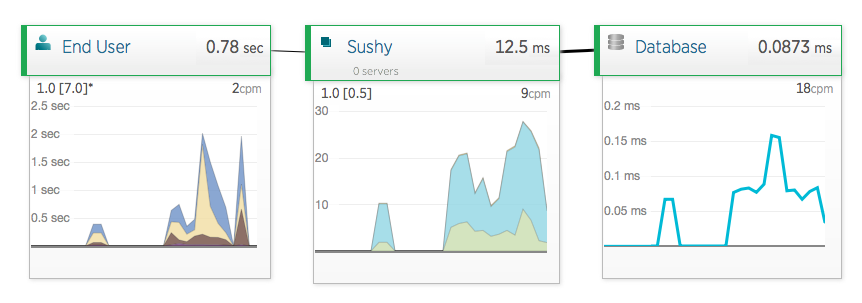
Here’s the end-to-end, high-level view:
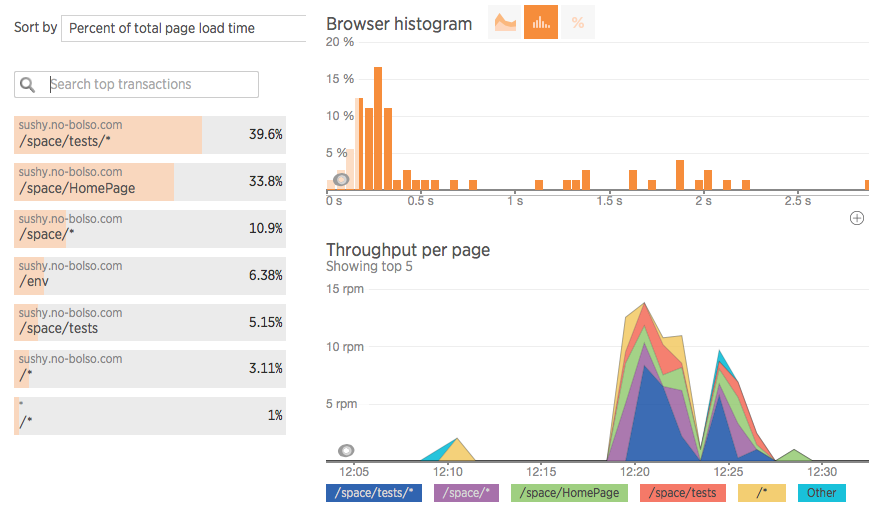
…and the per-route statistics when I did a little stress test:

But what makes it awesome for me is the remote profiling feature, which you can trigger from their website – here’s a partial call time breakdown of that stress test:
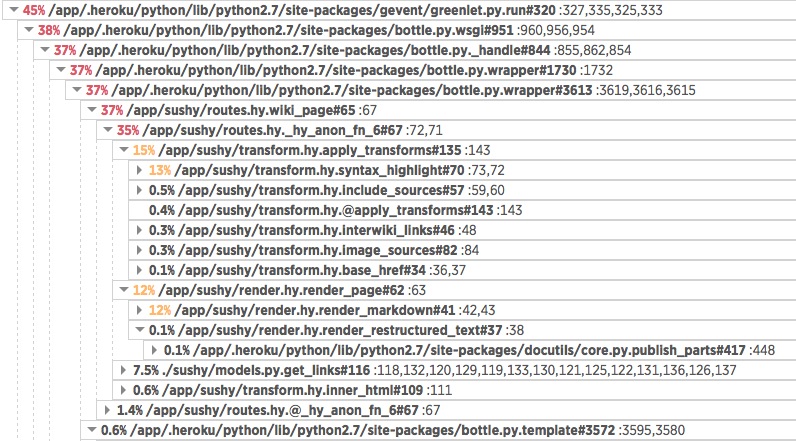
New Relic also keeps track of errors – complete with stack traces, which allowed me to fix an unrelated error (a typo) found during that stress test without having to debug it locally.
And without any action on my part, it injected a JavaScript agent into my templates that allows it to track user experience metrics as well:
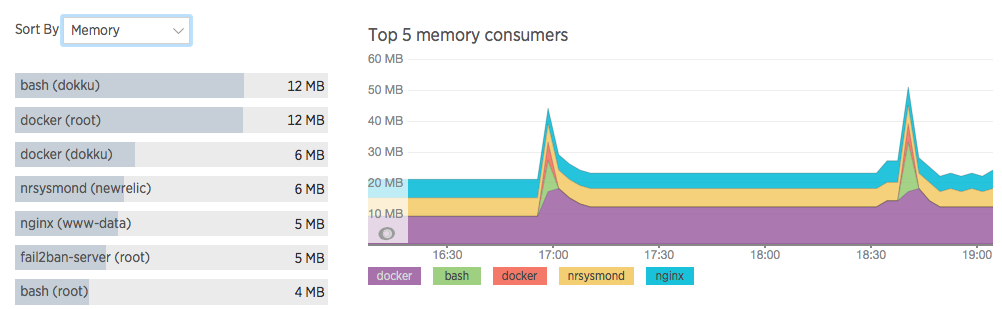
That was awesome by itself, and spurred me onto going full-stack and running their server agent, which amongst other things6 can give you per-process CPU and memory statistics:
After a day or so fiddling with New Relic, I can see myself using it for everything. Although I’m on the free plan and will soon lose all the Pro goodies, their paid service seems to be excellent value for money if you run any kind of serious web service.
And that’s pretty much the whole story where it regards deploying Hy on Dokku-alt and getting sane metrics from it via New Relic.
I would ordinarily hope to finish Sushy in a few more weekends and migrate this site to it, but work’s been… a little potpourri of surprises, and I’ve spent a long time away from development – which is why this blog post is also a step towards preparing an internal training session I’ve been meaning to do for a while.
After all, nothing like making the most effective use of your time, right?
-
Like footnotes and complex table formatting, to start with, but also a whole lot of minor little things that are simply done better in the Python libraries. ↩︎
-
I’ve run it on Python 2.x and 3.x, PyPy, IronPython (with a little pain), and keep trying it in all the Jython betas, without much success so far. ↩︎
-
These days, and discounting .NET stuff, I have Python, Go, Clojure, NodeJS and Erlang projects going (or, rather, given my lack of time, crawling). ↩︎
-
I also use pyenv for Python, although I’m slowly gravitating towards fig for a fully runtime-independent way of setting up development environments. ↩︎
-
To be fair, I’ve had a bit of trouble with Erlang – the build packs that are out there right now don’t support R17.0, but in the process I found out Dokku-alt sidesteps the PID 1 problem by setting up a
foremanprocess as PID 1. ↩︎ -
Like configurable alert thresholds (and a set of baseline ones with sane defaults). The only shortcoming I found so far is that since the Dokku container has a different hostname New Relic can’t match the host metrics with my app’s, but that’s perfectly understandable. ↩︎