Rui Carmo
The Return of Shelf
Remember when the internet was young, there was a finite (but quite large) set of personal sites, personal contact actually mattered and you had trouble keeping track of who blogged where, who you corresponded with and what their social handles were?
You know, before all hell broke loose and we got 300 variations on impersonal blogging platforms (ahem Medium), entirely too many walled-garden social networks and utterly unmanageable spam?
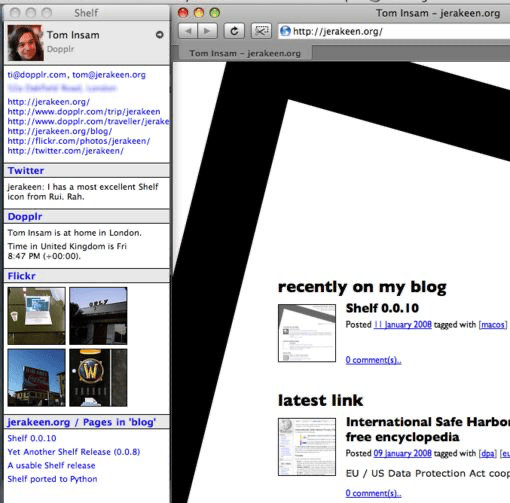
Well, back in those days I used something called Shelf, created by Tom Insam, which did a pretty amazing thing for the time (because Apple actually had working desktop automation, but I digress):
It looked at the current foreground application, and tried to figure out if what you were looking at corresponded to a person in your address book–and then gave you more context on them
It was pretty amazing, really:
I spent quite a while hacking on it 16 years ago, and one of the things I really wanted was for it to show me related emails. At the time, AI was not a thing, but Apple was surprisingly ahead of the curve and was shipping a Latent Semantic Mapping framework that I used to build myself quite a nice Mail.app extension–that Apple kept killing, again and again, as it progressively neutered what developers could build atop Mail.
Eventually Apple killed much better, downright brilliant extensions like Mail Act-On, which I had used for years, and all we got is that stupid little “Filing Suggestions”/Move To button in Mail, which, besides being available only on macOS, seldom works and is hardly deterministic.
Well, guess what, LSM is still there, and thanks to the power of AI I have resurrected Shelf to a degree:

The code is up on GitHub, as usual, and I kept the original philosophy of capturing context from the foreground app (via a hideous pastiche of Apple Events and Accessibility, but it “works”), matching it to additional content from the same app (I’m focusing on Mail) and providing “Next Best” actions–which are entirely deterministic, by the way. I also tacked on a smattering of local Apple Intelligence support thanks to SwiftIntelligence (because I might want to use external models later).
And it works beautifully so far, even if I clearly need to remove the nerdy diagnostics and re-think the UX.
So what did I learn from this?
Not common sense, I’m afraid.
First off, after creating three or four desktop apps using nothing but Swift, I now get both why some people love it and why some people absolutely hate it, especially compared with the ancient ObjC/AppKit combo. LLMs released since spring 2026 can finally generate Swift code that is actually usable, so I mostly let GPT-5.5/5.6 do the heavy lifting and focused on search ranking and the criteria for suggestions.
Also, oh goodness, how utterly useless Apple’s automation/AX APIs can be for this sort of thing. I have a lot of admittedly dated experience with Apple Events and Accessibility, but even I was surprised at how many things that should be trivial are either impossible or require a lot of workarounds to get right (like just finding the right window in a multi-window app, or getting the right item to glean context from).
And, finally, Apple’s Spotlight APIs in macOS 26 are completely and utterly broken because it is impossible for my app to find the exact same thing I can find with system Spotlight. Even with Full Disk Access, it seems that the only way I can programmatically search for an email message that I can find nearly instantaneously with Cmd+Space is to go and read the Mail SQLite storage myself, which is ridiculous:
- It’s not a question of ranking, predicates, anything
- It’s not a question of query timeouts
- It’s not a question of just about anything I can send to the API (and I’ve pretty much fuzzed it)
There are no decent modern examples, either, so all I get are some messages from some accounts, not any message that matches the criteria I set from across all accounts.
This makes my little email filing helper only partially useful, so I’ll probably shelve it (pun intended) until macOS 27 comes along, and by then I will also see if I can get on-device models to actually file things for me properly.
And no, creating email rules doesn’t scale, and I also only want messages filed after I’ve marked them as read, which is another thing I was able to do just fine with Mail Act-On before Apple nerfed Mail.
I’ll probably write about this again come Christmas, with any luck.