Although I abhor RGB lighting in PC builds, I’ve always been fascinated with Philips TVs and the Ambilight feature, of which there are dozens of hacky clones.
So of course I had to go and do my own, which I’ve been meaning to write about for a couple of months now.
I had a Pimoroni Mote kit sitting unused in a drawer for a good few years that I ended up never using because it was too small to use with my TV, and as soon as I realized that my new widescreen monitor has a white back, I started wondering about how feasible it would be to use it for that.
The Mighty Mote
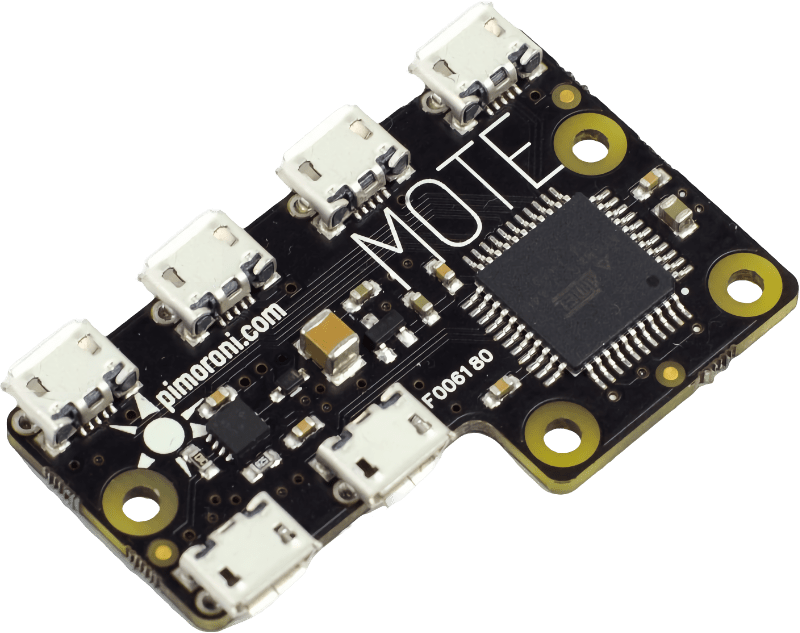
If you’ve never heard of the Mote, it is a little controller board (there is also a Pi HAT version) that can handle four rows of 16 individually addressable RGB LEDs, exposing them via a USB controller:

The full kit comes with four 16 LED strips (mounted on rigid PCBs), and there’s also a HAT version if you have a Pi, but I find the standalone controller preferrable if you want your LEDs to attain full brightness.
Ambient Spread
Since we also have white walls everywhere, I have been taking advantage of that to have indirect lighting in my office with a few Zigbee RGBW strips which, thanks to having independent white LEDs, afford me the possibility to have pure white or warm white lighting besides the usual garish TRON-like effects that YouTubers seem so fond of these days1.
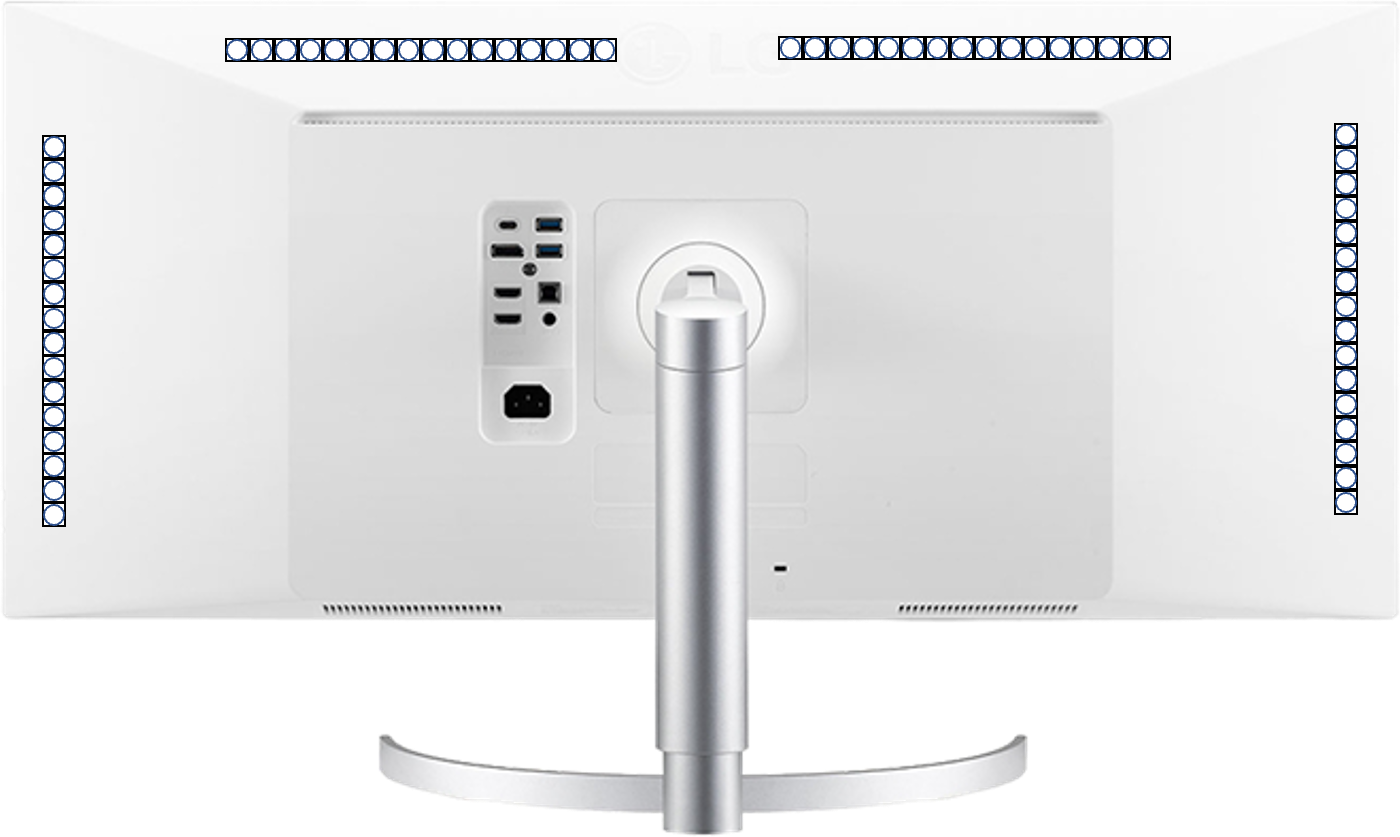
But the LEDs on those aren’t individually addressable, so I couldn’t use them for an Ambilight-like effect – the Mote was still the best choice, although the four 16 LED sticks were not a great fit for the 34” LG’s proportions.
I soon realized that I had no need to lay a LED strip across the bottom of the monitor, since I already had a Zigbee strip running along the back of my desk. So all I needed was to account for the top and sides:

Mounting the Mote sticks was trivial, requiring nothing but a square of double-sided tape at each end. Cable management is a bit of a challenge, though.
Distributed Hackery
However, I didn’t want to run the Mote straight off my Mac, since it made zero sense to take up a USB port with this on my 2016 MacBook Pro.
Nor did I want to have it drain power from any work-critical hardware directly, since those LEDs can draw a fair amount of current and are best powered by a standalone adapter.
So I devised a way to use both my Zigbee RGB strips and Mote strips – I plugged the Mote controller into the Raspberry Pi touchscreen I use as a home automation console (whose most recent claim to fame is having a Now Playing display), and hacked together a PyObjC script to take a screen capture, scale it down to 32x16 pixels and send out a multicast packet with the raw RGB values.
In .local, Everyone Can Hear You Scream
Why multicast, you may ask?
Well, because I had to have my Mac talk to both the Pi running the Mote controller and the Node-RED flows that expose Zigbee devices to HomeKit (which are on another machine). And this simplified configuration to no end:
- You can do point-to-multipoint trivially
- There is no need to have machines know each other’s IP addresses
- There is no bi-directional communication
- There is also no need to do authentication or encryption (you’re not going to glean much from 32x16 pixels’ worth of RGB data)
So I just pack the data into a single UDP packet that is picked up by a little bit of code on the Pi (also managed by piku) that listens for it and lights up the LEDs accordingly:
#!/usr/bin/env python3

import time
import socket
import struct
from os import environ
from mote import Mote

MCAST_GRP = environ.get("MCAST_GRP")
MCAST_PORT = int(environ.get("MCAST_PORT"))

sock = socket.socket(socket.AF_INET, socket.SOCK_DGRAM, socket.IPPROTO_UDP)
sock.setsockopt(socket.SOL_SOCKET, socket.SO_REUSEADDR, 1)
sock.bind((MCAST_GRP, MCAST_PORT))
mreq = struct.pack("4sl", socket.inet_aton(MCAST_GRP), socket.INADDR_ANY)
sock.setsockopt(socket.IPPROTO_IP, socket.IP_ADD_MEMBERSHIP, mreq)

print("Starting.")

mote = Mote()

mote.configure_channel(1, 16, False)
mote.configure_channel(2, 16, False)
mote.configure_channel(3, 16, False)
mote.configure_channel(4, 16, False)

prev = bytearray(b'\x00') * 64 * 3
black = bytearray(b'\x00') * 64 * 3

def fade(state):
    """Fade smoothly between current and new colors"""
    global prev

    limit = 32
    delta = []
    for i in range(64*3):
        delta.append(int((state[i] - prev[i]) / limit))
    if sum(delta) == 0:
        return
    for step in range(limit):
        interim_state = bytearray(prev)
        for i in range(64*3):
            interim_state[i] = min(255, max(0, interim_state[i] + (delta[i] * step)))
        render(interim_state)
        time.sleep(0.5/limit)
    prev = state

def render(state):
        """Update the Mote"""
    for led in range(64):
        offset = led * 3
        pixel = led % 16
        channel = led // 16
        r, g, b = state[offset], state[offset+1], state[offset+2]
        mote.set_pixel(channel + 1, pixel, r, g, b)
    mote.show()

try:
    state = None
    while True:
        try:
            sock.settimeout(30)
            state = sock.recv(512)
            fade(state)
            time.sleep(0.1)
        except socket.timeout:
            # Fade out if no new packets have arrived
            if state:
                fade(black)
            mote.clear()
            mote.show()
except KeyboardInterrupt:
    if state:
       fade(black)
    mote.clear()
    mote.show()
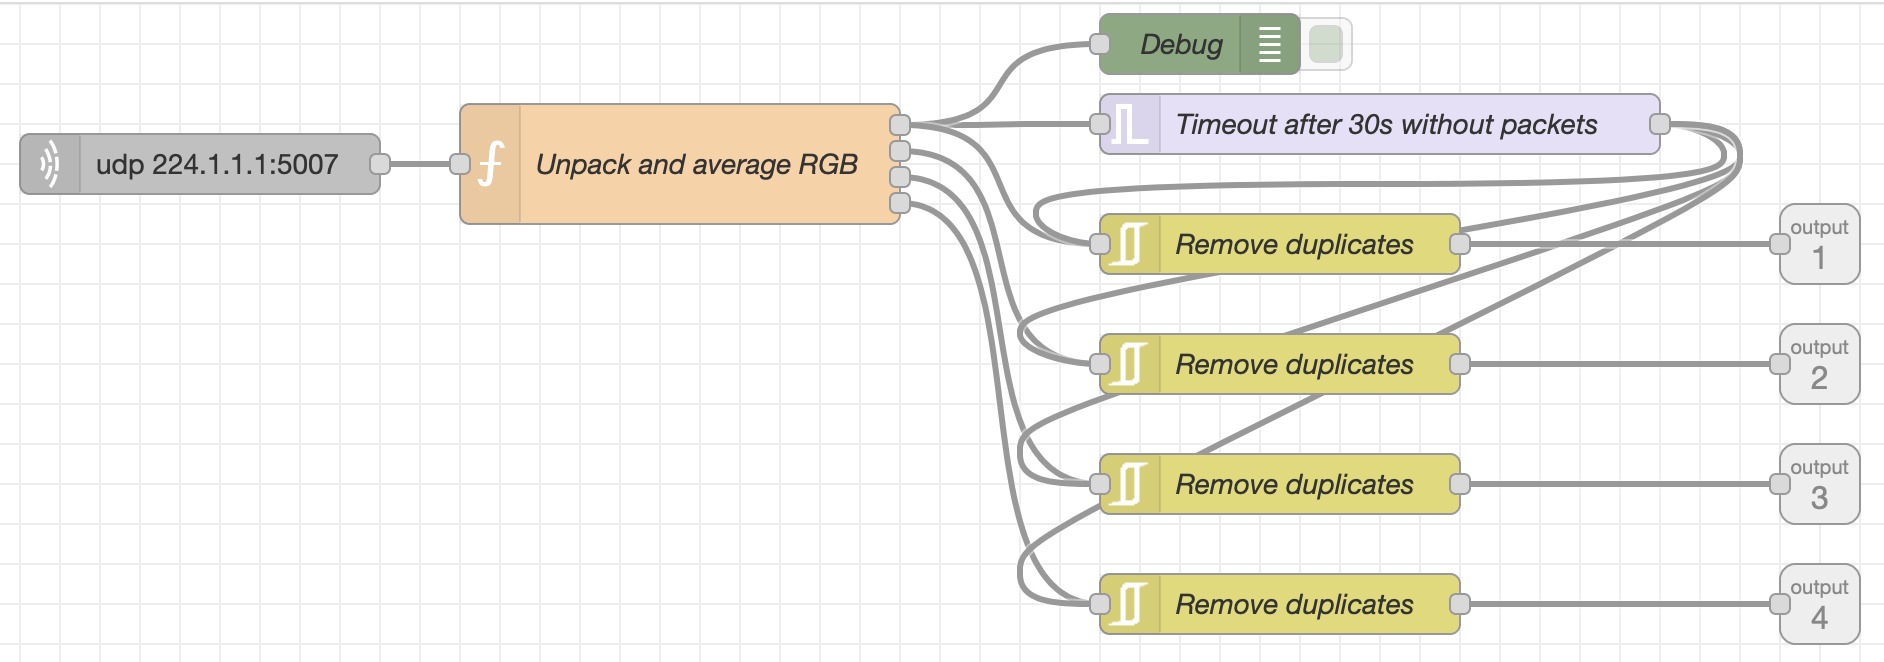
This controls the Mote, whereas a Node-RED subflow on my home automation controller takes the packets, computes the average for the top, left, right and bottom segments, and publishes the new color values to MQTT to set the office ambient lights:

It also fades everything to black if it doesn’t get an update inside of 30s, just like the Mote controller. And the end result is great–when I turn off my machine both the Mote LEDs and the ambient lighting fade to black in perfect sync.
However, the Python script I was using was based on some snippets of ancient PyObjC and was both slow and somewhat erratic at sampling pixel values, so I decided to rewrite it in Swift to leverage the GPU properly and make it faster altogether.
Un-Swift Development
This turned out to be a sub-optimal idea, for the following reasons:
Swifthas had multiple breaking changes since I last tried to use it in earnest four or so years ago.- The Apple developer documentation is little more than an annotated header dump–it has very few (if any) examples.
- Googling for answers invariably turned up unusable answers for Swift 3 or 4–and mostly for iOS at that.
- I did not want to use Xcode to write a simple CLI app (as it would melt my aging Intel MacBook Pro), so I also couldn’t use the debugger, refactoring helpers, etc.
This is where having a teenager who’s been doing iOS apps in Swift for the past couple of years came in handy–my kid has already gone through three major revisions and helped me sort out the graphics calls, so all I really needed to sort out was the networking part.
Multicast In Network.framework
All I’m going to say here (because it’s printable, and in real life there was a fair amount of swearing involved) is that, inscrutably, a NWConnectionGroup will never work unless you call .setReceiveHandlereven if you want to send packets, which is both undocumented (again, there are no examples, just class method references) and nonsensical.
The rest actually made sense, and I soon had a workable solution:

Raw Source
The resulting Swift script works OK (even if it lacks error checking, proper structure, etc.), so I’m including it below:
#!/usr/bin/env swift

import Foundation
import CoreGraphics
import QuartzCore
import AppKit
import Network

// This is a hack I picked up for measuring the execution time of a block
func executionTimeInterval(block: () -> ()) -> CFTimeInterval {
    let start = CACurrentMediaTime()
    block();
    let end = CACurrentMediaTime()
    return end - start
}

// This is our configuration
struct Config {
    // Network
    var port:  NWEndpoint.Port = .init(ProcessInfo.processInfo.environment["MCAST_PORT"] ?? "5007")!
    var group: NWEndpoint.Host = .init(ProcessInfo.processInfo.environment["MCAST_GRP"] ?? "224.1.1.1")

    // Screen
    var screen           = 1   // Screen ID (currently unused)
    var interval: UInt32 = 15  // Screen polling interval
    var width            = 32  // Horizontal LEDs
    var height           = 16  // Vertical LEDs
}

extension CGImage {
    public enum Error: Swift.Error {
        case imageResizingFailed
        case cgContextCreationFailed
    }

    // resize the image
    public func resize(width: Int, height: Int) throws -> CGImage {
        guard let colorSpace = self.colorSpace,
              let context = CGContext(data: nil,
                                      width: Int(width),
                                      height: Int(height),
                                      bitsPerComponent: self.bitsPerComponent,
                                      bytesPerRow: self.bytesPerRow,
                                      space: colorSpace,
                                      bitmapInfo: self.bitmapInfo.rawValue)
        else { throw Error.cgContextCreationFailed }
        context.interpolationQuality = .low // low quality, 0.15->0.09 ms for my 5120x2160 screen
        context.draw(self,
                     in: .init(origin: .zero,
                               size: CGSize(width: width, height: height)))
        guard let resultCGImage = context.makeImage()
        else { throw Error.cgContextCreationFailed }
        return resultCGImage
    }
}

func capture(config: Config) throws -> CGImage {
    var res: CGImage?

    // time snapshot execution
    let tt = executionTimeInterval {
        let display: CGDirectDisplayID = CGMainDisplayID()
        print(display)
        let img: CGImage = CGDisplayCreateImage(display)!
        res = try! img.resize(width: config.width, height: config.height)
    }
    print(tt)
    return res!
}

// grab the values along the image edges and build out a byte array
func getEdgeBytes(cgImage: CGImage) throws -> [UInt8] {

    let bmp = NSBitmapImageRep(cgImage: cgImage)

    var data: UnsafeMutablePointer<UInt8> = bmp.bitmapData!
    var r, g, b: UInt8
    var bytes: [UInt8] = []
    var edges: [UInt8] = []

    for _ in 0..<bmp.pixelsHigh {
        for _ in 0..<bmp.pixelsWide {
            // this is ARGB data, so skip first A
            data = data.advanced(by: 1)
            r = data.pointee
            bytes.append(r)
            data = data.advanced(by: 1)
            g = data.pointee
            bytes.append(g)
            data = data.advanced(by: 1)
            b = data.pointee
            bytes.append(b)
            data = data.advanced(by: 1)
        }
    }
    // left
    for y in 0..<bmp.pixelsHigh {
        let i = y * bmp.pixelsWide
        edges.append(bytes[i*3])
        edges.append(bytes[i*3+1])
        edges.append(bytes[i*3+2])
    }
    // top
    for x in 0..<bmp.pixelsWide {
        edges.append(bytes[x*3])
        edges.append(bytes[x*3+1])
        edges.append(bytes[x*3+2])
    }
    // right
    for y in 0..<bmp.pixelsHigh {
        let i = max(0, y * bmp.pixelsWide - 1)
        edges.append(bytes[i*3])
        edges.append(bytes[i*3+1])
        edges.append(bytes[i*3+2])
    }
    // bottom
    for x in 0..<bmp.pixelsWide {
        let i = x + (bmp.pixelsHigh - 1) * bmp.pixelsWide
        edges.append(bytes[i*3])
        edges.append(bytes[i*3+1])
        edges.append(bytes[i*3+2])
    }
    return edges
}

let config = Config()

guard let multicast = try? NWMulticastGroup(for:
    [ .hostPort(host: config.group, port: config.port) ])
    else { fatalError("Cannot set up multicast") }

let group = NWConnectionGroup(with: multicast, using: .udp)
var ready = false

group.setReceiveHandler(maximumMessageSize: 288, rejectOversizedMessages: true) { (message, content, isComplete) in
    // do nothing - we just need this set, otherwise
    // (despite the fact that we are only sending) the group won't work
}

group.stateUpdateHandler = { (newState) in
    print("Group entered state \(String(describing: newState))")
    switch newState {
        case .ready:
            ready = true
        case .waiting(let error):
            print("waiting \(error)")
        case .setup:
            print("setup")
        case .cancelled:
            ready = false
            print("cancelled")
        case .failed:
            ready = false
            print("failed")
        default:
            print("default")
    }
}

group.start(queue: .global())
sleep(5) // wait until the group is set up - hacky but simple

while ready {
    // grab the screen edges
    let data = try! getEdgeBytes(cgImage: capture(config: config))

    if data.count != 0 {
        // send out the bytes
        group.send(content: Data(data), completion: { NWError in
            if NWError == nil {
                //print("\(data), \(data.count)")
            } else {
                print("error:\n\(NWError!)")
            }
        })
    }
    sleep(config.interval)
}

// force cancellation if we leave the loop for whatever reason
group.cancel()
print("Done.")
This ran while taking less than 3% peak CPU on my 2016 Intel MacBook Pro and is virtually impossible to measure in Activity Monitor on my M1 Pro, so it’s definitely lightweight.
And now that I can actually use Xcode, I will eventually wrap it into a little startup menu item app and add a little smarts for figuring out which display is in use, etc.
The above code just goes for the default display and doesn’t care about networking settings, location and other things that kind of make sense to check if you want to avoid it running outside your default location, and that’s not really ideal. But it’s useful enough.
And now, for an encore, I’m going to automate some Christmas lights. ‘tis the season, right?
Update (August 2022)
I finally got around to getting this to work on both Windows and Linux by way of using Go, using a screenshot library that supports all platforms:
package main

import (
    "fmt"
    "github.com/vova616/screenshot"
    "golang.org/x/image/draw"
    "image"
    "net"
    "time"
)

const (
    mcastAddr = "224.1.1.1:5007"
    interval = 15
)

// img.At(x, y).RGBA() returns four uint32 values; we want RGB
func rgbaToRGB(r uint32, g uint32, b uint32, a uint32) []byte {
    rgb := []byte{byte(r / 257), byte(g / 257), byte(b / 257)}
    return rgb
}

func getEdges(img image.Image) ([]byte, error) {
    defer timer("getEdges")()

    bounds := img.Bounds()
    width, height := bounds.Max.X, bounds.Max.Y

    var edges []byte

    // left
    x := 0
    for y := 0; y < height; y++ {
        edges = append(edges, rgbaToRGB(img.At(x, y).RGBA())...)
    }

    // top
    y := 0
    for x := 0; x < width; x++ {
        edges = append(edges, rgbaToRGB(img.At(x, y).RGBA())...)
    }

    // right
    x = width - 1
    for y := 0; y < height; y++ {
        edges = append(edges, rgbaToRGB(img.At(x, y).RGBA())...)
    }

    // bottom
    y = height - 1
    for x := 0; x < width; x++ {
        edges = append(edges, rgbaToRGB(img.At(x, y).RGBA())...)
    }

    return edges, nil
}

func timer(name string) func() {
    start := time.Now()
    return func() {
        fmt.Printf("%s took %v\n", name, time.Since(start))
    }
}

func screenShot() image.Image {
    defer timer("screenShot")()

    src, err := screenshot.CaptureScreen()
    if err != nil {
        panic(err)
    }
    dst := image.NewRGBA(image.Rect(0, 0, 32, 16))
    draw.NearestNeighbor.Scale(dst, dst.Rect, src, src.Bounds(), draw.Over, nil)
    return dst
}

func main() {
    var data []uint8
    addr, err := net.ResolveUDPAddr("udp", mcastAddr)
    if err != nil {
        panic(err)
    }
    c, err := net.DialUDP("udp", nil, addr)
    if err != nil {
        panic(err)
    }
    for {
        data, _ = getEdges(screenShot())
        c.Write(data)
        time.Sleep(interval * time.Second)
    }
}
-
I have those strips set to light up automatically in warm white in early Winter mornings, and although the office is still physically cold until my machines start going in earnest, the ambient lighting does improve my mood somewhat. ↩︎