 Rui Carmo
Dell’s entry into the netbook segment, awaited with great anticipation by those people who never use function keys (Fn+ASDFG, etc. act as F1-F10). There is no F11 or F12 unless you upgrade the BIOS, which makes things interesting for people used to using F11 to maximize browsers…
The device was sold by Vodafone Portugal during 2009 with an internal 8GB SSD, HSPA module (with mostly undocumented and unsupported GPS features), webcam and a 16GB SD card (promotionally, limited to stock availability), preloaded with Windows XP and a few other things.
I decided to improve upon that for a bit and then eventually fell back to XP, but my notes may be of general interest (see also my notes on the Acer Aspire One and the Samsung NC10).
Resources:
| Date | Link | Notes |
|---|---|---|
| 2010 | ||
| Apr 18 | Mac OS X SSD tweaks | Of generic interest, but also applicable to the Mini 9. See the relevant bits regarding enabling noatime below, although they won’t be that useful if you use FileVault. |
| 2009 | ||
| Sep 9 | NetbookInstaller USB Installation Guide | It’s that easy, apparently. |
| Jul 31 | Netbook installer forum | Home of the new generic EFI installer |
| Mar 27 | Crucial EU Store | Replacement RAM and SSD modules, if you’re so inclined. |
| Dell Wireless 5530 AT Commands Reference | Amazingly detailed, and sure to be useful in a number of ways. Here’s a local copy. | |
| Mar 26 | Enabling GPS on Dell 5530 WWAN module | Not many people know that the multi-function Ericsson device inside doubles as a GPS (albeit a rather limited one due to its internal mounting). |
| DellEFI Project | Home of the DellEFI app, which performs the requisite hardware masking. DellEFI 1.1 didn’t work for me, for despite all the purported enhancements, it broke one of the best features – plug-and-play dual head support, which I prefer over mirroring and works beautifully with 1.03. | |
| Mar 22 | Mac OS X modem script | For those of you running an alternative OS (which exposes two virtual serial devices, one for control and another for data), the key to activating the built-in HSPA radio is to issue the AT+CFUN=1 command as part of the modem initialization script. I’m still not too happy with it since it ought to switch off the radio after disconnecting, but will keep tweaking it. Now tested with commercial hardware. Use *99***1# as dial number, enter the APN in the settings dialog. |
| Mar 7 | Mac OS X on the Dell Mini 9 | A set of notes regarding installing on the new 16GB model (which has a different card slot and SSD from initial prototypes). |
| 2008 | ||
| Oct 24 | Dell readies small, cheap computer for small biz | A pretty expensive coat of paint turns the Mini 9 into a Vostro A90, although I suspect there will be a slight variation in storage capacity down the road to help differentiate it. |
| Oct 13 | Dell Inspiron Mini 9 Netbook on Vodafone | First review of the HSPA device in the UK, in which we learn that the mobile version ships with an 8GB SSD. Bummer. |
| Sep 5 | Dell Inspiron 910 Service Manual | Full of nice pics. |
| Sep 4 | Dell Inspiron Mini 9 Reviewed | Pretty extensive 13-page review. I laughed when I read the title “Innovation at the Keyboard level”, though. |
| Sep 4 | One on One with Dell Inspiron Mini 9 Product Manager | Not much substance, but some interesting tidbits. |
| Sep 4 | Vodafone Group Signs European Retail Pact With Dell | Something else I can’t discuss. |
| Sep 4 | Dell Inspiron Mini 9 | Somewhat methodical but not very thorough review, although I wouldn’t rate the Ubuntu preload that highly. |
| Sep 4 | Inspiron Mini 9 | No fan, not enough disk space for benchmarking tools. Hmmm. 16GB of them? |
| Sep 4 | Dell Inspiron Mini 9 Review | Highlights (and includes good photos of) the single panel access for upgrading RAM, storage or connectivity. Does a good job on thermals and mentions the lack of a fan. Also includes large screenshots of the Ubuntu panel, if you’re into that sort of thing. |
| Sep 4 | Dell Online Store Link | Bluetooth is an option. Dang. |
Installation
Getting it to fit into 8GB
If you don’t want to upgrade, you can shoehorn Leopard into the factory-shipped 8GB SSD, but only for laughs.
The main trick (as described here) is to repartition the SSD as GUID partition table, then erase the drive and format it as FAT. The installer will automatically convert the filesystem (otherwise it would complain about a missing few megabytes of free space it doesn’t actually use).
The rest (removing printers and other junk prior to the install, and removing voices other than Fred, etc.) is pretty much common sense, although I keep forgetting to remove the hibernation file:
sudo pmset -a hibernatemode 0
cd /var/vm
sudo rm sleepimage
Upgrading to 10.5.6 from my vintage 10.5.0 DVD using the combo update was a no-brainer, and pretty much everything up to iTunes 8.1 could be installed provided you did it in a sensible order regarding the available disk space.
However, you’d soon run out of space for it to be useful for anything.
Things you Really Shouldn’t Do In 8GB
- Run Monolingual willy-nilly in your
Systemfolder, stripping debug symbols (AppleScript, for one, will stop working) - Forget to disable legacy USB support in the BIOS
- Forget to disable Software Update (the temptation to break your working setup to get the latest and greatest will be too big to resist)
- Use FileVault on the 8GB SSD – the
.sparsebundlewill grow and grow until it eats up all of your available disk space.
Connectivity
Getting online via HSPA
I coded a modem script that works, although I’m not too happy with the way it manages radio power (it switches on the radio with AT+CFUN=1, but I haven’t yet gotten round to switching off the radio in a controllable fashion when disconnecting).
Since this is an Ericsson chipset and as such very well documented, there is very good reference of the relevant AT commands here (local copy).
One little known fact is that this module doubles as a GPS receiver that you can switch on (at the expense of tying up a serial port) by sending:
AT+CFUN=1
AT*E2GPSCTL=1,5,1
AT*E2GPSNPD
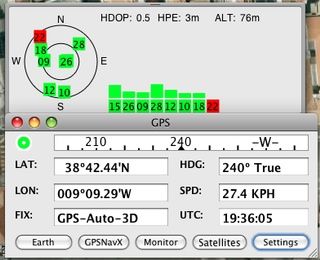
…to /dev/cu.usbmodemfd62 (or 64). Google Earth looks for an usb: device and then eventually hooks up to the radio module’s, although the time required for actually getting a fix is dismal (source), but you can use GPSUtility to good effect:
Tweaks
Moving the Swap File
Since I found it rather unnerving to have swap filling up the scarce amount of free room I had on the 8GB SSD, I decided to move swap to the SDHC card, on the grounds that it is used infrequently enough and that I’d rather have a bit of slowness every now and then than the whole system choking for lack of swap space.
To move the swap file, I first created a hidden folder on the SDHC as such:
mkdir /Volumes/Sidecar/.vm
I then edited /System/Library/LaunchDaemons/com.apple.dynamic_pager.plist to have the -F parameter point at that path instead of the default /private/var/vm/swapfile, rebooted, and removed the old files from /var/vm.
Enabling noatime
After going back to XP, I picked this up here as a generic SSD tweak to disable the last access time updates to the filesystem – I haven’t tried it myself, but other folk report it seems to make a slight difference in performance.
Stick the following .plist in /Library/LaunchDaemons, chown it to root:wheel and reboot:
<?xml version="1.0" encoding="UTF-8"?>
<!DOCTYPE plist PUBLIC "-//Apple//DTD PLIST 1.0//EN"
        "http://www.apple.com/DTDs/PropertyList-1.0.dtd">
<plist version="1.0">
    <dict>
        <key>Label</key>
        <string>com.nullvision.noatime</string>
        <key>ProgramArguments</key>
        <array>
            <string>mount</string>
            <string>-vuwo</string>
            <string>noatime</string>
            <string>/</string>
        </array>
        <key>RunAtLoad</key>
        <true/>
    </dict>
</plist>
As per the original article, you can check if it worked by doing:
$ mount | grep " / "
/dev/disk0s2 on / (hfs, local, journaled, noatime)
I don’t think this will be that useful if you use FileVault (since you then work inside a sparse disk image mounted on /Users/user and that has separate attributes), but it might be worth a shot.
Survival Skills
Everyone seems to be using netbook-installer these days, so the instructions below assume that you’re no longer using an EFI CD but rather a USB pen created with NetbookBootMaker.
If you want to do a full backup of a Windows partition, it’s somewhat simpler – all you need to do is use a Linux live image running off USB and dd to your heart’s content.
Backing up your installation
- Make sure you have “Enable support for legacy USB devices” enabled in the BIOS
- Make sure you have an up-to-date copy of NetbookInstaller in
/Applications - Boot from the USB pen containing your Snow Leopard installer
- Open Disk Utility
- Unmount your main hard disk
- Create a compressed image of that hard disk on an external USB drive
- Scan that image for restore (this is something you do not want to do later, simply because it makes restoring a lot easier)
- Reboot
- Make sure you have “Enable support for legacy USB devices” disabled in the BIOS
Restoring your installation
- Make sure you have “Enable support for legacy USB devices” enabled in the BIOS
- Boot from the USB pen containing your Snow Leopard installer
- Open Disk Utility
- Partition your SSD as GUID partition table (use the
Options...button) - Restore the image to the new volume
- While still running from the USB pen, use the Terminal to manually invoke the version of NetbookInstaller that is in your restored volume and restore the bootloader that way
- Reboot
- Make sure you have “Enable support for legacy USB devices” disabled in the BIOS