 Rui Carmo
A couple of months ago, DFRobot reached out to see if I wanted to take a look at the new LattePanda IOTA single-board computer–successor to the original LattePanda V1. I never owned a V1 myself, but I have found quite a few in the wild; they were popular with integrators for kiosk and digital signage applications. I was curious to see how the new model stacked up.
Also, and even though the V1 has been around for a good while, I think there is a shift back to Intel-based SBCs outside the hobbyist scene (largely thanks to Intel’s Twin Lake CPUs). The IOTA interests me because it’s at the intersection of that shift and the large community that LattePanda created with their development boards.
Disclaimer: DFRobot sent me an IOTA and several expansion boards free of charge, and this post follows my review policy.
This review turned out to take a lot more time to put together than usual because besides a bump in my usual workload I also complicated matters by trying to record a video at the same time, so expect that to pop up on YouTube in a week or so–I am developing a theory that everything takes twice as long when you need to deal with cameras, and four times as long if they’re recording video…
In The Box
I got a lot more than the IOTA in my shipment, to the degree where I don’t think I will be able to do everything justice in a single post:
- A LattePanda IOTA with 8GB RAM/64GB eMMC (plus an RTC battery).
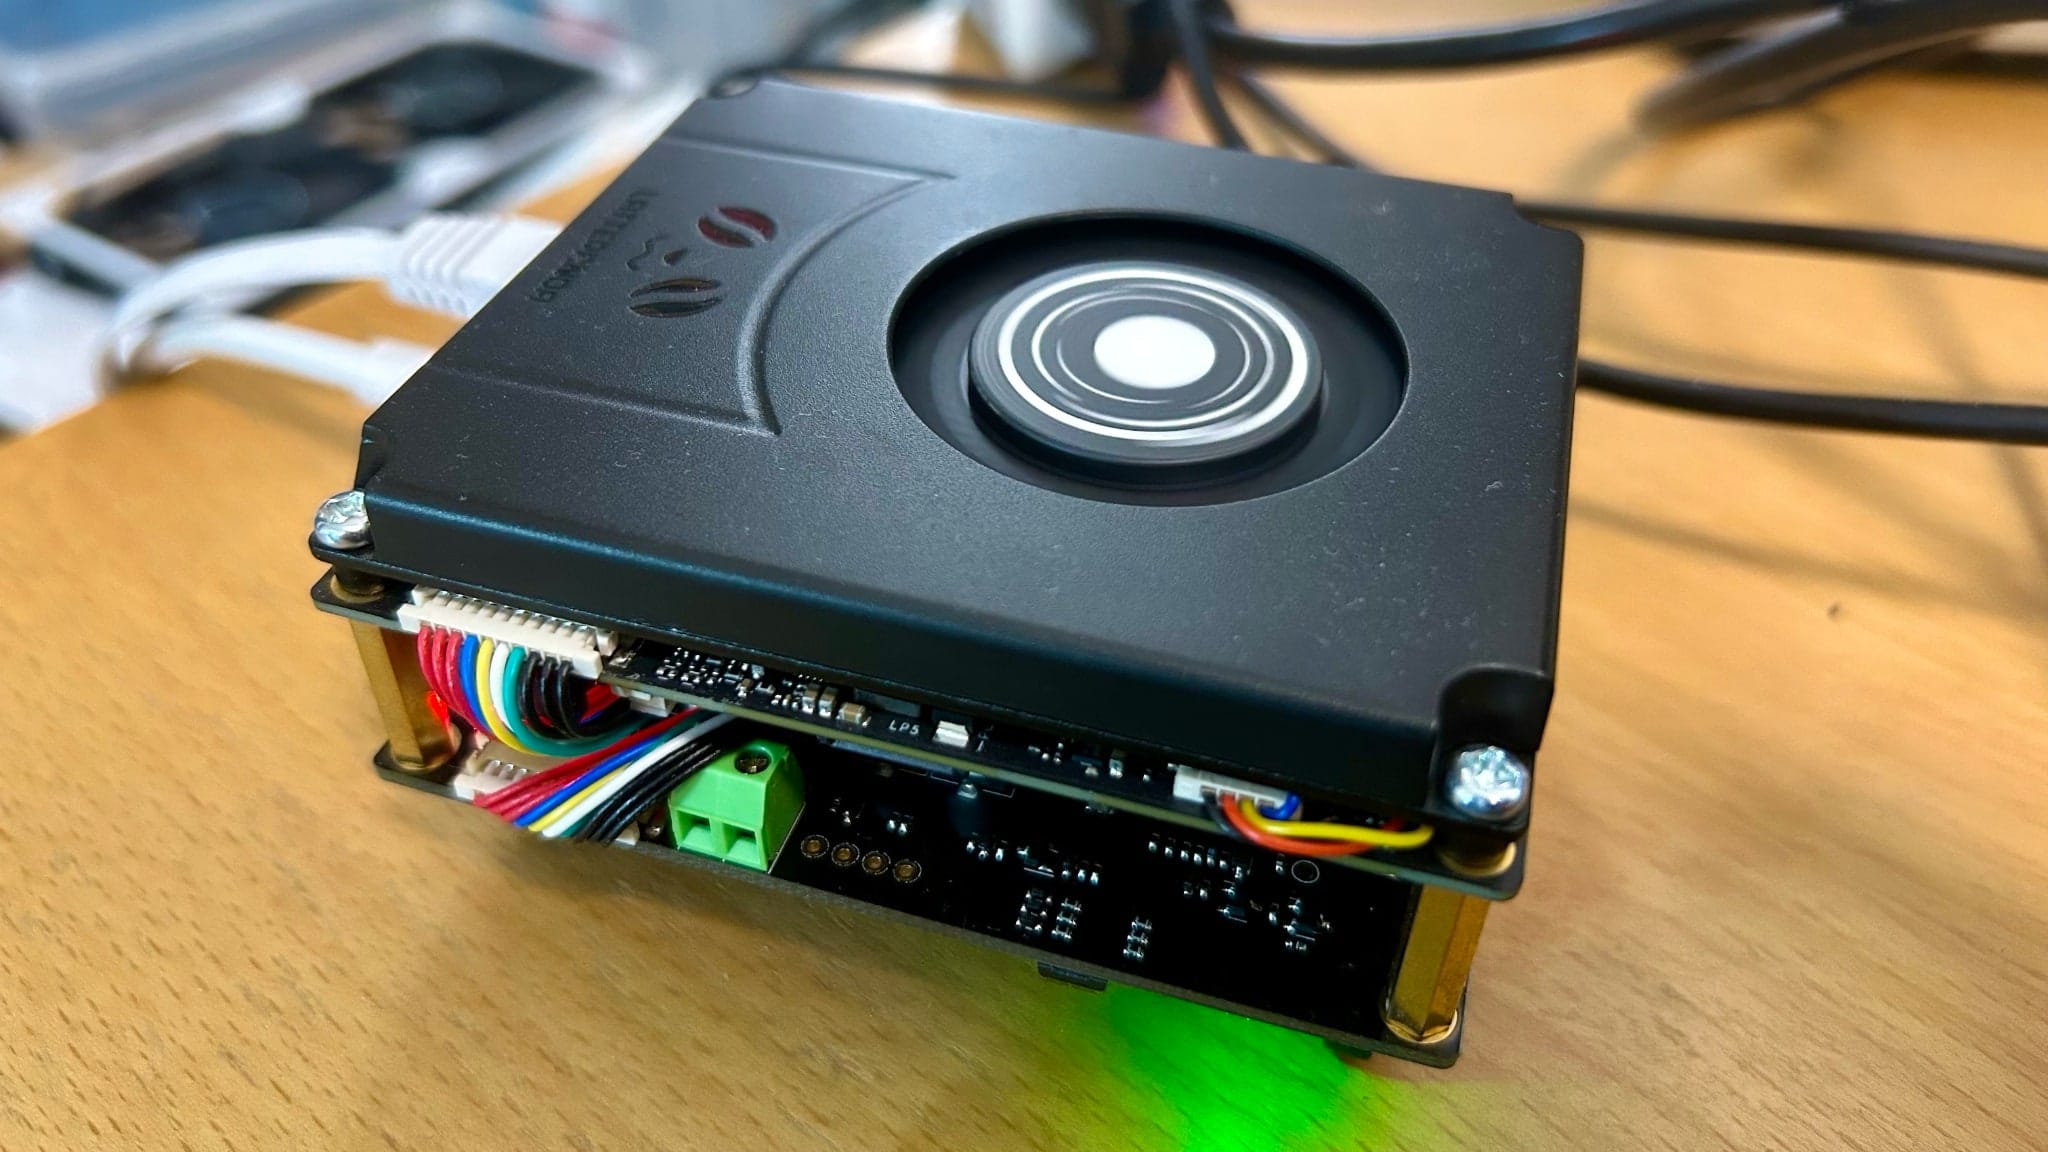
- An active cooler.
- An M.2 M-key expansion board that takes a 2230/2280 SSD and plugs into the main board’s PCIe 3.0 port via an FPC ribbon cable.
- An M.2 4G LTE expansion board. This is a daughtercard with a SIM slot that physically stacks atop the Wi-Fi card and plugs a few power pins into the GPIO ports, ready for you to plug in an M.2 LTE module.
- A 51W POE++ board that also plugs into the main board via FPC, providing an additional Realtek RTL8111H gigabit NIC (that worked fine with all operating systems I tested with).
- A UPS board that takes three standard 18650 Li-ion batteries and provides an alternate set of power inputs (a barrel jack and another USB PD).
Of all of these, I have to admit the one I was initially most excited about was the LTE board, although I quickly found out I don’t have a compatible M.2 LTE module (something I will try to fix in the near future).
However, I do have some ideas for the UPS board, since we’ve been having some power outages lately and even though I already have a UPS for my main servers it would be nice to replace one of my smaller servers with something that could stand on its own–and I have a particular use for it out in the countryside.
Hardware
The IOTA is built around Intel’s Twin Lake N150 processor, a quad-core x86 chip clocked up to 3.6 GHz. For those who care about those details, the CPU comes with 6MB cache and 24 EU Intel UHD Graphics, but the more important thing is that the IOTA makes use of it in 8GB or 16GB LPDDR5 variants with in-band ECC (which I believe to be relatively rare in SBCs), and each of those SKUs is matched with 64GB or 128GB eMMC 5.1 storage.
The version I tested has these specs:
- Intel N150 (quad-core, 4 threads, up to 3.6 GHz, 6MB cache, 24 EU GPU)
- 8GB LPDDR5 RAM / 64GB eMMC 5.1 storage
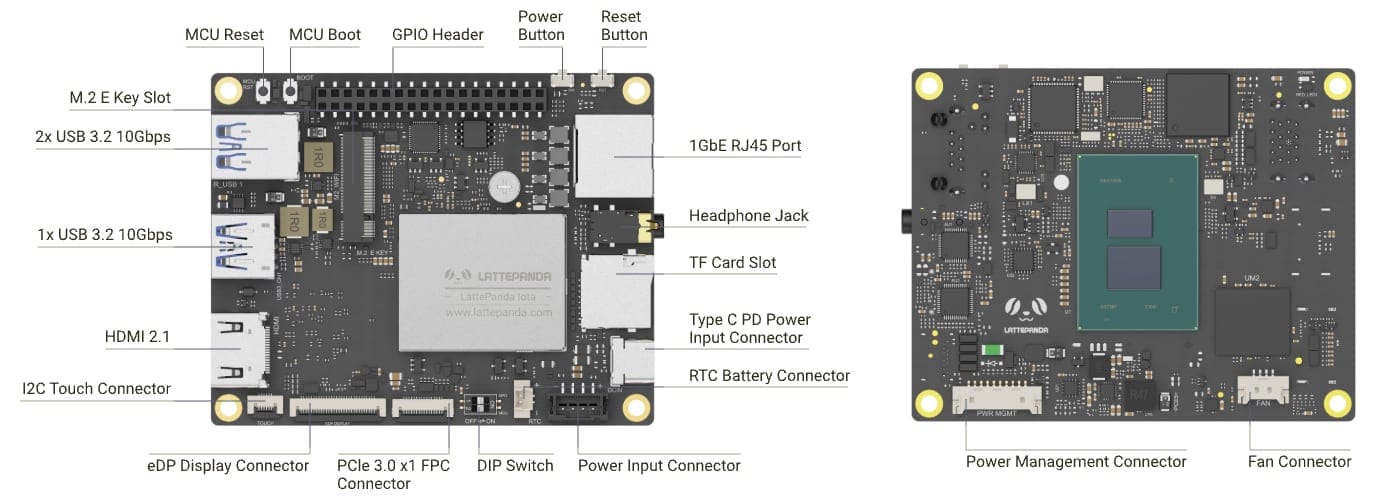
- HDMI 2.1 (4K@60Hz) and eDP 1.4b FFC connector (2‑lane, up to 1080p@60)
- 3× USB 3.2 Gen2 Type-A (10 Gbps) + one USB 2.0 header
- 1× GbE RJ45 with Wake-on-LAN
- 1× M.2 E-Key (Wi-Fi/BT)
- 1× PCIe 3.0 x1 FPC connector
- 1× MicroSD slot
- a 36-pin GPIO header driven by an RP2040
…plus a 3.5 mm audio jack and two options for power: USB PD (which is what I used, with a high-efficiency GAN charger) and a DC input on the board itself.
And, of course, as a little spoiler, all of it is completely Linux compatible:
❯ lspci
00:00.0 Host bridge: Intel Corporation Alder Lake-N Processor Host Bridge/DRAM Registers
00:02.0 VGA compatible controller: Intel Corporation Alder Lake-N [Intel Graphics]
00:0a.0 Signal processing controller: Intel Corporation Platform Monitoring Technology (rev 01)
00:14.0 USB controller: Intel Corporation Alder Lake-N PCH USB 3.2 Gen 2x1 (10 Gb/s) xHCI Host Controller
00:14.2 RAM memory: Intel Corporation Alder Lake-N PCH Shared SRAM
00:15.0 Serial bus controller: Intel Corporation Alder Lake-N PCH I2C Controller
00:16.0 Communication controller: Intel Corporation Alder Lake-N PCH HECI Controller
00:1a.0 SD Host controller: Intel Corporation Alder Lake-N eMMC Controller
00:1c.0 PCI bridge: Intel Corporation Alder Lake-N PCI Express Root Port #7
00:1f.0 ISA bridge: Intel Corporation Alder Lake-N PCH eSPI Controller
00:1f.3 Audio device: Intel Corporation Alder Lake-N PCH High Definition Audio Controller
00:1f.4 SMBus: Intel Corporation Alder Lake-N SMBus
00:1f.5 Serial bus controller: Intel Corporation Alder Lake-N SPI (flash) Controller
01:00.0 Ethernet controller: Realtek Semiconductor Co., Ltd. RTL8111/8168/8211/8411 PCI Express Gigabit Ethernet Controller (rev 15)
Upgrading from the LattePanda V1
Compared to the original LattePanda V1, the IOTA is a significant leap forward on paper:
- The N150 CPU is around four times faster than the 1.44GHz Atom x5-Z8350 the V1 shipped with.
- The same applies to the RAM capacity, which can now go up to 16GB LPDDR5 with ECC, over the original 2/4GB.
- eMMC storage is roughly equivalent, but part evolution means that the IOTA’s is naturally faster.
And while I mostly confirmed those figures (see below), the key thing is that you get a completely modern baseline– faster USB connectivity, PCIe 3.0 and an RP2040 to replace the older ATmega32U4 chip.
But what I really like is that the form factor is nearly identical (save minor variations in connectors, of course), so I suspect most industrial enclosures will fit. And, of course, the IOTA is more power efficient (the Atoms were never the coolest chips in the block, style or temperature-wise).
Like I said above I’ve found a few V1s in the wild in all manner of solutions, so I think integrators will appreciate that the IOTA was designed as a drop-in upgrade.
Software
One of the big advantages of the IOTA when compared to the other single-board computers I’ve been reviewing over the years is that you have full choice of operating systems and guaranteed hardware and software compatibility, with a standard UEFI BIOS and no vendor-specific kernel patches to worry about. So although I still have a soft spot for ARM-based SBCs, I do appreciate being able to run whatever OS I want without worrying about low-level support, obsolete kernels or missing drivers.
BIOS
Like the LattePanda Mu I tested recently, the IOTA has a very comprehensive BIOS with all that you could wish for–including explicit fan curve settings that I have been experimenting with.
For instance, one thing I always switch on is Wake-on-LAN, and I also typically set up power recovery options to my liking–all things that are easily done in a standard BIOS and that I appreciate having on an SBC.
Windows
Like other LattePanda boards, the IOTA ships with Windows 11–and like all N150 machines I’ve had to run Windows on, the first boot is snappy but you’re best served by leaving it overnight to run Windows Update, which in this case was hampered by the eMMC (it’s not exactly slow, but like a blade of grass amidst the thundering herd of Windows Update).
However, I didn’t spend much time in Windows.
Proxmox
After fitting a small 512GB NVMe, Proxmox installed without any issues–but since I wanted to test the UPS module and couldn’t really use it together with the NVMe drive, I soon realized that I had to use another Linux distribution since Proxmox refuses to install to the internal eMMC–I usually work around that by installing Debian first and then adding the Proxmox repositories, but this time around I decided to do something different.
Talos Linux
Yes, you can run Talos on it (and Kubernetes) without any issue–I just grabbed an image off the Factory, booted it and it was able to install to the NVMe. But although that is what my IOTA will eventually end up running, I needed something a bit more conventional to do my testing.
Fedora Silverblue
Since I had such good results recently running Fedora Silverblue on an N150 laptop, I installed it on the IOTA’s internal eMMC while I sorted out how to stack the modules I want in a custom case.
That gave me full hardware support–all built-in chipset devices, the RP2040 and the expansion modules I tested all worked:
❯ lsblk
NAME         MAJ:MIN RM  SIZE RO TYPE MOUNTPOINTS
sda            8:0    1    0B  0 disk
sdb            8:16   1    0B  0 disk
mmcblk0      179:0    0 58.2G  0 disk
├─mmcblk0p1  179:1    0  600M  0 part /boot/efi
├─mmcblk0p2  179:2    0    1G  0 part /boot
└─mmcblk0p3  179:3    0 56.7G  0 part /var/home
                                      /var
                                      /sysroot/ostree/deploy/fedora/var
                                      /sysroot
                                      /etc
mmcblk0boot0 179:8    0    4M  1 disk
mmcblk0boot1 179:16   0    4M  1 disk
zram0        251:0    0  7.5G  0 disk [SWAP]

❯ sensors
acpitz-acpi-0
Adapter: ACPI interface
temp1:        +27.8°C

coretemp-isa-0000
Adapter: ISA adapter
Package id 0:  +35.0°C  (high = +105.0°C, crit = +105.0°C)
Core 0:        +35.0°C  (high = +105.0°C, crit = +105.0°C)
Core 1:        +36.0°C  (high = +105.0°C, crit = +105.0°C)
Core 2:        +36.0°C  (high = +105.0°C, crit = +105.0°C)
Core 3:        +36.0°C  (high = +105.0°C, crit = +105.0°C)
But since I think most people coming here will want to know how much of an improvement the IOTA is over the V1, I’m going to go straight into the performance part:
Performance
If you’ve read my previous posts on N150 devices, you know what to expect: The IOTA is a solid performer, and while it won’t set any records in CPU benchmarks when compared to a mainstream desktop CPU, it’s perfectly adequate for light server workloads, web browsing, office productivity and media consumption–I’ve been using an N150 mini laptop for a few months now for exactly that, and the IOTA is pretty much equivalent to it.
But, more importantly for what it is designed to do, it is a tiny little beast for embedded applications. In fact, it is likely much more performant than anything you really need for an industrial setting, and I can see it being a great upgrade for digital signage solutions based on the V1.
Since I actually have an Atom x5-Z8350 system that is equivalent to the V1 (a z83ii mini-PC), I ran a few comparisons between the two:
- the IOTA was nearly five times faster than the Atom in CPU-bound tasks (
sysbenchresults were 4.8 times faster). - …and around six to eight times faster in simple OpenGL benchmarks. It also has no trouble playing 4K video, although (realistically) if you are going to use it for signage your biggest constraint is going to be your physical panel.
As to storage performance, that is hardly comparable due to architecture differences, but the built-in eMMC is decent for what it is–I ran fio with my usual invocation:
❯ fio --filename=/var/fio --size=5GB --direct=1 --rw=randrw --bs=64k --ioengine=libaio --iodepth=64 --runtime=120 --numjobs=4 --time_based --group_reporting --name=random-read-write --eta-newline=1
And got acceptable, but not earth-shattering results:
read: IOPS=622, BW=38.9MiB/s (40.8MB/s)(4671MiB/120005msec)
write: IOPS=625, BW=39.1MiB/s (41.0MB/s)(4692MiB/120005msec)
This may seem slow compared to SSDs, but I found it adequate even when running a Linux desktop environment (although you will want to avoid heavy swap usage). Using the NVMe adapter was noticeably faster, but the PCIe 3.0 FPC connector is limited to x1 speeds, so doing comparisons is a bit moot.
Again, it is much more than adequate for general use, let alone embedded applications.
Thermals
Depending on your application, the IOTA can idle at 36°C (in Linux) or… 46°C (in Windows). But either way, the active cooler does an excellent job of cooling it down.
As usual, I ran a CPU stress test and plotted a couple of charts:
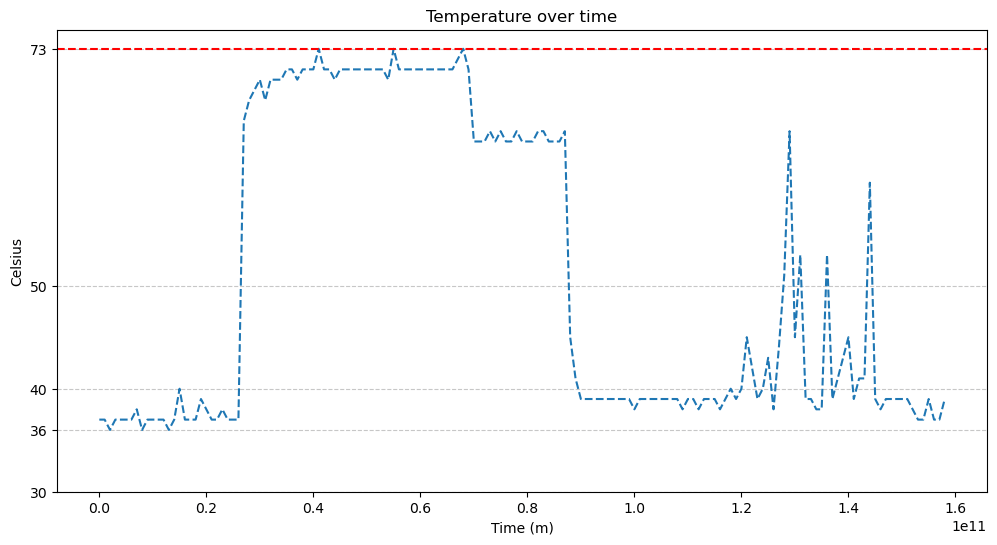 The latter peaks are from me running a few updates after the main run, and I thought they were a good example of how the machine deals with short peak loads.
Again, this was done with BIOS defaults (power limits set to 10000 and 20000) and the active cooler, at around 24°C ambient.
But the temperature never got past 75°C. In particular, when compared to the other Alder Lake devices I tested this year (including the beefier LattePanda Mu), the clock speed is remarkably stable during sustained load:
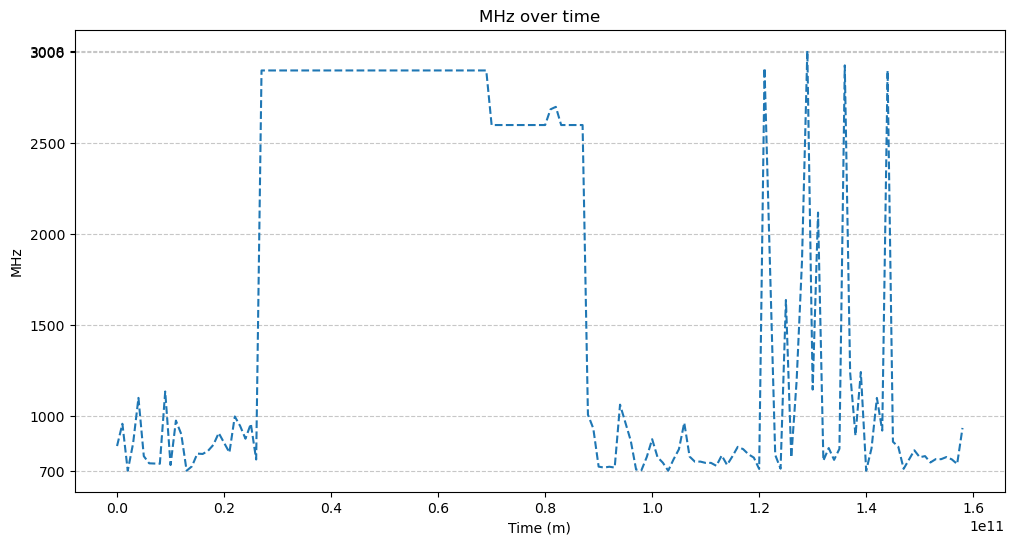
Of course, this is all with the standard BIOS settings (and drawing less than 6W off the wall) so your mileage may vary–but, again, even if you can get this to clock higher, it will still be a lot more CPU power than a typical embedded application will require.
I have seen a few people online tweaking the BIOS power limit to be even lower and still getting acceptable results, so I suspect that even with a passive cooler it will be possible to get very good performance out of the IOTA.
Noise
The active cooler is reasonably quiet under normal loads, but the fan can get quite noisy (and a tad whiny) under sustained load. In a very quiet office (and given my propensity to have everything fanless and utterly quiet) it got a little annoying and even whiny as I was testing things.
While in a typical embedded scenario noise won’t be your first concern, you should bear in mind that you’ll need to tweak the BIOS fan settings (or run the IOTA with a lower power limit and a passive cooler) if you need absolute quiet.
RP2040 and GPIOs
The IOTA’s GPIO connector provides direct access to the onboard RP2040’s pins:
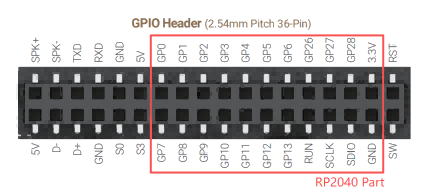
Since the IOTA’s RP2040 comes with MicroPython installed, I used that to play around with a bit.
I’ve written at length about the benefits of marrying a general-purpose MCU like the RP2040 with a beefier CPU (like when I reviewed the Radxa X4), so I won’t go into that again here other than pointing out that despite having to sort out communication between the MCU and the host CPU in your code, using the RP2040’s PIO will give you much finer resolution and control for some purposes than what you’d get by tying in the GPIOs directly to the Intel bus, so I see it as a win-win.
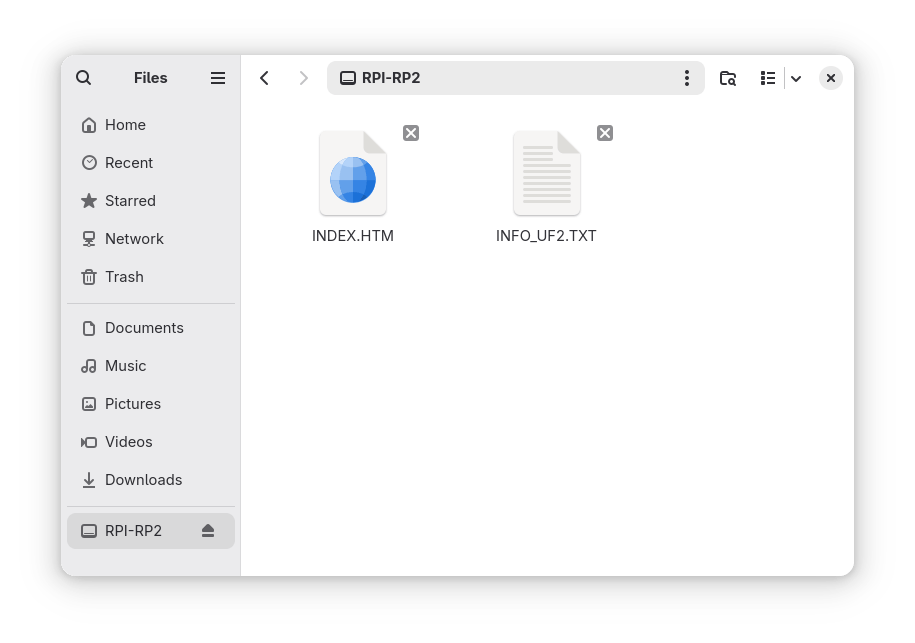
As it happens, the LattePanda team already sorted that out for you and provides a prebuilt image of telemetrix, a Python “bridge” that runs against a server you can flash to the onboard RP2040. Flashing it is trivial, and works just like any other RP2040 device: Just hit RST and hold down BOOT, and you’ll be able to drop in a UF2 file to your liking:
I plan to play around with this a bit more when I set up the IOTA permanently at a remote location, but to do that I need to sort out another thing: the UPS module.
Using the UPS Module
The booklet that comes with the UPS module mentions that it is only compatible with Windows, and I’ve even seen other reviews that state the same, but as it happens the usbhid device is immediately detected in Linux:
❯ lsusb
Bus 001 Device 001: ID 1d6b:0002 Linux Foundation 2.0 root hub
Bus 001 Device 002: ID 2341:8036 Arduino SA Leonardo (CDC ACM, HID)
Bus 001 Device 003: ID 2e8a:0005 MicroPython Board in FS mode
Bus 002 Device 001: ID 1d6b:0003 Linux Foundation 3.0 root hub
…and if you install NUT, nut-scanner immediately picks it up:
❯ nut-scanner
Scanning USB bus.
No IP range(s) requested, skipping SNMP
Scanning XML/HTTP bus.
No IP range(s) requested, skipping NUT bus (old libupsclient connect method)
Scanning NUT simulation devices.
Scanning NUT bus (avahi method).
Scanning IPMI bus.
[nutdev-usb1]
        driver = "usbhid-ups"
        port = "auto"
        vendorid = "2341"
        productid = "8036"
        product = "LattePanda_UPS"
        serial = "6D76279D5088"
        vendor = "DFRobot"
I have ordered a set of 18650 batteries for it, but they haven’t arrived yet–when they do, I will either update this post or link to the update (and hopefully I’ll have sorted out a working case design by then). The plan is to verify charge/discharge rates, check the actual runtime under idle/typical load, and confirm it generates the correct NUT events (on‑battery/low‑battery), since right now all I get is detection and an error reading the battery capacity.
Designing an Enclosure
Of course, if you’re interested in integrating the IOTA into your solutions, you will eventually need to enclose it. STEP files of many LattePanda products are easy to find, so it’s easy to get started.
Stacking the IOTA
There is a little catch, though. The expansion boards available at launch make for a great first impression regarding expandability, but in practice you can’t combine them at random. For instance, I was a bit sad that the IOTA only has one PCIe 3.0 FPC connector, since I’d have liked to use both the SSD and the PoE boards (for the sake of the extra NIC).
Also, if you decide to install the M.2 SSD adapter (like I originally did), neither the PoE nor the UPS boards will fit since the connectors will conflict with the M.2 board–however, you can try to be a little creative with some extra standoffs (and, in the case of the UPS board, extending the power cables).
This will also mean additional care when (re)designing enclosures. As usual with LattePanda, there are STEP files available on GitHub (which were updated at least once since I started writing this) and you will be able to model everything very accurately:
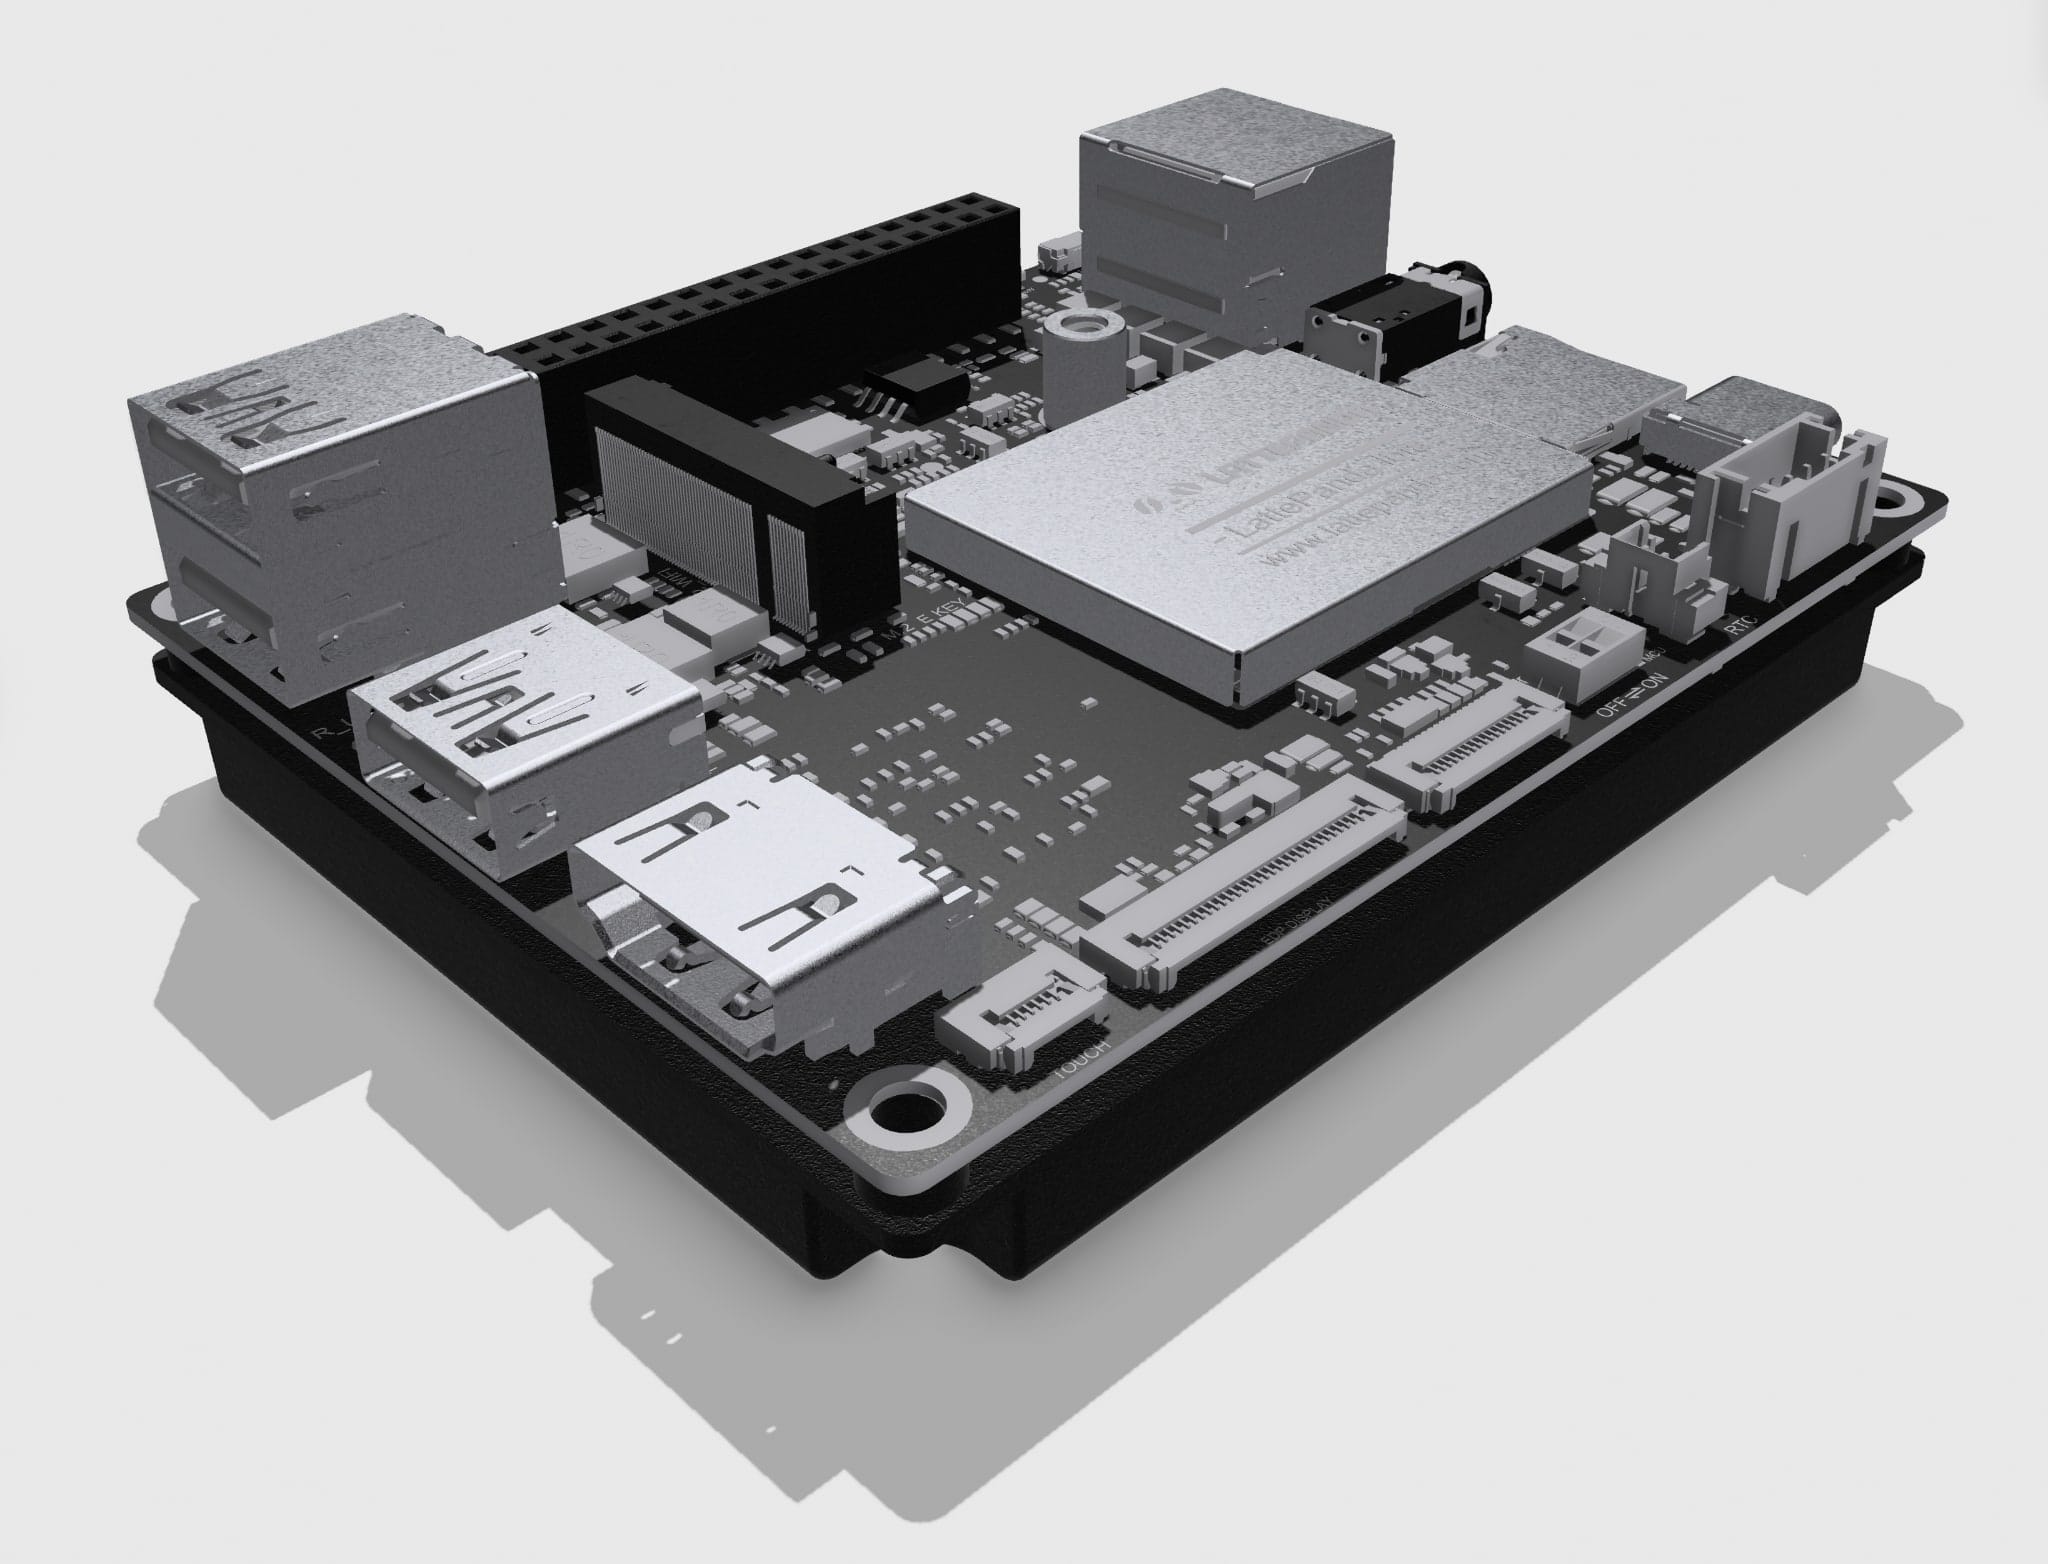
Additionally, some of the boards may block or constrain access to parts of the main board, so you may need to get creative with wiring and placement depending on your use case. In particular, I’d recommend planning clearance around some of the connectors around the edge of the board–especially the PCIe FPC cable, which effectively sticks out a bit on the side and shouldn’t be bent at an angle.
I’ve been trying to design a case that also holds the UPS module and have come up against that exact issue:
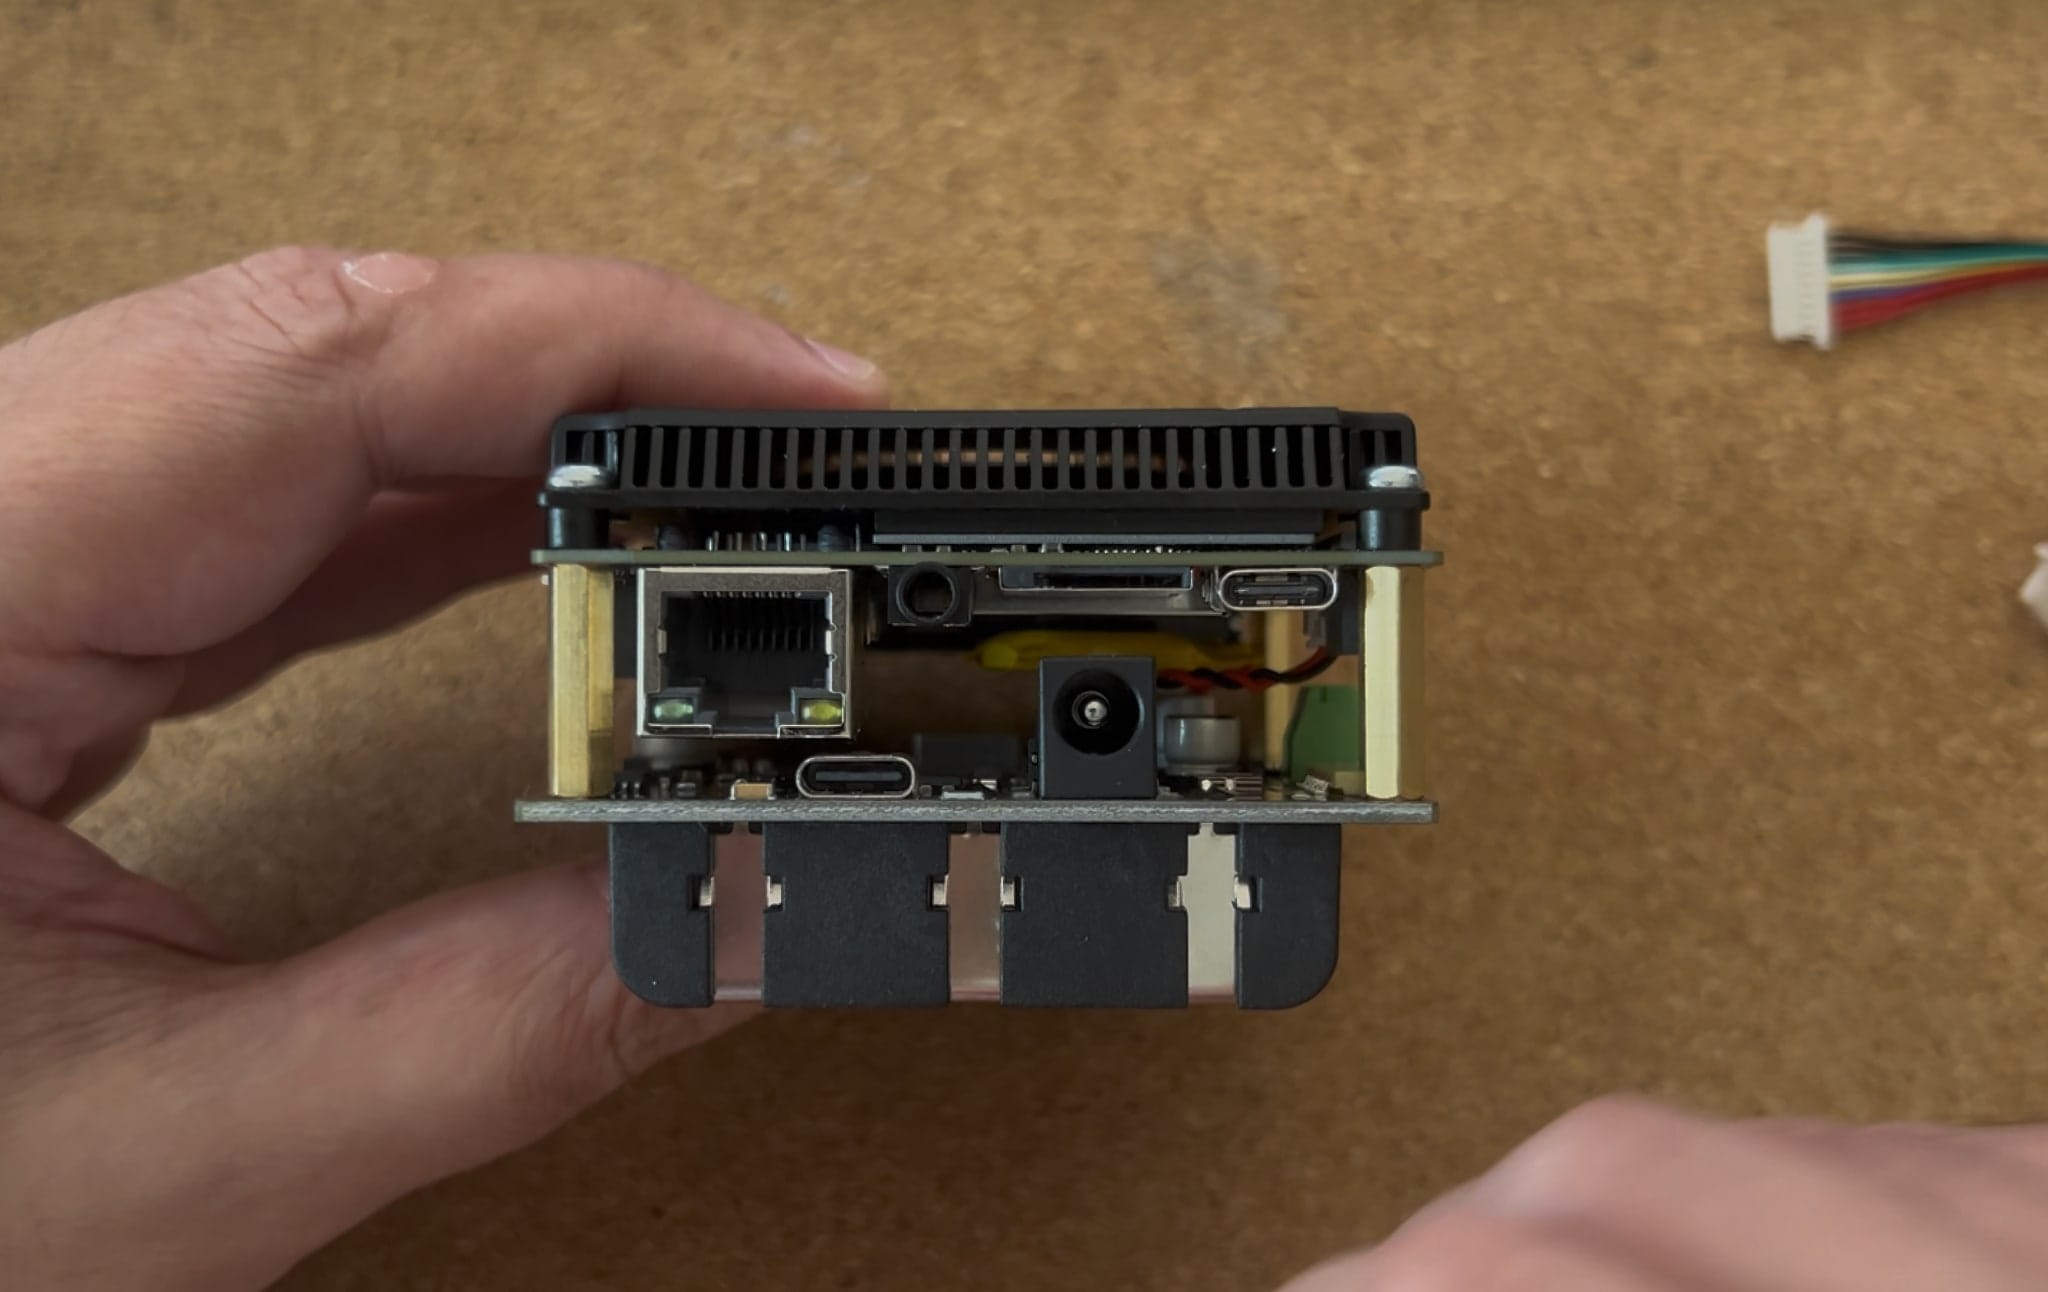
…so I’ve been pondering placing the UPS module alongside the IOTA, which should allow me to reinstate the NVMe adapter and use it as a full-blown Proxmox node. I’ll update this post when I figure out a good solution for it–and publish my enclosure design somewhere.
Conclusion
There are dozens, if not hundreds of Intel SBCs on the market now–not just the consumer and hobbyist stuff, but also modern revisions of older industrial PCs that are being given new life with Intel’s Alder Lake N chip, but I don’t think there are many with the historical popularity of the LattePanda, so it’s great that the IOTA was designed as a drop-in replacement for the V1.
If you don’t need PCIe or dual Ethernet, the IOTA is a great pick. And with full x86 support, it’s a breath of fresh air compared to ARM boards with vendor kernels and patchy driver support, not to mention that you get standard UEFI, a complete BIOS and a pretty beefy CPU that might even be overkill for most typical industrial applications (although it will make for a great upgrade if you design point-of-sale devices).
My only complaint is that the modular expansion system could have been a bit more flexible with regard to combining different options, but I understand the design constraints and the IOTA is meant as a starting point for custom solutions, so I expect integrators to go out and design their own expansion boards.
But overall, I think LattePanda has a winner on their hands with the IOTA, and I look forward to seeing what the community does with it. I know what I plan to do with mine…