 Rui Carmo
Reviewing things is an interesting experience–no matter what, I learn something from dealing with the various hardware and software bits I get, and every now and then you come across something you really like despite some challenges along the way.
This time everything went fine until the very end, and I’m still processing the outcome. But let’s rewind back to a few months ago–I now have a dual 10GbE NAS and managed switches with 10GbE SFPs, so I thought I could turn to testing a category that a few people asked me to take a look at, which is custom firewall appliance hardware.
Although I only have a 1Gbps fiber connection (for now), 10Gbps connections are actually available here in Portugal, and even the lowest of Intel’s recent chips have more than enough bandwidth to directly manage that much network traffic (let alone with hardware offloading of most of the processing) so I started doing some research on the topic, and I came across the iKOOLCore R2Max.
Disclaimer: iKOOLCore sent me the R2Max free of charge (for which I thank them), and as usual this article follows my review policy.
The Plan
My original plan was to set up the R2Max as a unified WAN gateway for two fiber connections–my current 1Gbps/200Mbps connection and a new 10Gbps one. It was going to act as a load-balancing router and connect directly to a new server LAN (starting with my TerraMaster F4-424 Max , which has dual 10GbE NICs).
However, due to various issues (including contracts and coverage), I was unable to actually get a 10Gbps fiber connection until the hardware arrived, and I still have a very limited amount of 10GbE ports. And that’s just what I had to try to solve for on the hardware side… But let’s start with that.
Hardware
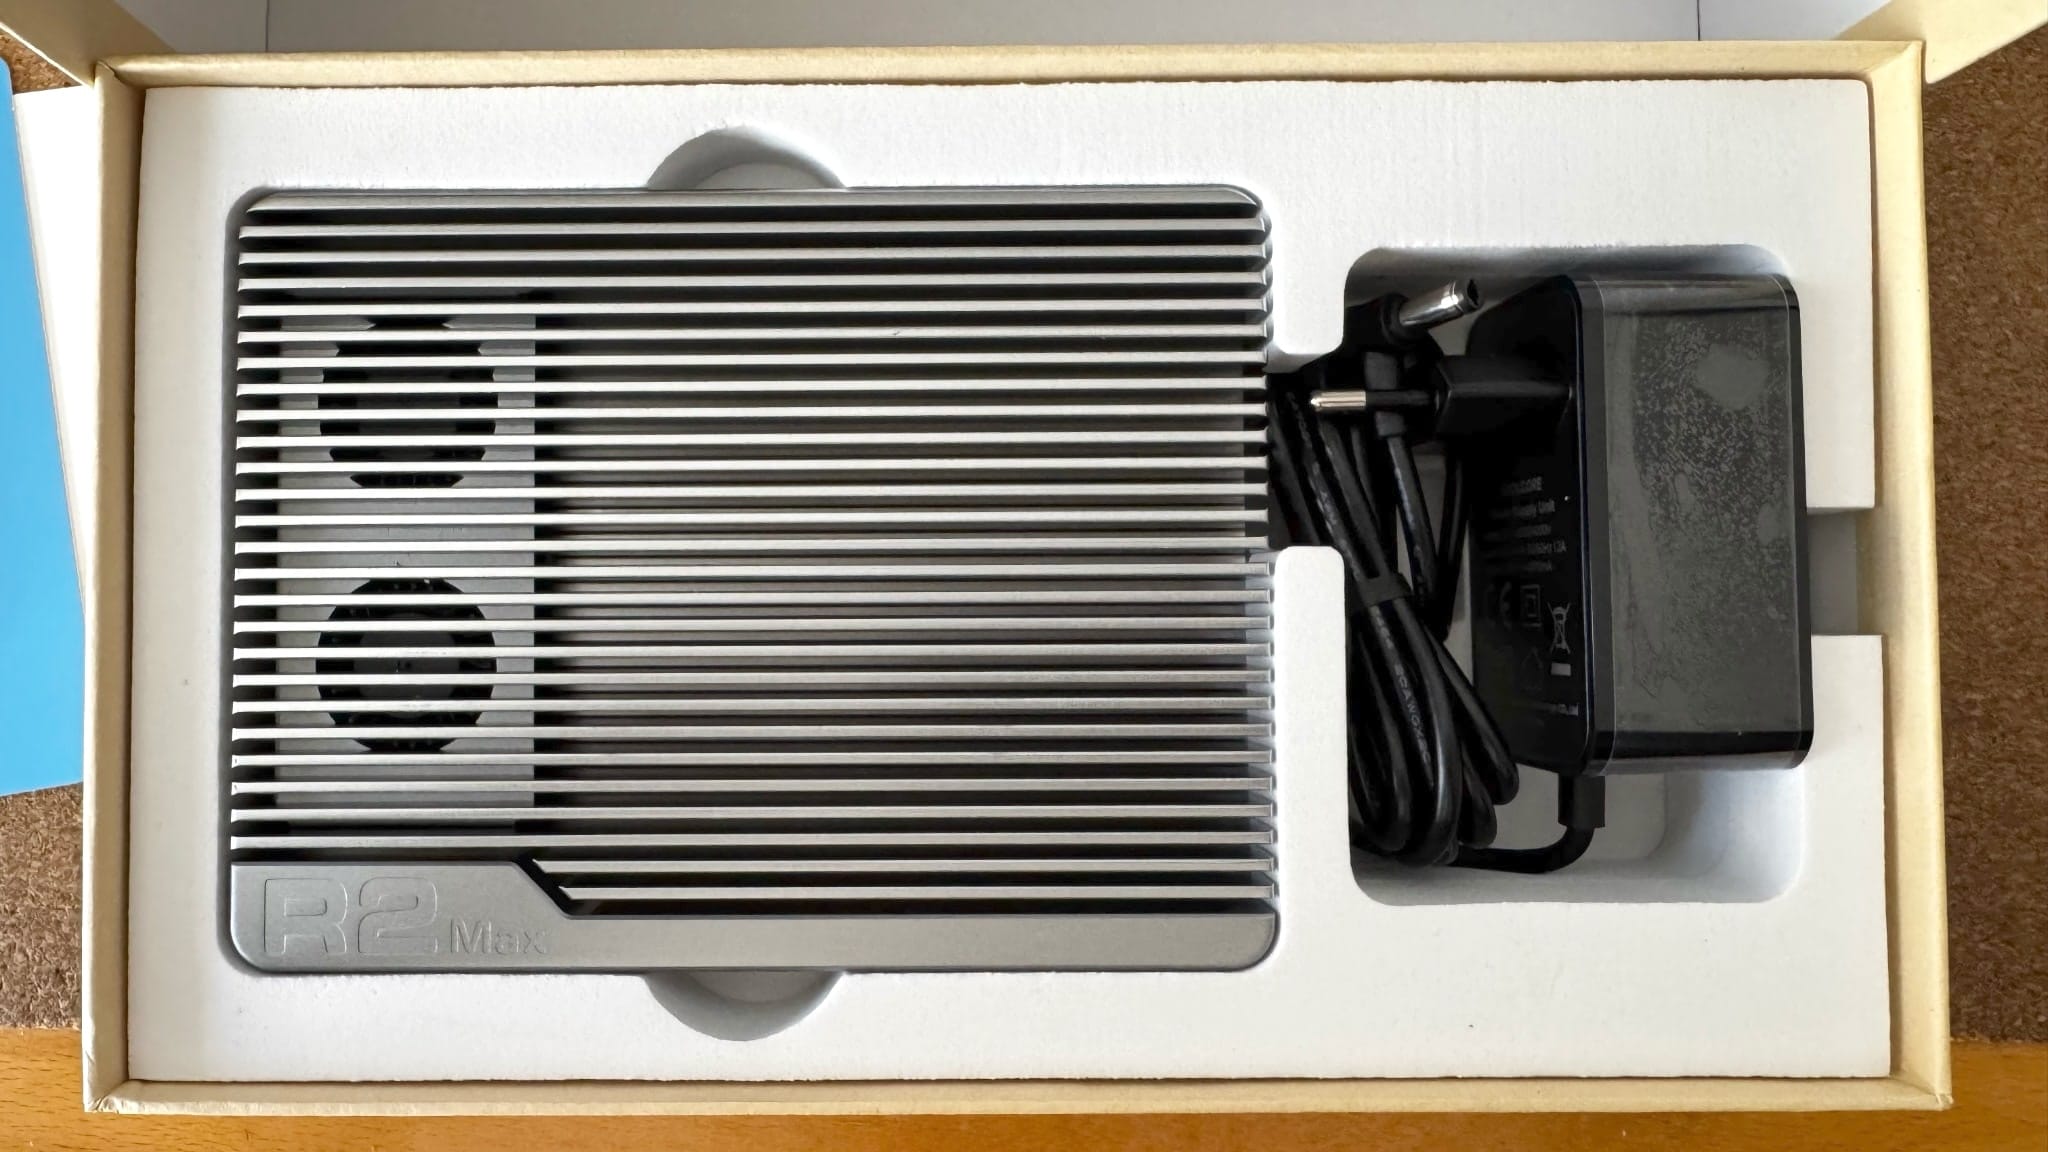
The R2Max comes in various SKUs, of which I got the N150 version. This was interesting to me as I have been wondering how the N150 would compare to the N100 performance-wise. The key point here is that It has half the cores of the N355 version (and thus lower TDP), but that shouldn’t matter much in terms of network throughput as long as you don’t do a lot of sophisticated processing.
Physically, my first impressions were pretty favorable: the case is fully metal, which is quite wonderful given that most mini-PCs tend to cut corners regarding this.
Flipping the case revealed two easy-to-access slots for RAM and storage expansion:
- A single-channel DDR5 slot (mine came with 8GB 4800MT/s, but you can upgrade it–foreshadowing…), which is fine for a firewall/small server.
- Two NVME slots (mine came with a tiny 2242 drive), which according to their wiki share one PCI lane and can both be set up for redundant booting (for reasons you’ll come to later, I didn’t take BIOS screenshots this time around).
However, the stars of the show are the Ethernet ports. For some reason, there are no external markings on the ports whatsoever (the manual has a diagram with which is which, but it would have been nice to have some silk screening), but you get:
- Two 10GbE using Marvell’s AQC113C, which support anything from 10Mbps to 10Gbps
- Two 2.5GbE using Intel’s very well known i226-V chipset
There is also a Micro SD/TF slot you can use for booting, and a decent set of USB and video ports:
- 2 x USB-A 3.2 5Gbps ports on the front panel.
- 1 x USB-C 3.2 Gen2 10Gbps port with eDP 1.4a for display output, data transfer at up to 10Gbps, and power delivery (PD) up to 15W.
- 1 x HDMI 2.0, which like the eDP port supports 4K@60Hz resolutions.
Looking at the output of lspci on Proxmox yielded a pretty standard result:
❯ lspci

00:00.0 Host bridge: Intel Corporation Device 461c
00:02.0 VGA compatible controller: Intel Corporation Alder Lake-N [Intel Graphics]
00:0d.0 USB controller: Intel Corporation Alder Lake-N Thunderbolt 4 USB Controller
00:14.0 USB controller: Intel Corporation Alder Lake-N PCH USB 3.2 xHCI Host Controller
00:14.2 RAM memory: Intel Corporation Alder Lake-N PCH Shared SRAM
00:16.0 Communication controller: Intel Corporation Alder Lake-N PCH HECI Controller
00:1c.0 PCI bridge: Intel Corporation Alder Lake-N PCI Express Root Port
00:1c.3 PCI bridge: Intel Corporation Device 54bb
00:1c.6 PCI bridge: Intel Corporation Alder Lake-N PCI Express Root Port
00:1d.0 PCI bridge: Intel Corporation Alder Lake-N PCI Express Root Port
00:1d.2 PCI bridge: Intel Corporation Alder Lake-N PCI Express Root Port
00:1f.0 ISA bridge: Intel Corporation Alder Lake-N PCH eSPI Controller
00:1f.3 Audio device: Intel Corporation Alder Lake-N PCH High Definition Audio Controller
00:1f.4 SMBus: Intel Corporation Alder Lake-N SMBus
00:1f.5 Serial bus controller: Intel Corporation Alder Lake-N SPI (flash) Controller
01:00.0 Ethernet controller: Intel Corporation Ethernet Controller I226-V (rev 04)
02:00.0 Ethernet controller: Intel Corporation Ethernet Controller I226-V (rev 04)
03:00.0 PCI bridge: ASMedia Technology Inc. ASM1182e 2-Port PCIe x1 Gen2 Packet Switch
04:03.0 PCI bridge: ASMedia Technology Inc. ASM1182e 2-Port PCIe x1 Gen2 Packet Switch
04:07.0 PCI bridge: ASMedia Technology Inc. ASM1182e 2-Port PCIe x1 Gen2 Packet Switch
05:00.0 Non-Volatile memory controller: Samsung Electronics Co Ltd NVMe SSD Controller 980
07:00.0 Ethernet controller: Aquantia Corp. AQC113C NBase-T/IEEE 802.3an Ethernet Controller [Marvell Scalable mGig] (rev 03)
08:00.0 Ethernet controller: Aquantia Corp. AQC113C NBase-T/IEEE 802.3an Ethernet Controller [Marvell Scalable mGig] (rev 03)
According to their wiki, the two Marvell 10GbE interfaces each take up two lanes and each Intel 2.5GbE interface has its own. I am a bit curious as to what those ASM1182e chips are doing, but on paper this device has a decent alignment between PCIe lanes and devices.
Fan Noise
One of the things I noticed immediately when plugging in the machine was that despite the massive passive cooling and the CPU being at 25C, the dual fans not only kicked in immediately but also were unusually noisy–almost grating, which is sadly one of the typical outcomes of using small 40mm fans.
So the first BIOS setting I changed was to turn off the fans completely–but to get an idea of their influence, I left the machine idle at the BIOS screen for a couple of hours, and the reported CPU temperature slowly crept up to 42C–so the fans do have a positive effect.
Eventually I tuned the fan curve to have them only kick in at 40C, which kept them mostly off–and over time the fan noise actually improved a bit, so I think there’s a possibility that mine were somehow misaligned and just needed to be broken in.
Still, given the natural habitat of this kind of device will be a network closet/rack, this isn’t really an issue.
Performance
I ran my usual stress testing using ollama (the smaller models still fit into the 8GB RAM the R2Max), and to my surprise, the N150 was actually slower than the N100 results I had from earlier machines. This was a bit confusing to me until I realized that that was essentially due to RAM speeds–the N100 machine I had was using a 5600MT/s SODIMM, while the R2Max was using slightly slower 4800MT/s–and RAM speed matters a lot in LLM testing.
A quick stress test with more conventional tools showed a 25-30% CPU improvement, but the mini PC I used for comparison doesn’t have the same kind of thermal solution and there are too many factors at play, so I wouldn’t consider this a fair comparison. So I decided to test with a 5600MT/s SODIMM later (which, as we’ll see, turned out to be a lousy idea).
However, this being a firewall device, the only worthwhile comparison would be throughput–and I don’t have anything else with dual 10GbE interfaces except the TerraMaster, which wouldn’t be comparable anyway.
Testing Approach
Since the SSD came completely blank (which is fine by me), I decided to install Proxmox and enable IOMMU to pass-through the various network devices to VMs. This made testing everything much easier, and I set up six different virtual machines:
- Debian Bookworm (12)
- Ubuntu Focal (24.04)
- OPNSense (24.10 and 25.1)
- OpenWRT (23.05 and, later, 24.10)
I then proceeded to set those up to work with 3 of the network interfaces via PCI pass-through–that means both of the Marvell Aquantia AQC113C and one of the Intel I226-V, which I used as an admin port.
This ensured that each of the VMs (which, of course, could only run one at a time) had full access to the network hardware and completely bypassed the Proxmox host.
Network Topology
As a starter test, I plugged in one of the R2Max’s 10GbE ports directly to the TerraMaster and another to the SFP on one of my Sodola switches, but, as usual, I had trouble getting iperf to provide consistent results when trying to generate traffic from multiple 2.5GbE clients, so I stuck to two test scenarios:
- Direct host-to-host
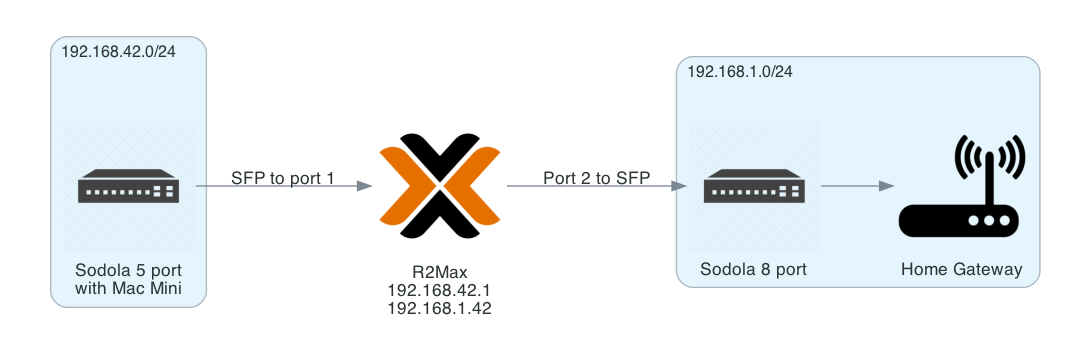
iperftesting, with iperf running both on the TerraMaster and the R2Max host (i.e., without a VM), just to see the practical maximum. - Routed traffic between both of the R2Max’s 10GbE interfaces using a virtualized router, with the TerraMaster plugged into one interface and my mac Mini on another, but using the 5GbE USB adapter I reviewed a while back (I need to get another 10GbE machine)
For the routed scenario, I then actually “lived” behind it using NAT for a couple of weeks (because my home gateway has a lot of trouble with custom routing, so I couldn’t setup a return route):
Proxmox made it quite easy to switch between software configurations, but I had some trouble with the actual physical connections due to two factors:
- I had to physically set up the R2Max in my closet for the direct link testing
- I don’t have enough machines with 10GbE ports (and a limited amount of SFPs), so I had to keep tearing down my network and rebuilding it after.
Both of these things took quite some time, and I ended up going back and forth between VM configurations–which is why, unfortunately (for reasons we’ll see later) I left most of my notes and log outputs inside the VMs themselves.
Host To Host
The first couple of tests I ran were directly between the Proxmox host and the TerraMaster NAS, and even though the Marvell chipset is supported in Proxmox, again (just like when I was testing a 5Gbps Ethernet adapter), ethtool didn’t really report the right link speed, but I was able to get roughly 8Gbps throughput between both machines (which is pretty good).
Testing with the VMs, however, yielded some interesting results.
OPNSense 24.10 and 25.1
The first firewall software I tried was OPNSense (which is what I would go for in a fully load-balancing setup), and to begin with I created a 2-core VM and set it up with direct PCI passthrough for the network devices, but unfortunately OPNSense (and FreeBSD in general) does not support the AQC113C chipset (there was some degree of support for the AQC107, but that is neither mainstream nor compatible), so… I cheated.
To get OPNSense 24.10 to actually use the 10GbE ports, what I did was create two new Linux bridge devices in Proxmox and mapped them into the VM as VirtIO devices. Those were recognized and worked, but I wasn’t really able to get past 7Gbps in a point-to-point test since the host still had to handle the packets and forward them to the VM.
As a side note, the bridging setup would also not be ideal for a load-balancing firewall because it won’t immediately fail over on basic tests like link status changes, but at least it allowed me to test what would be my preferred option for firewall software.
Now, it is important to note that given the way PCI pass-through works, OPNSense would have exactly the same issue running on bare metal on the R2Max, since there are no AQC113C drivers available–and that all the above also applies to the latest version (25.1)
Also (quite annoyingly) both 24.10 and 25.1 seemed to default to running a DHCP server immediately upon install, which made a mess of my local LAN via the management interface. I don’t remember this being the behavior a few years back, but if you test OPNSense, try to avoid plugging it onto your LAN while installing it…
OpenWRT 23.05
Things went a lot better with OpenWRT: again, I mapped the PCI devices directly to the VM, and even though the AQC113C NICs weren’t recognized by the base OS, a quick opkg install kmod-atlantic got them working without any hitches.
Without the need to go through Proxmox and VirtIO, I got well past 8Gbps on a point-to-point iperf test against my TerraMaster, although I was just using 2 CPU cores for the VM.
OpenWRT 24.10
Since testing for this took a fair amount of time, OpenWRT 24.10 actually came out in the meantime, so I set everything up again and tested that as well–but this time I took the time to hack together a Makefile
stub for when I need to do it again:
.PHONY: create-openwrt-vm

create-openwrt-vm:
    @echo "Fetching the latest OpenWrt version..."
    VER=$$(curl --silent "https://api.github.com/repos/openwrt/openwrt/releases/latest" | \
        grep '"tag_name"' | sed -E 's/.*"([^"]+)".*/\1/' | sed 's/v//') && \
    echo "Latest version: $$VER"

    @echo "Downloading OpenWrt image..."
    wget -O openwrt.img.gz "https://downloads.openwrt.org/releases/$$VER/targets/x86/64/openwrt-$$VER-x86-64-generic-ext4-combined.img.gz"

    @echo "Checking downloaded image size..."
    du -sh openwrt.img.gz

    @echo "Decompressing the image..."
    gunzip openwrt.img.gz

    @echo "Resizing the image to 5G..."
    qemu-img resize -f raw ./openwrt.img 5G

    @echo "Setting up VM parameters..."
    VM_NAME="OpenWrt" && \
    VM_ID=$$(pvesh get /cluster/nextid) && \
    RAM=2048 && \
    CORES=1 && \
    BRIDGE=vmbr0 && \
    IMAGE=./openwrt.img && \
    STORAGE=local

    @echo "Creating the VM..."
    qm create $$VM_ID \
        --name "$$VM_NAME" \
        --memory $$RAM \
        --cores $$CORES \
        --cpu cputype=kvm64 \
        --net0 virtio,bridge=$$BRIDGE \
        --scsihw virtio-scsi-pci \
        --numa 1

    @echo "Checking storage status..."
    pvesm status

    @echo "Importing disk to the VM..."
    qm importdisk $$VM_ID $$IMAGE $$STORAGE

    @echo "Configuring VM disk..."
    qm set $$VM_ID --scsihw virtio-scsi-pci --virtio0 "$$STORAGE:$$VM_ID/vm-$$VM_ID-disk-0.raw"

    @echo "Setting serial and VGA..."
    qm set $$VM_ID --serial0 socket --vga serial0

    @echo "Configuring boot options..."
    qm set $$VM_ID --boot c --bootdisk virtio0

    @echo "Enabling VM to start on boot..."
    qm set $$VM_ID --onboot 1

    @echo "OpenWrt VM creation and configuration completed successfully."
However, there wasn’t a lot of difference performance-wise in point-to-point testing–maybe slightly above, but one thing that was common to both of them was that ethtool simply refused to report link speeds above 5000Mbps:
    Supported link modes:   10baseT/Full
                                100baseT/Full
                                1000baseT/Full
                                10000baseT/Full
                                2500baseT/Full
                                5000baseT/Full
    ...
    Speed: 5000Mb/s
    Duplex: Full
    Auto-negotiation: on
And, of course, I checked that the SFPs on the Sodola switches were reporting 10Gbps link speeds (I had to swap one cable early on to ensure negotiation worked, but that was to be expected since I have many generations of patch cables, some of which 20 years old).
Debian 12 and Ubuntu 24.04
The above is why I also set up Debian and Ubuntu VMs–I hoped that the Ubuntu kernel, at least, shipped with better drivers, but as it turned out… Nope. Same behavior, pretty much identical performance in point-to-point testing.
Router/NAT Testing
After the initial round of tests, and for a couple of weeks, I plugged my Mac Mini into the R2Max directly using the 5Gbps USB adapter i reviewed a while back and used OpenWRT to route to my LAN (and to the outside). The double NAT I had to setup was a bit annoying at times, but speeds on my LAN were as good as if I was directly connected to the TerraMaster.
I have no doubt that removing what little overhead there might be from Proxmox will allow the R2Max to do near-wirespeed routing, but (again) given that I don’t have enough 10GbE ports, I was limited to using 2.5 and 5GbE connections.
However, that might actually be a good thing. One thing to note is that when using the Sodola switches and connecting directly to their SFPs, they got quite hot–but the R2Max, even though noticeably warmer to the touch on the area above the 10GbE NICs, never got anywhere near painfully hot. Then again, it’s Winter, and ambient temperatures were always around 22oC.
I’m actually quite curious to see how warm 10GbE ONTs and home gateways actually get…
Catastrophe
As I was wrapping up my testing last weekend and preparing to transfer console logs, take BIOS screenshots, etc., I decided to upgrade the RAM to see how the BIOS coped with larger SODIMMs, have another go at RAM benchmarking and… somehow I fried not just the machine itself, but also one of my (very) expensive 48GB 5600MT/s SODIMMs:
I initially thought this was due the very tight fit around the RAM slot and some subtle misalignment I couldn’t really see (which in retrospect is rather unlikely, since the module slotted in and clipped on fine), but after poking at the remains I think the cause was a bit more prosaic–the module itself was too tight a fit.
It looks like at least one of the SMD components on the very tightly packed SODIMM touched the host PCB or the metal casing in a place that wasn’t properly insulated–it’s really hard to tell from the way things were burned off on either part, but a couple of SMD components dropped off the SODIMM, and I don’t see that happening as a part of something like a bent connector pin–even though the connector eventually got charred to bits.
Missing Data
This is why I don’t have my usual slideshows of BIOS settings nor updated ollama and iperf outputs–only what little I noted down as I went along.
I might be able to rescue them from the SSD, but right now I just don’t have a spare machine (or the time) to go through that.
Post-Mortem
I discussed the matter with iKOOLCore and they assured me they will revise the insulation around the RAM port–they were as suprised as I was at this outcome, and asked me for high-res photos of the damage to help them understand what happened (hence my getting out my soldering microscope and taking a closer look).
I also made a mental note to never again try upgrading review machines (that particular SODIMM came from my TerraMaster, and it was quite an investment, plus I had to downgrade it to a much smaller 2x8GB configuration since I wanted it to have both slots populated).
Autopsy
Since the machine was dead, I ended up disassembling it completely:
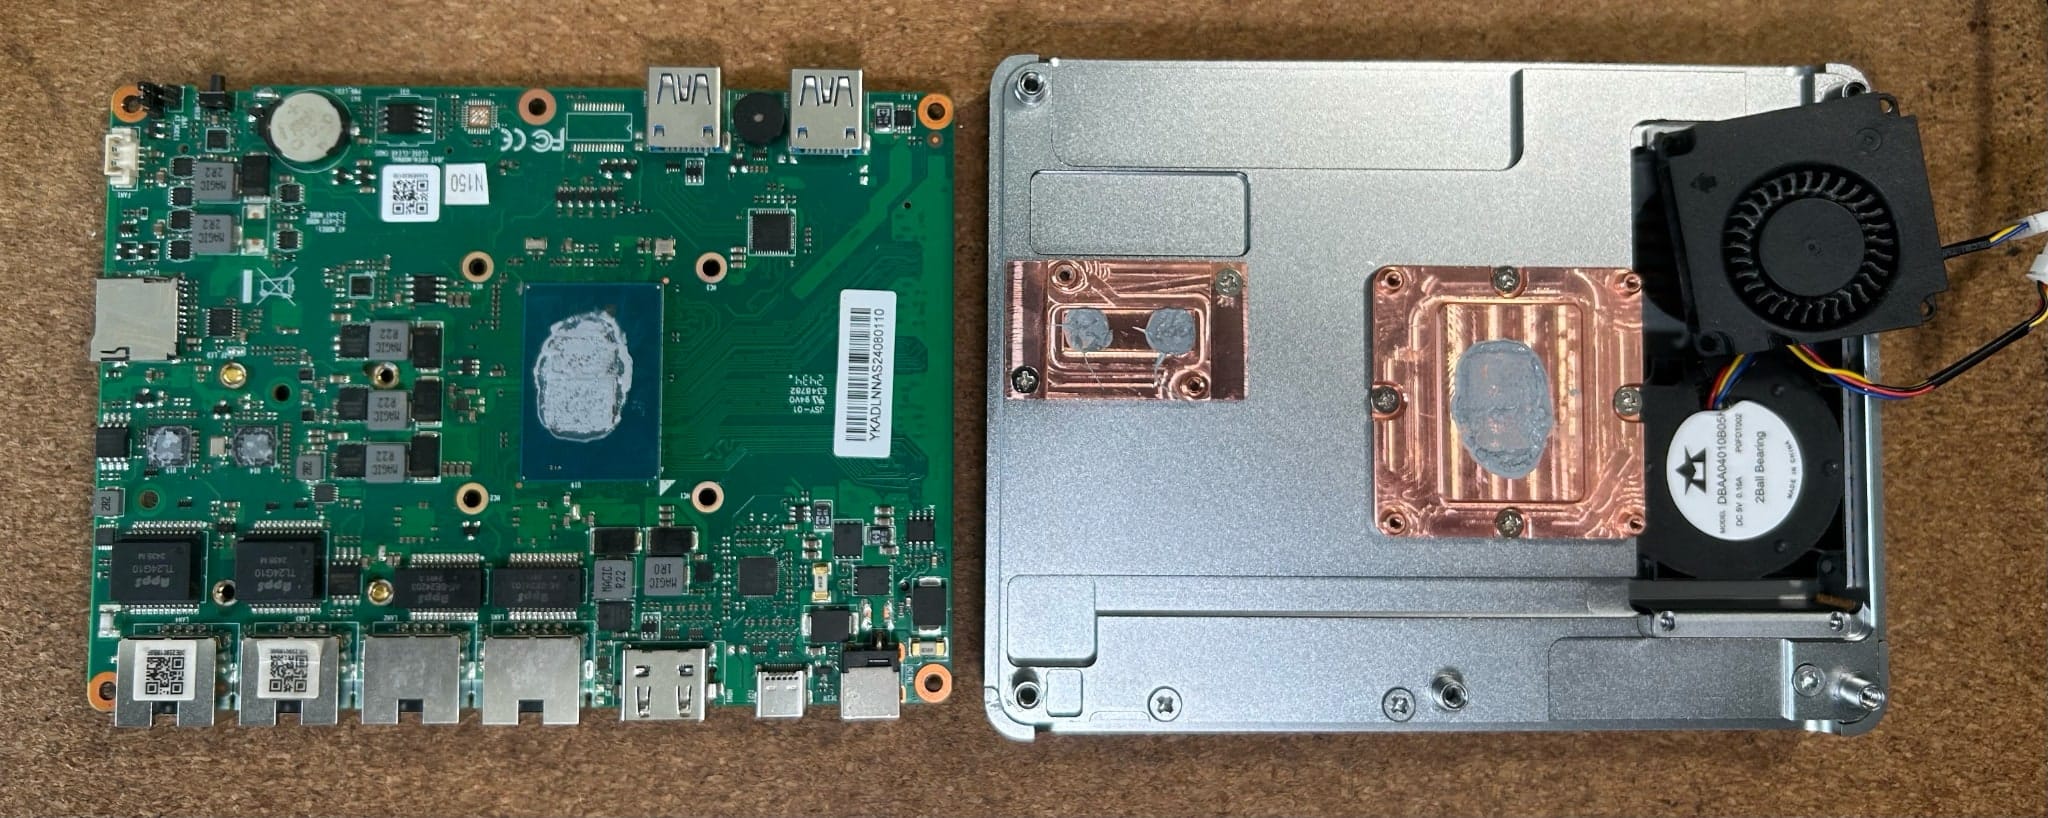
This allowed me to check on the thermal solution, and (all things considered) I was quite satisfied with the fact that both the 10GbE interfaces share a copper shim that ensures heat dissipation onto the massive heatsink. I also had a good look at the fans used–they are side blowers, and do indeed force air through the heatsink fins, although I still think they are too small (and were already accumulating a bit of cruft).
But on the whole, I found the engineering approach to be simple and effective. I just have my doubts about the SODIMM slot, of course…
Conclusion
Even if it came to an untimely demise, I actually quite liked the R2Max (and will likely get one or something very much like it if I ever manage to get a second fiber connection). Overall, it offers solid performance for home or small office use, and if you’re going to deploy it on an industrial setting, the fan noise is not likely to be an issue.
If you want to run OPNSense, though (or any NetBSD-based firewall OS), you might want to look elsewhere, since the AQC113C driver situation is unlikely to be sorted out anytime soon and the Marvell chipsets are only really supported in Linux.
Other than that, well… I obviously hope that iKOOLCORE will revise the SODIMM slot (although, again, I honestly don’t think it was ever designed to cope with such a closely packed module).
Ah well.