 Rui Carmo
This is a tale of ancient wizardry, yearning for control, failed prototypes, and just plain bad timing. Let us begin.
A long time ago, in what seems like an alternate universe right now, I got a Logitech Cyberman 2 as part of my extended dabbling with 3D modeling software like Caligari TrueSpace. It looked like this:

Yes, that’s a DB-9 plug. Yes, it was that sickly shade of green, and intended to be used dual-handed (if I recall correctly, Descent supported it).
And yes, I’ve been doing 3D modelling for a long time. And with my renewed interest in 3D printing came more of it, and my interest in getting a dedicated input device peaked again, so I’be been wanting one of these for a while:

Spoilers
I bought one. Unsuspectingly, at what was a fairly decent price. And I did it because I spent almost six months trying to build my own (with the degree of perfectionism I’m stubbornly prone to) and decided I wasn’t going to wait until I had ironed out all the kinks–and perhaps I should have.
But this isn’t an ordinary review. Partly because I am going to walk you through all the things I researched and tried, partly because I may well end up doing some more tries again later, but mostly because it might be useful for someone–either the code or my conclusions including the plot twist at the end.
The Alternatives
As usual, I did my research. As it turns out, there are almost literally dozens of open source SpaceMouse alternatives out there.
Most of them try to emulate regular mice or a combination of keyboard and mouse inputs, and the general pattern is:
- A few sensors, buttons or joysticks.
- An Arduino or
RP2040that reads those and emulates mouse or keyboard events. - Some sort of hacky software (or extension to a specific CAD program) that makes it all “work” in a moderately kludgy way.
But the two most interesting to me were:
- The Space Mushroom, which uses 3 analog joysticks to provide full
6DOFmotion input–a neat and cheap approach at the problem. - The DIY SpaceMouse for Fusion 360, which uses a magnetometer and has a very nice design, but isn’t really
6DOF.
But both of them had weird input solutions, and I wanted the “real deal”–i.e., something that sent out the same kind of HID reports as a regular SpaceMouse:
# spacemouse.py
from usb_hid import Device

SPACEMOUSE_REPORT_DESCRIPTOR = bytes((
  0x05, 0x01,           # Usage Page (Generic Desktop)
  0x09, 0x08,           #  0x08: Usage (Multi-Axis)
  0xa1, 0x01,           # Collection (Application)
  0xa1, 0x00,           #   Collection (Physical)
  0x85, 0x01,           #     Report ID
  0x16, 0x00, 0x80,     #     Logical minimum (-500)
  0x26, 0xff, 0x7f,     #     Logical maximum (500)
  0x36, 0x00, 0x80,     #     Physical Minimum (-32768)
  0x46, 0xff, 0x7f,     #     Physical Maximum (32767)
  0x09, 0x30,           #     Usage (X)
  0x09, 0x31,           #     Usage (Y)
  0x09, 0x32,           #     Usage (Z)
  0x75, 0x10,           #     Report Size (16)
  0x95, 0x03,           #     Report Count (3)
  0x81, 0x02,           #     Input (variable,absolute)
  0xC0,                 #   End Collection

  0xa1, 0x00,           #   Collection (Physical)
  0x85, 0x02,           #     Report ID
  0x16, 0x00, 0x80,     #     Logical minimum (-500)
  0x26, 0xff, 0x7f,     #     Logical maximum (500)
  0x36, 0x00, 0x80,     #     Physical Minimum (-32768)
  0x46, 0xff, 0x7f,     #     Physical Maximum (32767)
  0x09, 0x33,           #     Usage (RX)
  0x09, 0x34,           #     Usage (RY)
  0x09, 0x35,           #     Usage (RZ)
  0x75, 0x10,           #     Report Size (16)
  0x95, 0x03,           #     Report Count (3)
  0x81, 0x02,           #     Input (variable,absolute)
  0xC0,                 #   End Collection

  0xa1, 0x00,           #   Collection (Physical)
  0x85, 0x03,           #     Report ID
  0x15, 0x00,           #     Logical Minimum (0)
  0x25, 0x01,           #     Logical Maximum (1)
  0x75, 0x01,           #     Report Size (1)
  0x95, 32,             #     Report Count (24)
  0x05, 0x09,           #     Usage Page (Button)
  0x19, 1,              #     Usage Minimum (Button #1)
  0x29, 32,             #     Usage Maximum (Button #24)
  0x81, 0x02,           #     Input (variable,absolute)
  0xC0,                 #   End Collection
  0xC0                  # End Collection
))

KNOWN_DEVICES = [
    ("3Dconnexion", "SpaceMouse Compact", 0x256f, 0xc635),
    ("3Dconnexion", "SpaceMouse Pro Wireless (cabled)", 0x256f, 0xc631),
]

def get_device():
    return Device(
        report_descriptor = SPACEMOUSE_REPORT_DESCRIPTOR,
        usage_page=0x01,               # Generic Desktop Control
        usage=0x08,                    # Multi-Axis
        report_ids=(1,2,3,),           # Descriptor uses these three report IDs
        in_report_lengths=(6,6,2,),    # This controller sends 6 bytes in its report.
        out_report_lengths=(0,0,0,),   # It does not receive any reports.
    )
So I decided to roll my own.
Trying Mushrooms
The first one I built was a mushroom prototype, which looked like this:
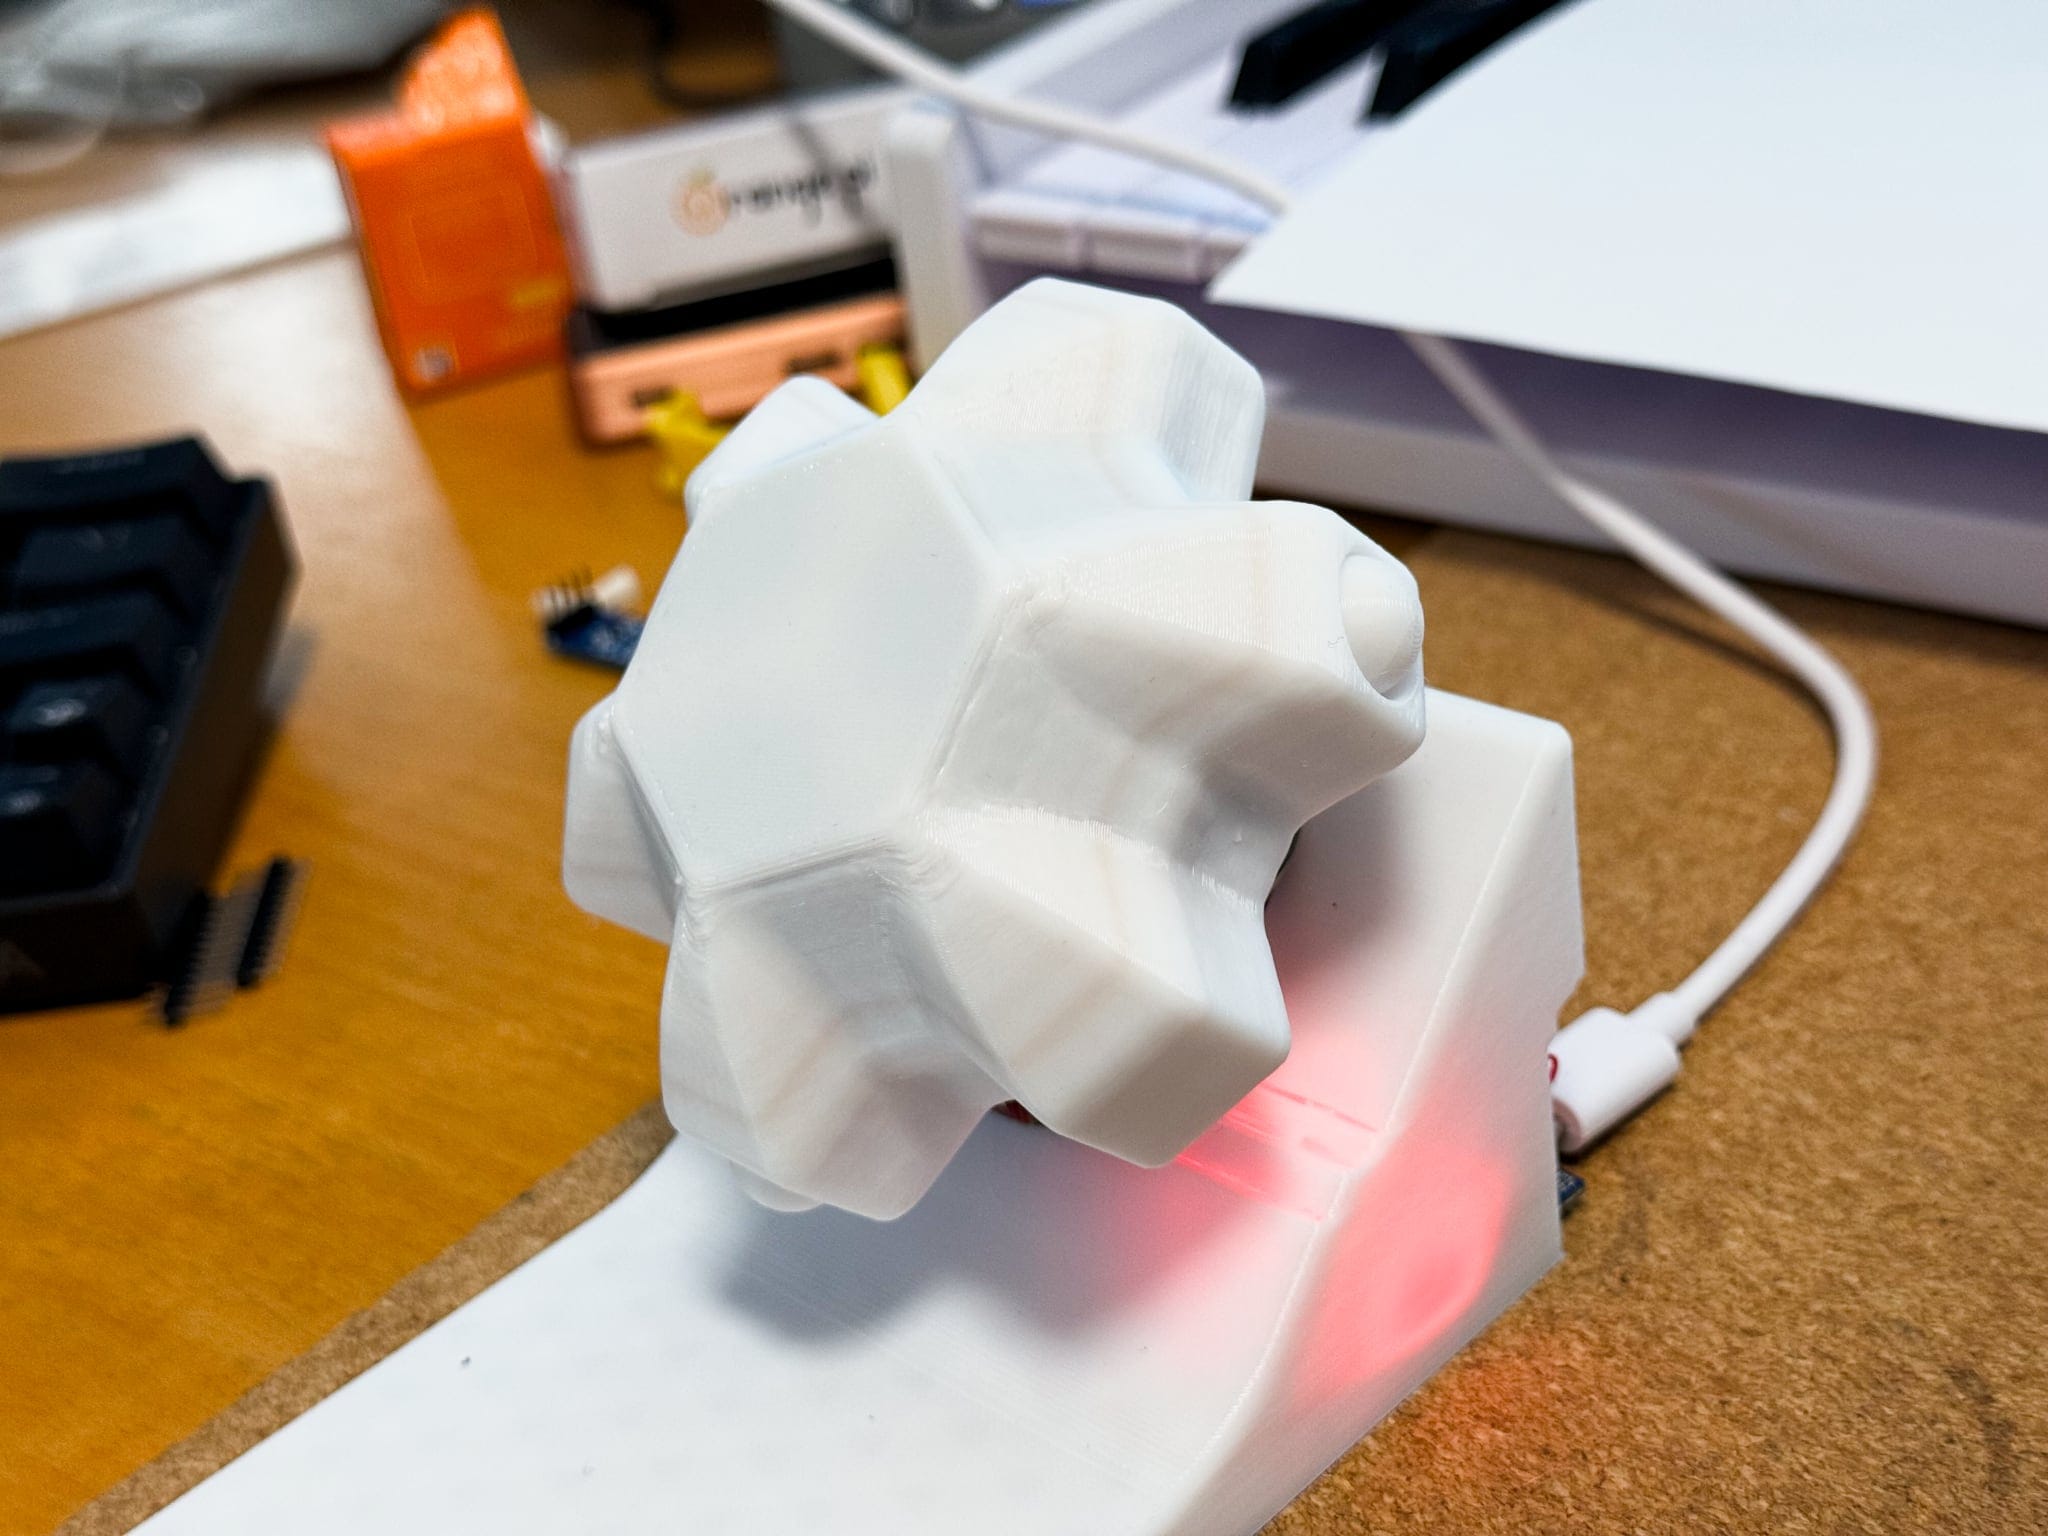
If you click through to my older post you’ll see the Arduino code for handling the inputs and sending out HID reports in the right format, which worked great.
The 3DConnexion driver was perfectly OK with it, and it all worked well enough for me to validate that a SpaceMouse would indeed be useful in all the programs I needed to use it with (including, to my surprise, OrcaSlicer).
But the build itself was not without some issues–besides my having to fiddle with the transformation matrix for a good while, the ball joints required a couple of re-prints to have adequate tolerances, and even with the knob assembly printed in PETG (and the joints then finally sliding fairly smoothly in their sockets), there were always enough gaps that the movement felt a little uneven–plus the fitting quickly went a little loose.
The saving grace of that approach was that it was trivially cheap and produced absolute motion coordinates right off the bat–which, as you will see, considerably reduces the complexity of things.
Accelerating a Tad Too Much
I decided to move on from that and tried to do a “better” version with an MPU-9050. Since the DIY SpaceMouse has a pretty nice design, I took the models and adapted them to fit a WaveShare RP2040 Zero and theMPU:
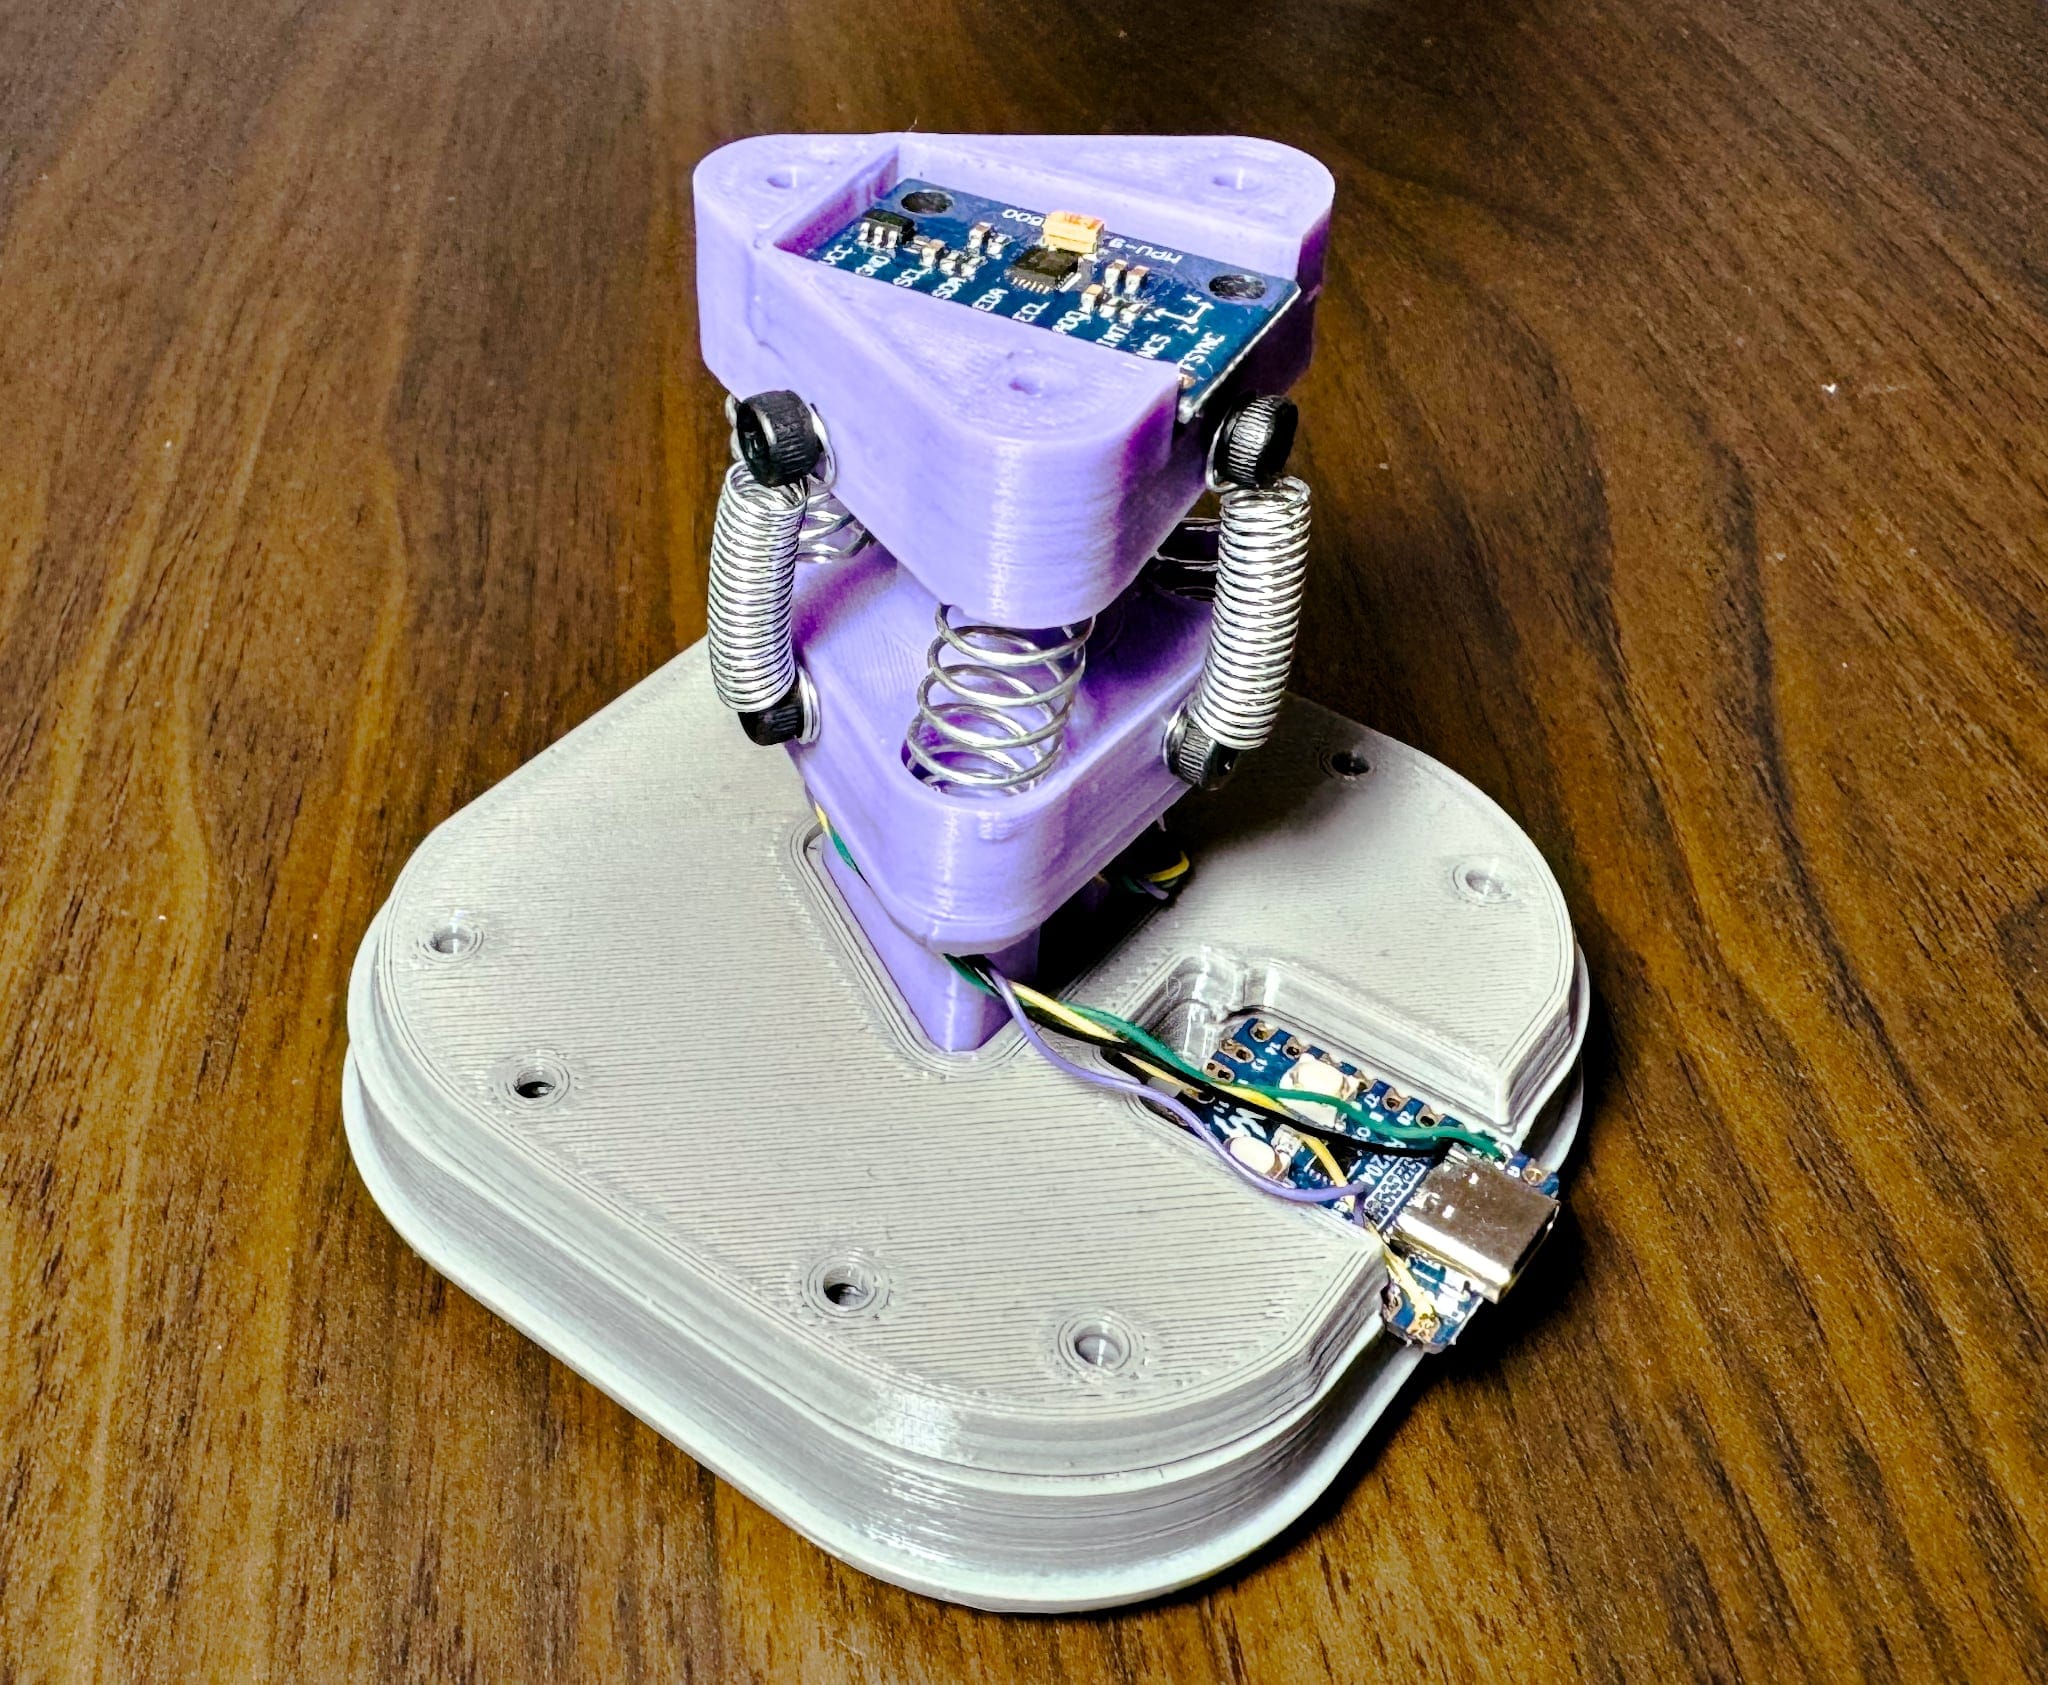
As it turned out, the original design has two important flaws:
- The spring-loaded mechanism is very prone to vibrations and back pressure when you let go.
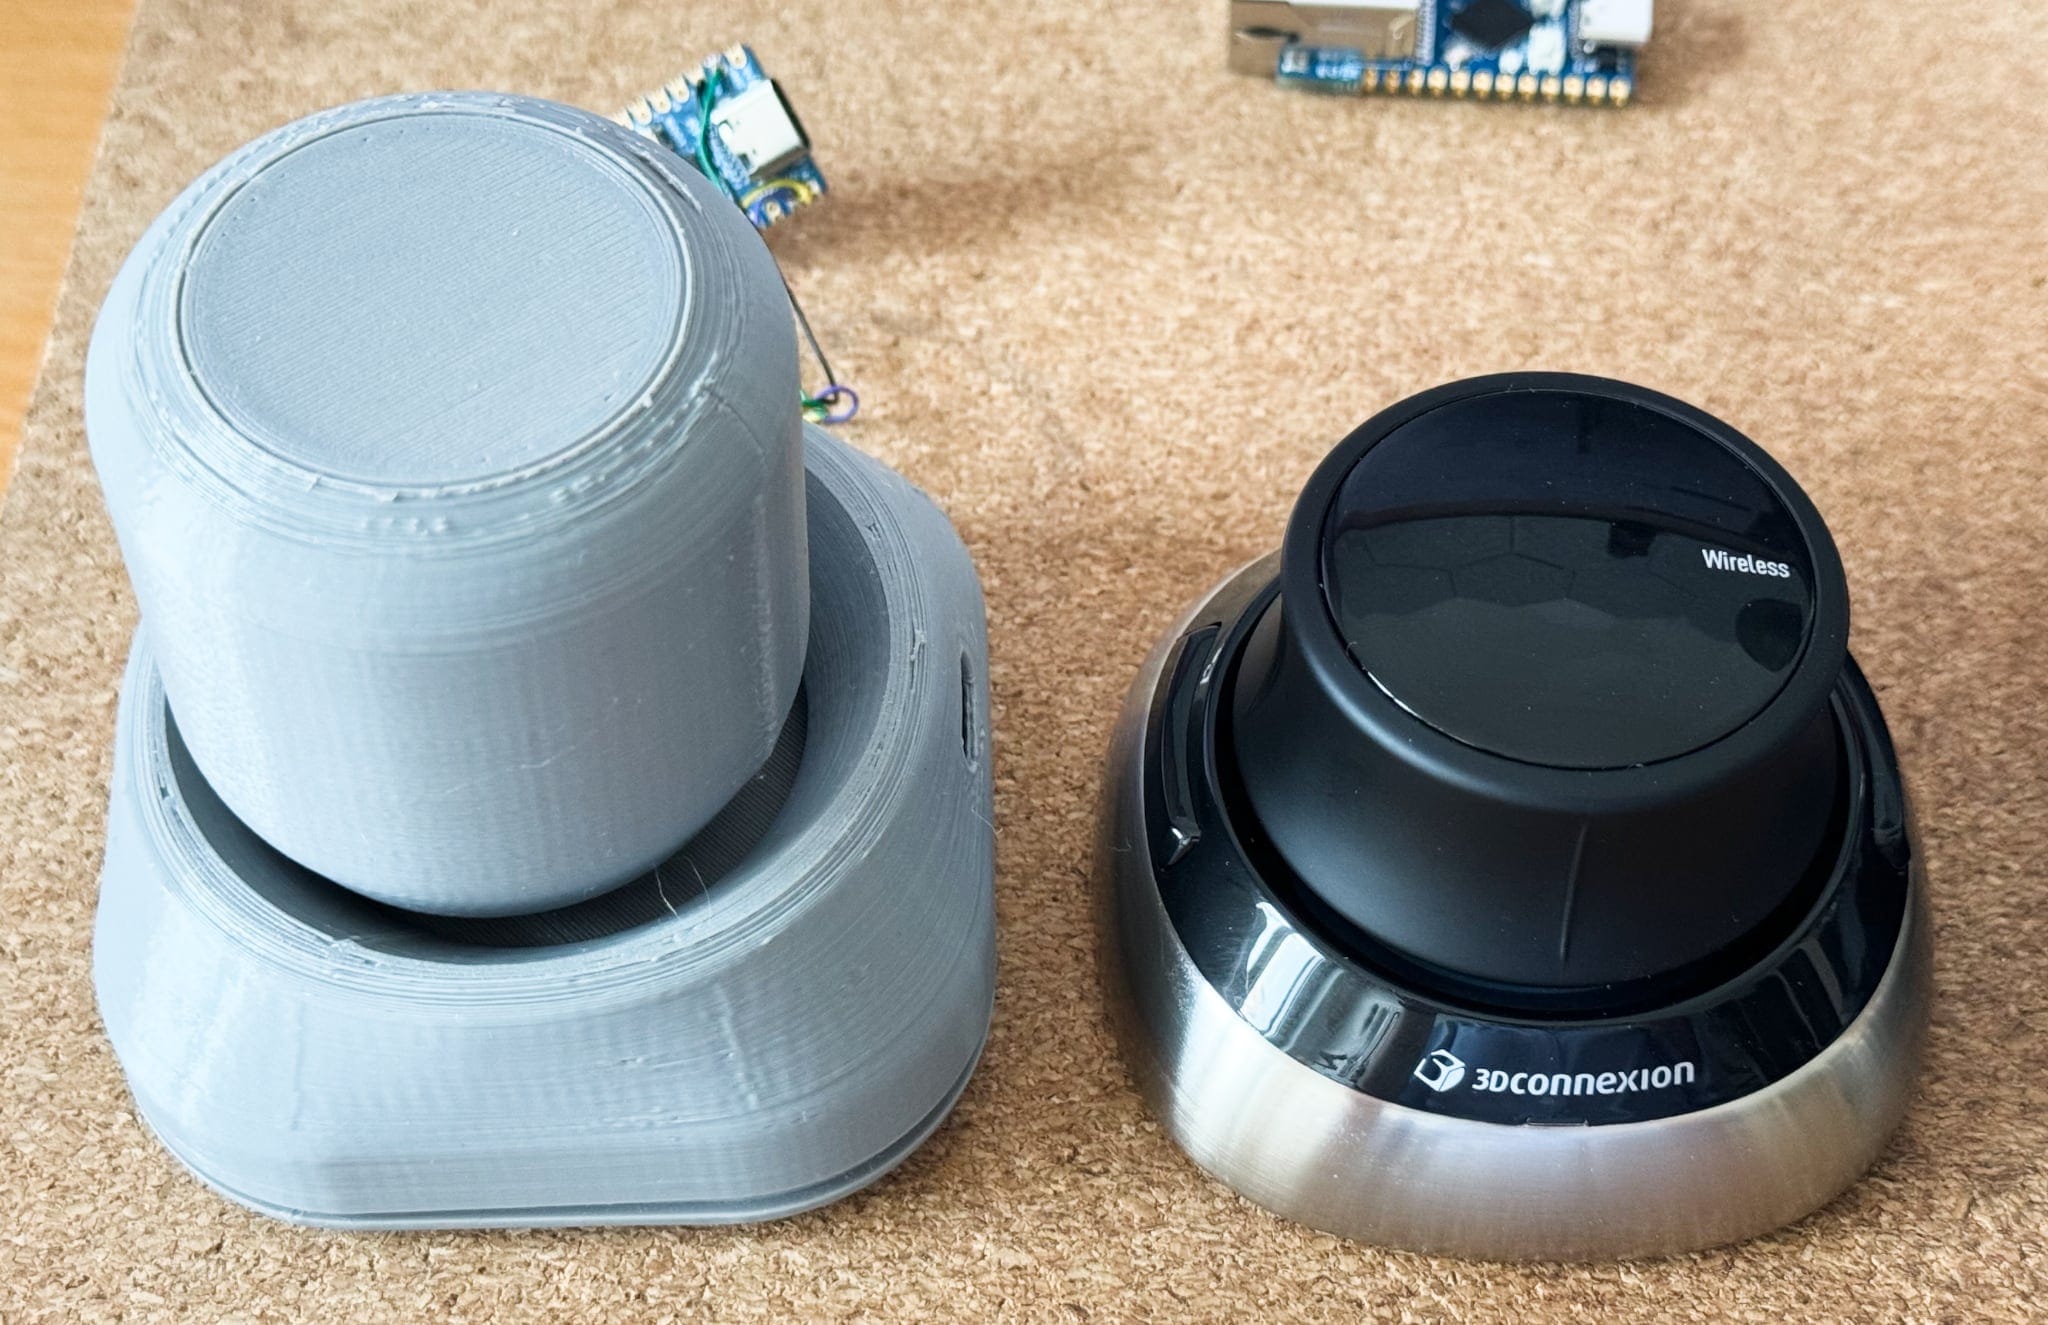
- Ergonomically, it’s nowhere near the comfort of the real thing–it’s much too tall and forces my wrist into an uncomfortable position.
That difference in height when you put the real thing alongside is pretty stark:
But the real challenge wasn’t the physical design–it was getting useful data out of the sensors and handling the kinematics.
If it moves, it’s Physics
Capturing 6DOF motion with this prototype wasn’t as simple as I expected. It took me ages to get something that almost worked, but I never got to a state where the code and calibration were usable enough–and I soon realised I was wasting my time without the proper components.
First of all, the MPU-9050 boards I got were actually MPU-60501–they had an accelerometer and a compass, but no magnetometer, so I couldn’t get “absolute” xyz coordinates–only instant acceleration, and very noisy readings altogether.
That’s easy enough to filter out, but it’s a bit annoying to have a constant Z acceleration of 9.8m/s2 (also known as gravity…), and the physical setup meant that when I let go of the mouse, the vibrations where pretty hard to dampen before they generated drift (you get a few swings across multiple axis, and errors start to accumulate really fast, hence–drift).
I probably could fix that by using the field intensity of a magnet placed vertically as a replacement for the Z axis, for instance (and from what I read I can also get some sort of stable XY plane readings), but, again, I didn’t have a magnetometer.
So I tried doing without, but integrating acceleration to estimate absolute position is just hard.
After a few nights fiddling with Kalman filters and researching similar approaches, and even as I tried to order actual MPU-9050 boards, I realised that no matter how I accounted for my time, I had already invested far more time than the cost of getting a real device.
Worse, I had other projects to do that required my actually… modelling stuff. So I decided to shelve my prototypes.
What I Learned
Well, I learned a lot about Kalman filters and kinematics (which I don’t regret at all). I also explored some weird corners of both the Arduino IDE and PlatformIO (which I have also been using for a couple of ESP32 projects, so there was a bit of synergy there).
But the nicest hardware-related thing I learned (even though I already had a notion of it being true) was that the RP2040 is a beast. I switched to CircuitPython halfway through this, and the performance is perfectly adequate to use for high-resolution HID devices and a delight to code in. I was able to iterate on the maths a lot faster, just save and wait for the device to reload–no compilation and refreshing steps required.
The only thing I had a little bit of trouble with was setting up the USB device. Since that’s not immediately obvious from the documentation, here’s the meat of it (the rest are libraries and the device code from above):
boot.py
# boot.py
from usb_hid import enable
from spacemouse import get_device, KNOWN_DEVICES
from supervisor import set_usb_identification
set_usb_identification(*KNOWN_DEVICES[0])
enable((get_device(),))
code.py
# code.py
from time import sleep
import math
from board import GP0, GP1
from busio import I2C
from mpu6050 import IMU

# Initialize I2C and MPU6050
i2c = I2C(GP1, GP0)
mpu = IMU(i2c)

# Initial velocity and position
vx, vy, vz = 0, 0, 0
x, y, z = 0, 0, 0

while True:
    # raw inputs
    ax, ay, az = mpu.acc
    gx, gy, gz = mpu.gyr
    print(f"x: {ax}:{gx}, y: {ay}:{gy}, z: {az}:{gz}")
      # a bazillion of futile attempts removed
    sleep(0.1) # for debugging
    # don't forget to only send out HID updates
    # whenever a small threshold is reached
The SpaceMouse Wireless Itself
By this time I already knew how a SpaceMouse really works, and it’s a pretty great mechanical design–the optical sensors provide absolute position inputs (so no dealing with acceleration), and the mechanism has no bounce whatsoever.
So when I saw that the Wireless version was actually cheaper than the wired one, I took the plunge. Alas, I should have considered why that was so…
Physically, the device is pretty awesome. The first impression you get when you pick it up is that it is heavy.
Not “I dropped some buckshot into my 3D print” heavy, but more along the lines of “who left Mjölnir on my desk?” heavy. So there is no way you’re going to move it around by accident, and the base is very grippy.
The second is that the ergonomic, sensitivity and responsiveness are great–I can move about in Shapr3D and Fusion360 with a precision and finesse that my mushroom prototype lacked, and my wrist sits in a very comfortable position.
The only real downsides to the model I got were:
- A proprietary 2.4GHz dongle
- A micro-USB port, which is very dated
Also, weirdly enough, both the SpaceMouse and the cute little travel case it came with lack a place to securely store the dongle. Good thing I didn’t intend to travel with it.
The Catch
Of course, given my usual luck with these things, as I tidied up this draft for publishing I ended up figuring out why it was discounted: The model I got was just replaced by a Bluetooth version with USB-C. Drat.
I know you can’t win them all, but this is why I usually don’t rush any of my personal projects–something always happens that makes me change direction or fine tune things. And I really need to start applying that rationale to snap purchases…
Right now, the SpaceMouse is the one changing direction–it’s back in its box waiting to be returned, even as I order the Bluetooth version. And in keeping with my usual karma, I have a feeling I’ll get a couple of MPU-9050 next Monday and manage to get a working hack going the day before the new model shows up on my doorstep…
Update: I didn’t. The
MPU-9050breakouts I got were both fakes, and only came with anMPU-6050. Again.
Ah well. Never rush things, kids. It just leads to more stuff to fix.
-
This is apparently widespread when you order from AliExpress like I did. ↩︎