Tao of MacThe Tao of Mac is the personal wiki of Rui Carmo, featuring a technology-oriented blog, links to articles, several compilations of resources around various key technology topics, and a collection of photos and videos.https://taoofmac.com/atom.xml2026-04-23T15:31:48+00:00CC Attribution-NonCommercial-NoDerivs 3.0Review Policyhttps://taoofmac.com/space/site/review_policy?utm_content=atom2022-01-01T00:00:00+00:002026-04-23T15:31:48+00:00Rui Carmohttps://taoofmac.comThis site has been around for over 20 years, so it was only natural that I would write about stuff I purchased. Those pieces became popular enough that people started asking me to review things, and eventually I started getting review units/copies from vendors.
So I thought it would be a good idea to have a policy in place to make sure everyone is on the same page:
I don’t do paid reviews. I realize there is a fine line between getting “free” stuff to review and being paid to review it, but I’m not interested in crossing it–this site does not generate any form of income for me, and I’d like to keep it that way.
I only review things I have a personal interest in (i.e., things that I would ordinarily have an actual use for, learn from or would otherwise consider buying) or that would be interesting for the people I occasionally provide consulting services to.
I don’t do scripted reviews (i.e., there is no content placement, I write about the features I find important, etc.)
There are no editorial tweaks–vendors get to read my reviews at the same time as the general public.
I don’t participate in vendor affiliate programs–I’m OK with handing out discount codes or linking to the vendor’s site with a utm referral tag (so they can check attribution), but other than my usual (automatic) Amazon/AliExpress linking (which I started using for books decades ago and now do for electronics components), there are no other affiliate links on this site to ensure I don’t get any direct revenue from the reviews.
When applicable, scripts used for performance measurements and benchmarks will be published here or on GitHub.
Benchmarking will be focused on the aspects I value (although I will try to use standard tooling where appropriate).
I review what’s “in the box”, not what’s promised for future releases or what might be available in a future version.
I’m also open to reviewing books–I’ve done pre-publishing reviews in the past, and I’m always happy to read and review books on topics I’m interested in.
I have also recently started a YouTube channel called @TheTaoOfTech that I am slowly populating with videos that complement the content on this site. I will try to keep the same review policy there, although I might do some sponsored videos in the future (but I will always disclose that).
So if you have something you’d like me to review, please get in touch and we’ll take it from there.
Many people ask me about page views, statistics, Google rankings, etc. This is what I have to say about it:
This site does not use Google Analytics for privacy reasons, nor any other mainstream analytics or tracking platform. The flip side of that is that it is (incorrectly) down-ranked in just about every single public site ranking.
It does, however, use Cloudflare Analytics, which is privacy-preserving and a more accurate than most other tracking sites because it automatically filters out bots, referrer spam and other things that contribute to site traffic inflation. However, it can provide some interesting figures (updated for August 2024):
Over 2M monthly pageviews (and steadily rising).
Over 110K unique human visitors per month, mostly from the US, UK, Germany, and Singapore (if I add in figures from Japan and Australia, I get almost as much traffic from APAC than from the UK, which has always been interesting to me).
You can check this PDF for a sample Cloudflare traffic report.
This audience reach comes down to four main factors:
My emphasis on consistently solid technical content–which ensures continued reader interest.
No fake audience engagement on site (I interact with readers directly via e-mail correspondence)
Posts are automatically broadcast to X/Twitter, Mastodon and a few sites that consume my RSS feed directly.
I get a lot of traffic from places like Reddit, Hacker News, etc. (especially when I post something with an unusual technical angle).
All of my posts are automatically broadcast to my X/Twitter and Mastodon accounts, and I also post occasional links to my LinkedIn profile.
I am also (slowly) starting to produce YouTube videos. This will be a slow process, as I am not a professional video editor and I have no intention of becoming one. I will, however, try to produce some videos that complement the content on this site, and am curious to explore the medium a bit more (and not just in Youtube).
Links to all my social and video accounts can be found on the site footer.
]]>Agentic Skillshttps://taoofmac.com/space/ai/agentic/skills?utm_content=atom2026-02-21T09:00:00+00:002026-04-23T09:11:40+00:00Rui Carmohttps://taoofmac.comReusable skill modules for agentic systems: prompt packs, tool recipes, and structured workflows that you can load into a running agent, adapt for a project, or keep around as references when shaping instruction sets.
These live here so the main Agentic Systems page can focus on frameworks, platforms, and infrastructure.
Drop-in prompt/skill that applies a 6-step critical thinking protocol (Sagan, Karpathy, Lifton, Popper) to counter LLM agreeableness bias
]]>Artificial Intelligencehttps://taoofmac.com/space/ai?utm_content=atom2004-01-22T21:22:58+00:002026-04-21T17:39:30+00:00Rui Carmohttps://taoofmac.comThat grand, spacious (and long ignored) branch of computing that I never really found a reason to graduate in (big mistake I only realized 30 years later) and that, these days, deals not just with thinking machines (so-called “hard” AI), but mostly with enhancing the usefulness of machines in general by exploring mechanisms to express and manipulate harvested knowledge.
Or just pretty pictures and sophisticated text generation. Either way, it seems we’re currently between AI winters, with a lot of investment in GPU hardware that still needs to prove itself consistently, measurably useful in real life use cases.
High-performance Rust nearest-neighbor vector search library with Python bindings and zero configuration; the CPU backend uses rayon/SIMD while the GPU backend runs on wgpu compute, yielding cosine similarities via optimized dot products.
Offers optional ANN IVF reranking, batch queries, pandas/polars/numpy DataFrame outputs, internal caching, and direct loading from .npy, .npz, and .parquet files.
Autonomous Apple Silicon LLM research suite combining ANE, MLX, and legacy MPS training paths, built on Karpathy’s autoresearch loop with detailed platform instructions for the agent.
GPU/CPU hybrid LLM inference engine that preloads hot neurons to the GPU, offloads cold states to CPU, and exposes llama.cpp-compatible examples along with PowerInfer GGUF weights and predictor tooling for fast local serving on consumer GPUs.
a CCTV viewer that connects to RTSP streams and performs real-time object tagging using YOLO and ollama
]]>Large Language Modelshttps://taoofmac.com/space/ai/llm?utm_content=atom2025-05-01T17:30:00+00:002026-04-21T08:46:30+00:00Rui Carmohttps://taoofmac.comThis page is a collection of notes and links related to large language models (LLMs), their applications, and the underlying technology. It serves as a reference for understanding the current state of LLMs, their capabilities, and their limitations, and is the result my cleaning up the main AI page and splitting it into more manageable sections. It is not exhaustive, but it should provide a good starting point for anyone interested in the topic.
a multi-node AI orchestration platform for deploying tool-using agents across server clusters, with CLI/browser interfaces, governance, and MCP support.
A pure C/Objective-C+Metal inference engine that runs the 397B MoE model on Apple Silicon laptops using SSD streaming, 2-bit quantization, and custom GPU kernels.
]]>John Ternus to Become Apple CEOhttps://taoofmac.com/space/links/2026/04/21/0730?utm_content=atom2026-04-21T07:30:00+00:002026-04-21T11:52:40+00:00Rui Carmohttps://taoofmac.com
So this is happening. Cook moves to executive chairman, Ternus takes… his turn at the helm.
Cook turned Apple into the most efficient manufacturing and logistics company on the planet–something I’ve been reading about in detail via Patrick McGee’s Apple in China, which makes a painfully convincing case for just how deep that dependency runs. He also built a massive services and content business on top of it.
But despite all of that, the soul of the company has felt increasingly bland, and the accumulating faux pas in software quality–culminating in the Liquid Glass debacle and the general state of macOS and iPadOS–have tested even the most faithful.
Ternus is a hardware guy, and very likely deeply involved in the MacBook Neo. My hope is that he has a better feel for what good product actually looks like, and can drive the kind of change that has been overdue for a while now.
I’d start with fixing macOS and iPadOS, preferably in a way that matches what people actually expect from their devices rather than what a design committee thinks looks modern.
Whether that happens is another question entirely. But at least the new CEO isn’t from the services side.
(It would also be nice if Apple realized that remote work is a thing, but I think that boat has sailed)
]]>Agentic Systemshttps://taoofmac.com/space/ai/agentic?utm_content=atom2025-12-23T10:00:00+00:002026-04-20T18:27:07+00:00Rui Carmohttps://taoofmac.comNotes and resources on building and operating agentic AI systems, covering orchestration frameworks, task routing, memory, and evaluation approaches that extend baseline LLM capabilities.
Pi.dev is the home of the Pi coding agent and its ecosystem of extensions, adapters, and clients. See the Pi.dev Ecosystem page for the curated project list.
Actor-based agent platform that bundles state, storage, workflows, scheduling, and WebSockets into self-hostable Rust binaries or managed cloud runtimes, letting each agent run as a persistent, stateful primitive with built-in persistence and tooling.
credential vault and HTTP gateway for AI agents that stores secrets once, injects them transparently into outbound API calls, and keeps raw keys out of agent context.
HTTP browser-control bridge that lets any agent drive Chrome via a compact, stealthy API, with snapshot/text modes, token-efficient read flows, and persistent sessions
Rust Token Killer CLI proxy that compresses command output before it reaches your Claude Code session, saving ~60‑90% of LLM tokens on git/status/test workflows with ultra-compact summaries and hook-first install.
CLI for Google APIs (Gmail, Calendar, Drive, Docs, Sheets, Chat, etc.) with OAuth credential management, headless flows, and JSON/TSV/compact output modes tailored for agent interactions and automation.
VS Code extension that discovers Claude Code sessions, visualizes costs/performance, and surfaces rule-based findings to debug and tune agentic workflows without leaving your editor.
Claude Code pipeline (using two cooperative skills) that converts plain-language game descriptions into complete Godot 4 projects with generated art, code, and visual QA via screenshot analysis.
lightweight CLI for defining focused LLM agents in TOML and running them from the terminal, pipes, cron jobs, CI, or git hooks with skills, memory, and sub-agent delegation.
browser-sidebar AI assistant for Chrome/Edge that collaborates on web automation, extraction, navigation, form filling, and research using your own model/provider credentials with local-first data handling.
Autonomous research harness that lets Claude/Codex agents edit train.py, run 5‑minute training passes, and iterate on models via human-written program.md instructions, logging each experiment the next morning.
A WASM-based sandbox with capability enforcement for running agent-generated code safely. Provides isolation without Docker and reduces tool-call overhead.
macOS sandbox-exec wrapper that builds deny-first policies for Claude/Codex/AMP workflows so coding agents only touch the files and integrations they need.
context-aware safety guard for Claude Code that classifies tool calls, blocks or confirms dangerous actions, inspects reads/writes for secrets and exfiltration, and can optionally consult an LLM for ambiguous cases.
A sandboxing toolkit and agentic platform for running agents in isolated environments. Covers Docker, QEMU, and Apple Virtualization for benchmarking, safe code execution, and UI automation.
]]>Model Context Protocolhttps://taoofmac.com/space/ai/mcp?utm_content=atom2025-05-01T17:30:00+00:002026-04-20T18:09:38+00:00Rui Carmohttps://taoofmac.comThis page is a collection of notes and links related to the Model Context Protocol (MCP), a proposed standard for extending managing context in large language models (LLMs) via external tools.
local markdown-first knowledge indexing/search engine with hybrid BM25/vector/reranking and MCP transport for Claude-compatible clients, plus context-aware retrieval via CLI.
a WebMCP demo that lets agents compose music in a browser-based sequencer via WebMCP tools
]]>Notes for April 13-19https://taoofmac.com/space/notes/2026/04/19/1400?utm_content=atom2026-04-19T14:00:00+00:002026-04-21T06:48:06+00:00Rui Carmohttps://taoofmac.comThis was a pretty decent week despite my allergies having kicked in to a point where I have constant headaches, but at least I had quite a bit of fun with my projects.
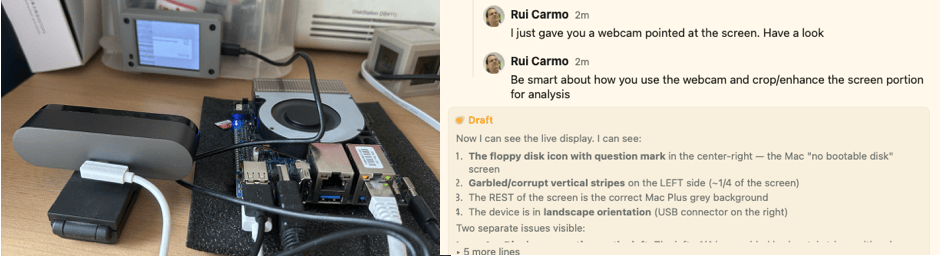
Yeah, I find Opus sycophancy and its traits obnoxious, but this time it’s right–I was trying to get Cydintosh to work with my particular flavor of Cheap Yellow Display and having so much trouble matching screen corruption and flipped colors (and bits) to the display code, that after I finally managed to get at least a stable (if broken) boot picture on screen, I thought to myself… why not let piclaw sort this out for me?
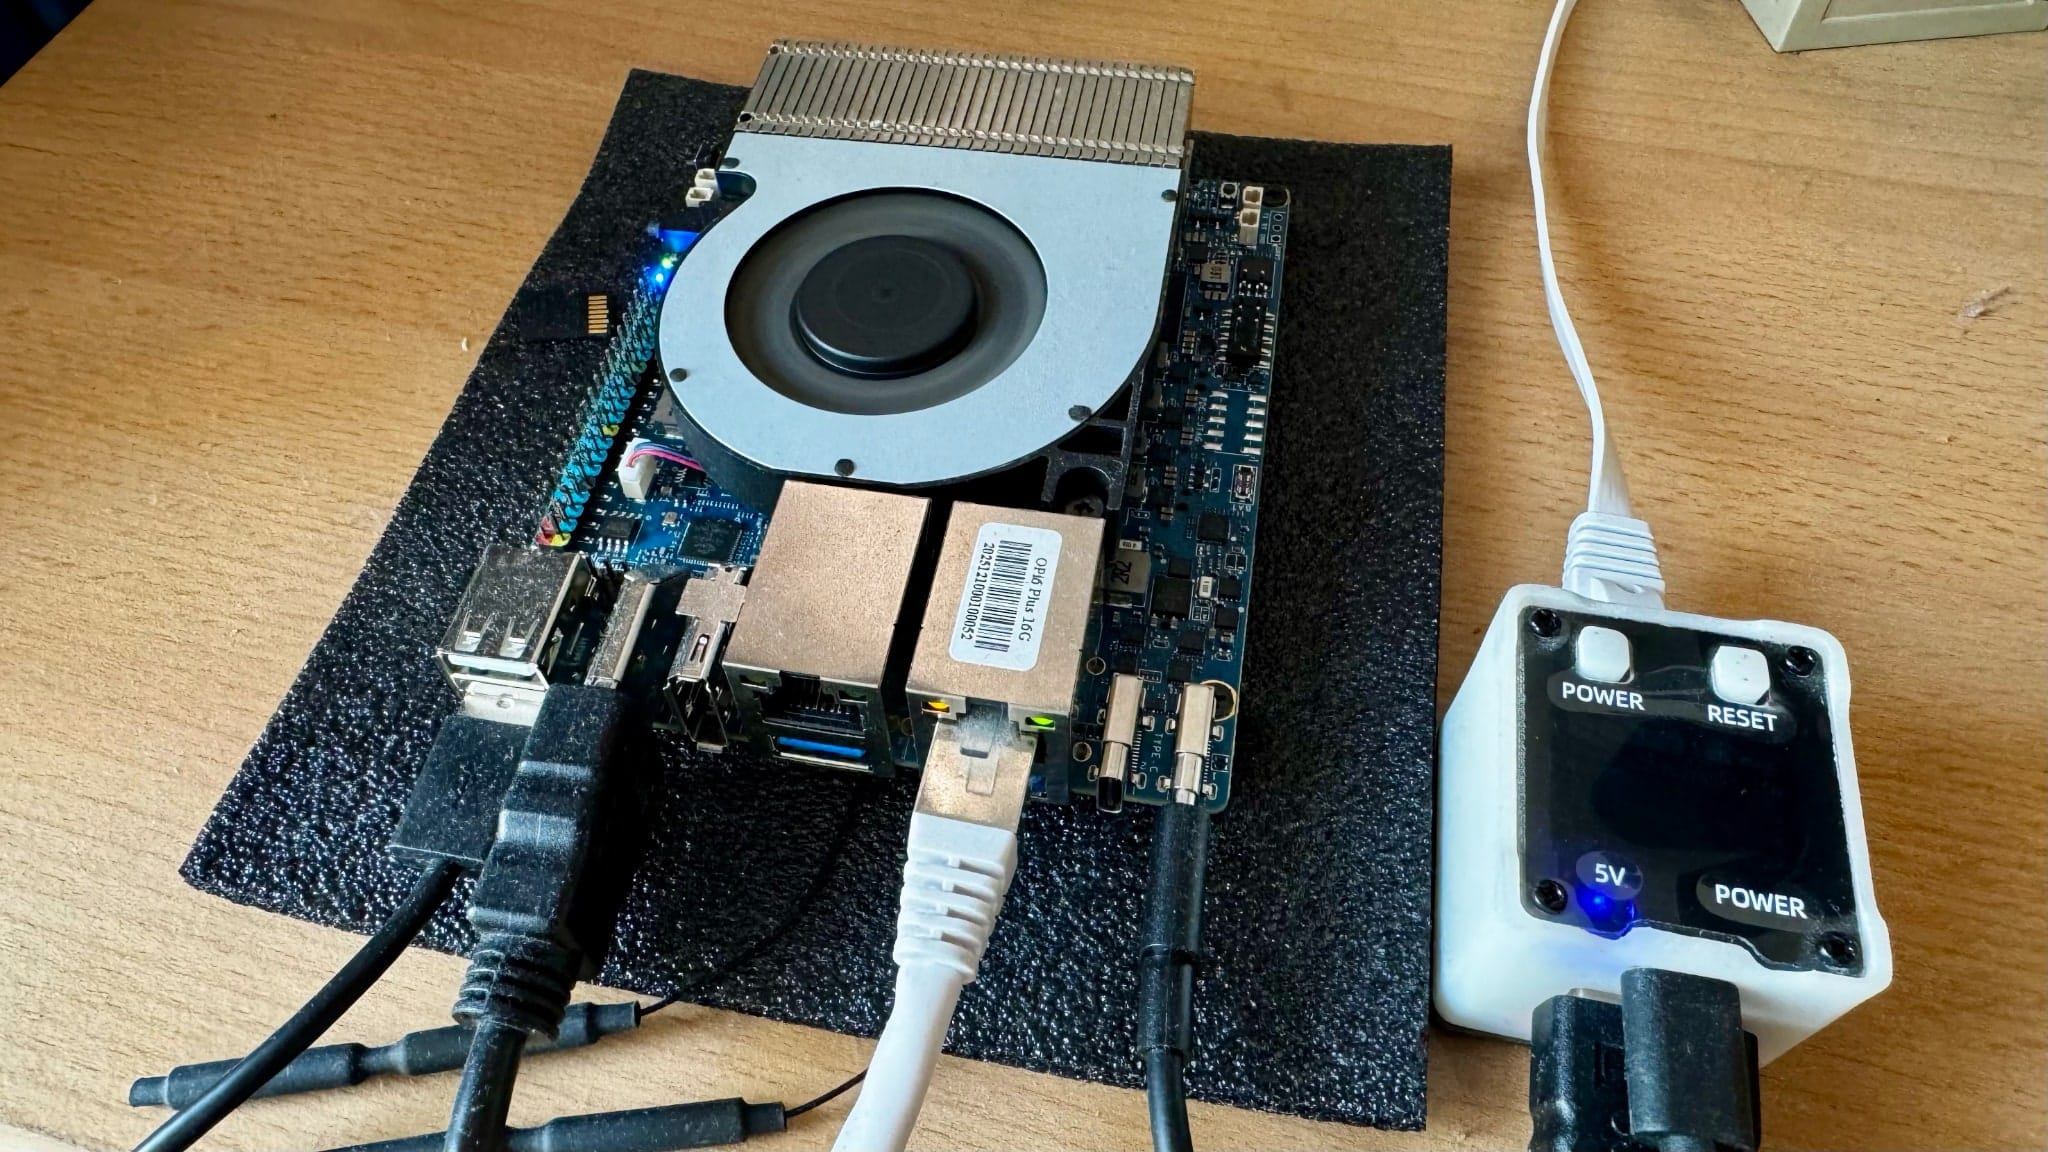
So I plugged the CYD and a Logitech Brio 4K into the Orange Pi 6+, and… I got the most surreal ESP32 closed loop debugging setup going:
I ended up moving the camera farther away to get better focus
Five minutes later, I had all the display bugs fixed except for touch input, which was still rotated–a fair bargain.
I was looking at smolvm and going through my notes on Firecracker and other sandboxing mechanisms, when I realized I had come across QEMUmicroVMs a few months ago when looking at agent sandboxing mechanisms and the old QEMU JIT.
Now, I actually think that microVMs are way overrated, but I was literally in the shower when I realized that, for me (since I have zero interest in running microVMs in my laptop) Proxmox would be the perfect way to manage them (also since I have zero interest in running another exotic hypervisor).
So I did a little spelunking, and… It worked. Badly, but it worked. I took my terminal session, added a few notes, and asked piclaw to investigate if it was possible to patch the UI–and guess what, it was a pretty simple patch–I got the agent to flesh out a Debian package, turn my hacks into a CI/CD workflow that builds and packs a suitable kernel into the .deb, and now I have a nice VM template, decent integration of microVMs into the web UI, the works.
pve-microvm patches qemu-server to add the machine type, ships a template workflow that pulls OCI container images and converts them to PVE disk images, and redirects serial to the web console so you get a proper terminal in the UI. There’s also init support and a balloon device (as well as qemu-agent support), but the OCI images are so barebones that I haven’t yet sorted out all of the ergonomics about using them to automatically deploy stuff.
Proxmox microVM integration in action
This looks like a very low impact addition to Proxmox so far and I would love to upstream it, but I’m not holding my breath since maintainers aren’t trivial to reach and the old-style “join our developer mailing-list” approach is… just too effort-intensive as I have so much stuff to do these days.
The macemu work took an unexpected turn–I shifted from BasiliskII (68k) to SheepShaver (PowerPC), and things moved a lot faster than I expected. To make a long story short, it was Friday and I idly asked piclaw to do a comparative source analysis between both emulators, hoping for something that I’d missed in the quagmire of ROM patches I’ve been wading through.
Turns out that it told me that there was no real JIT support and did a comparative analysis of opcode coverage, ending with “there are, however, much less opcodes to translate in the RISC architecture. Do you want me to set up a quick opcode test harness for PPC”?
Uh… yeah? By Friday evening, every opcode family except AltiVec had native ARM64 codegen and was booting to the Welcome to Macintosh screen (and crashing, but this was comparatively 100x faster than the 68k work), and yesterday afternoon, after some back and forth about creating a second harness (effectively a headless Mac with no hardware to skip problematic ROM regions), I got it to do AltiVec via NEON (which the Orange Pi 6 Plus supports–I’ve yet to devise a fallback path for older chips).
The process was straightforward: point piclaw at an opcode group, have it implement the native codegen, run the harness, iterate on whatever broke, then once an opcode group was “done”, smoke test it on the headless Mac harness. The AltiVec stuff was the most satisfying part–mapping NEON intrinsics to Altivec semantics is tedious but tractable, exactly the kind of work where AI earns its keep and the harness catches every subtle difference.
SheepShaver now boots Mac OS to a desktop with VNC input working. There’s still a long way to go because I have done zero hardware testing (it’s got no audio, only VNC input and, more importantly, no network or graphics acceleration), but a from-scratch PPC JIT on ARM64 booting to a desktop in around 24h is… not nothing.
I wish I could finish the 68k JIT, though, the register allocation strategy I guided the agent towards and the weird ROM patches BasiliskII does just don’t get along.
The fun part for me has been that a lot of this has been done on an iPad on my couch, using the Apple Pencil or iOS voice typing to scratch out instructions. After an outing yesterday, I had the idea to just swipe between agents, and… oh boy.
The idea is simple–swipe left or right on the timeline to switch between agents–but making it feel right on an iOS PWA required far too many weird CSS and JS hacks, and the one real problem I’m having is that AI, no matter how many times you specify in painful detail what you want and how many actual code samples you give it, is still too prone to breaking very intricate UX–I’m getting really tired of weird regressions every time I add another feature.
I’m not an Anthropic customer (besides GitHub Copilot’s model selection, which now also includes the new, lobotomized Opus 4.7, I have a personal Codex subscription for OSS work), but so many people seem to have been caught by their ban on third-party coding harnesses that I decided to dust off Vibes, start porting it to Go (which I had already in my backlog) and turning it into an ACP-only wrapper so that people can use Claude with a nice web UI.
I think it’s the least I can do, and also gives me a decent web UI to drop in for my own work when I absolutely have to use Copilot.
And, of course, since I have far too many projects already, I decided to see if I could get Haiku to boot on ARM64. I don’t particularly care about doing AI for salesy startupy business stuff, but I love using it to build things I think should exist, and I have quite a few more I’d like to make happen…
]]>JavaScripthttps://taoofmac.com/space/dev/javascript?utm_content=atom2007-02-28T21:44:19+00:002026-04-19T08:00:20+00:00Rui Carmohttps://taoofmac.comThe ECMA - 262 Standard, ratified after Netscape and Microsoft (mostly) agreed to make JavaScript and JScript interoperable.
In order to run NodeJS sanely on macOS and WSL, I’ve taken to setting up an unprivileged package install folder like so:
mkdir"${HOME}/.npm-packages"# Add a new dotfile, without expanding $HOME
cat<< 'EOF' >> ~/.npmrcprefix=${HOME}/.npm-packagesEOF# Add the following five lines to .bashrc, without expanding variables:
cat<< 'EOF' >> ~/.bashrc NPM_PACKAGES="${HOME}/.npm-packages"PATH="$NPM_PACKAGES/bin:$PATH"# Unset manpath so we can inherit from /etc/manpath via the `manpath` commandunset MANPATH # delete if you already modified MANPATH elsewhere in your configexport MANPATH="$NPM_PACKAGES/share/man:$(manpath)"EOF
I’ve taken to looking for alternative ways to develop in JavaScript that don’t require me to put up with its syntax and overall insanity. Here’s a few I like (mostly compilers, since that’s what makes the most sense for me):
Most of these are library-independent. Check my jQuery page for more, since there’s an entire sub-culture that believes it to be JavaScript programming in and by its own…
Node-based CLI that runs your dev server through a local proxy so every service gets a stable .localhost URL (with HTTPS/2, host sync, and auto-managed ports for subdomains/worktrees).
Moebius/cel-shading effect implemented in Three.js using custom shaders — specular, diffuse, and outline passes for a stylised hand-drawn look
]]>OpenClaw Ecosystemhttps://taoofmac.com/space/ai/agentic/openclaw?utm_content=atom2026-02-21T09:20:00+00:002026-04-18T07:04:26+00:00Rui Carmohttps://taoofmac.comOpenClaw is a self-hosted personal AI assistant you run on your own devices, with a gateway control plane that connects to the chat channels you already use (WhatsApp, Telegram, Slack, Discord, Google Chat, Signal, iMessage, Teams, WebChat, plus optional BlueBubbles, Matrix, and Zalo) and adds voice on macOS/iOS/Android alongside a live, controllable canvas. It ships with a CLI onboarding wizard (openclaw onboard) for macOS, Linux, and WSL2, with installs via npm/pnpm/bun. See the OpenClaw site and docs for the canonical reference.
OpenClaw was created by Peter Steinberger. In his February 2026 post “OpenClaw, OpenAI and the future,” he described OpenClaw as a playground project that “created such waves,” and announced he is joining OpenAI to work on bringing agents to everyone while OpenClaw moves to a foundation and stays open and independent.1
This page tracks the core project and the variants that build on or integrate with its workflows within the wider Agentic Systems space.
an autonomous AI creature that lives in a folder, continuously generating research reports, scripts, and notes with personality genome, memory system, and dreaming cycle
lightweight Claude assistant running in containers with security-first design, minimal codebase, WhatsApp integration, scheduled tasks, and agent swarms support
MicroPython-based OpenClaw-for-embedded platform targeting ESP32-class boards, with multi-provider LLM routing, chat channels, tool calling, OTA updates, and extension support on sub-$5 hardware.
smallest possible AI personal assistant for ESP32 in C, targeting <=888KB firmware, with schedules, GPIO control, persistent memory, and Telegram/web relay chat
Adaptive Cards extension for OpenClaw that adds rich interactive cards, forms, buttons, and inline GUI-style chat elements by patching the server plugin and chat UI.
an OpenShell plugin for running OpenClaw agents in secure sandboxes with declarative policy, network controls, and managed inference routing through NVIDIA cloud models.
Kubernetes Helm monorepo for an OpenClaw-adjacent AI log intelligence stack with OTLP ingestion, anomaly detection, trace-correlated incident ticketing, and GitOps-style multi-tenant deployment.
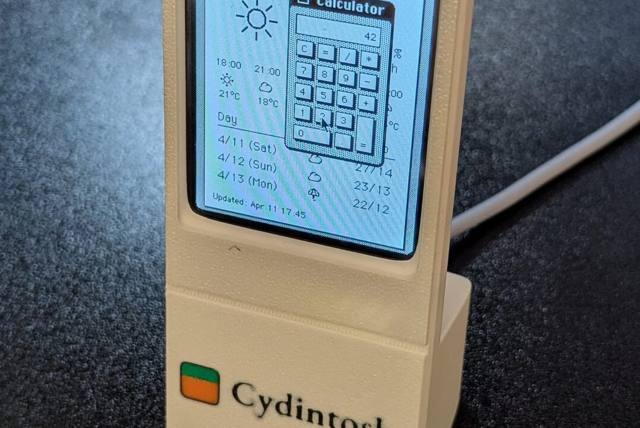
I have a soft spot for tiny Macintosh projects, and this one pushes all the right buttons–an ESP32 Cheap Yellow Display board running a Mac Plus emulator inside a 3D-printed case. I haven’t finished hacking my Maclock yet, but it’s a perfect fit with my ESP8266 hackery, not to mention the collection of vintage emulation hacks I keep filing away and my never-ending ARM64 JIT for BasiliskII, so I had to link to it.
The utterly brilliant part is that doesn’t stop at getting System 3.2 onto a small screen–it adds little Retro68 utilities for weather, Wi-Fi status and hardware control, which turns the whole thing into equal parts retrocomputing in-joke, embedded hack and practical home automation gadget.
It’s already printing (in the obligatory platinum-like PLA I keep around for special occasions), and I am so going to plug this into HomeKit somehow…
]]>Pi.dev Ecosystemhttps://taoofmac.com/space/ai/agentic/pi?utm_content=atom2026-02-24T11:15:00+00:002026-04-17T22:31:09+00:00Rui Carmohttps://taoofmac.comThe Pi coding agent is a terminal-first assistant focused on interactive workflows, extensibility, and running local agents with practical toolchains. The primary distribution today is pi-mono, which serves as the core runtime and extension point for the ecosystem.
This page tracks the Pi-centric projects, adapters, and clients that extend the core agent, including alternate front-ends, web access tooling, and automation bridges within the wider Agentic Systems collection.
while parsing a block mapping
  in "<byte string>", line 2, column 1
did not find expected key
  in "<byte string>", line 190, column 1
]]>Androidhttps://taoofmac.com/space/com/google/android?utm_content=atom2007-11-17T22:36:03+00:002026-04-13T18:32:30+00:00Rui Carmohttps://taoofmac.comThe mobile platform sponsored by Google as part of the Open Mobile
Alliance, evolved from their 2005 acquisition of the company with the
same name.
Gotta love stats. One little thing, though - Android apps are more likely to be free and ad-driven, so anything coming from an ad server isn’t necessarily a good market penetration metric for a platform.
More pretty charts (US-centric, therefore meaningless). The difference here is that there are umpteen versions of Android devces and far fewer of other platforms…
$529 unlocked, shipping to the US, UK, Singapore and Hong Kong, or with a two year T-Mobile US contract for $179. There go a lot of pipedreams about it being sold direct to the public at “astonishingly low” prices.
This teardown mania is somewhat fun, but one wonders how long it will take until people realise that only a very small minority of what is “unearthed” is news…
Let’s see how this pans out. I’m quite curious, actually, to see if Verizon can pull this off in the sense of generating genuine buzz around an operator-specific set of Android devices.
Although this was fixed fairly quickly, it is the perfect example of why mobile phones aren’t exactly trivial to “improve upon” using today’s technology.
About a year later, one of the first sightings of actual hardware (but running over Wi-Fi. I don’t get the “masked” bit, though - the hardware’s pretty obvious.
]]>European AI: A Playbook to Own Ithttps://taoofmac.com/space/links/2026/04/13/0730?utm_content=atom2026-04-13T07:30:00+00:002026-04-13T07:30:00+00:00Rui Carmohttps://taoofmac.com
Mistral published a 52-minute read on how Europe should build an independent AI stack–talent pipelines, single-market scale, local infrastructure, sovereign compute, the lot. It reads like a policy brief dressed up as a manifesto, and while it has a glaring flaw and some of the proposals are predictably self-serving (Mistral is, after all, the company that would benefit most from “buy European AI” procurement rules), the underlying analysis is hard to argue with.
The five pillars–attract talent, scale the single market, drive adoption in the real economy, build local infrastructure, and secure sovereign AI capacity–are all sensible, and the specific measures (an EU AI talent visa, streamlined regulation, public procurement mandates, European cloud infrastructure) are concrete enough to be actionable rather than the usual Brussels hand-wringing. The 40% figure they cite for Europe’s share of global AI research output versus its minuscule share of commercialisation is the kind of stat that should make policymakers uncomfortable.
Where it completely falls apart, though, is that Mistral, even as an European company, currently doesn’t hire remotely in Europe – so the whole thing feels a tad insulting if, like me, you’re actually in the industry and not in politics.
There is some merit to it, though, and whether any of this actually happens is a different question entirely. Europe’s track record on turning common sense into working industrial policy is, to put it generously, mixed–and the current geopolitical climate makes “digital sovereignty” feel less like an aspiration and more like an urgent necessity that nobody has quite figured out how to fund.
]]>Notes for April 6-12https://taoofmac.com/space/notes/2026/04/12/1700?utm_content=atom2026-04-12T17:00:00+00:002026-04-12T17:00:00+00:00Rui Carmohttps://taoofmac.comThanks to a bit of spillover from Easter break, this was a calmer, more satisfying week where I could actually get stuff done and even have a bit of fun.
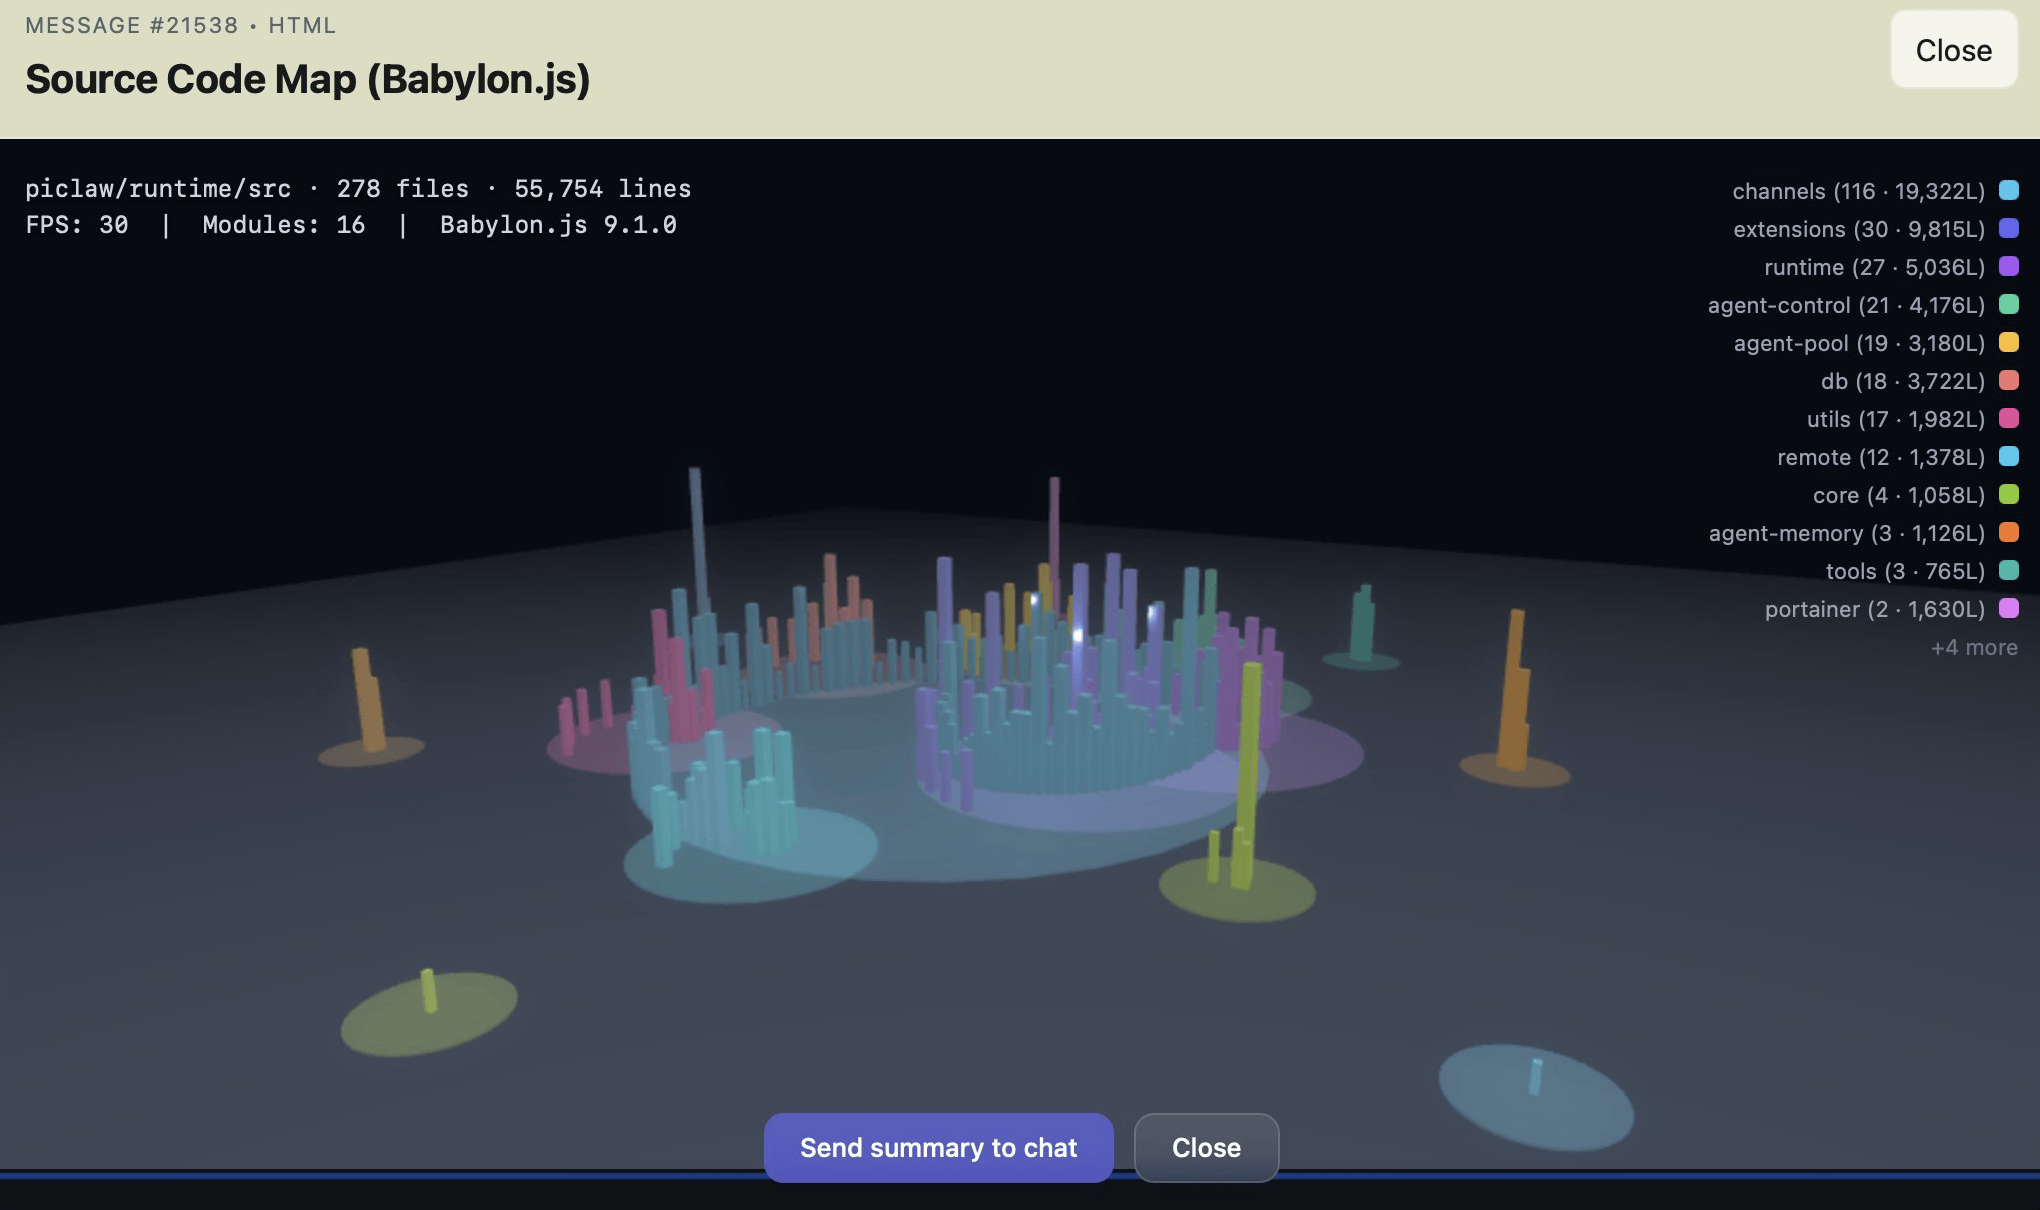
My idea of fun, apparently, is to do 3D visualizations in piclaw
Now that piclaw is in cruise mode, I’ve started focusing on actually using it.
So I created an instance called Flint, which manages not only my Obsidian vault but also all of my personal pursuits and most of my homelab: I gave it the API tokens for my Proxmox cluster and Portainer, and over the past week it’s been busy:
It re-tagged most of my notes and drafts (as well as adding reference URLs for ongoing drafts), quizzing me on what to do with specific notes as it went
It rebuilt and redeployed my GPU sandbox (which I broke last week): recreated the VM, mounted the Ubuntu ISO, prompted me to run the installer, and installed the latest NVIDIA drivers, nvidia-docker and a baseline set of utilities.
I then asked it to look at the Portainer stacks in my gitea instance, my Obsidian notes, and what needed to be set up, and it installed the Portainer agent and brand new versions of the stacks with tweaked network and volume settings, updated my notes, and upgraded the pinned image versions (troubleshooting as it went).
It developed and published an OPDS server and an EPUB read later service so I can fetch interesting web pages and read them later on the XteInk X4, including monitoring the CI pipeline and redeploying the containers
It audited my Cudy OpenWRT config and set up centralized stats collection in Graphite, which I had been meaning to do for ages (and I intend to have it set up Telegraf on other machines to collect metrics).
So far, Flint is a resounding success (it’s using GPT-5.4, a fairly sensible and stable model), but it doesn’t just do notetaking and operations.
Flint has also become quite useful to help me tidy up my workflow—I was already using a piclaw instance to convert ancient Textile and raw HTML posts into Markdown in batches, but there are a few things that have been nagging at me for years and that I can finally make significant progress on:
Adding links to my resource pages
Drafting link blog entries
Streamlining static site builds
I’ve had Shortcuts to do the first two for ages, but they both relied on adding bits of text to Reminders that were then post-processed and added to git using either the CLI or WorkingCopy. That worked OK for a while, but my iPad mini’s increasing slowness has made them quite frustrating, especially since I tend to do that kind of quick posting over breakfast and it was taking up too much time.
As it happens, GitHub has a REST API for Git Trees, and what that means in practice is that I can update a JSON changeset with these minor changes, let it accumulate over breakfast, and then apply them in batches–or, rather, have Flint do that, with all the guidance and steps in a SKILL.md file.
So my new breakfast workflow is to just send links to Flint using the iOS sharing pane or a bookmarklet (still experimenting with both), have it create a JSON changeset for links, and occasionally ask it to screenshot a page and create a blank Markdown document for linkblog posts. That is pre-filled with a title, likely tags and the appropriate image reference, and I just pop open the built-in editor tab in piclaw, finish the post and ask it to add the files to the changeset and post them via the API.
So far, it’s been going swimmingly: zero git fetches/commits/pushes, all handled server side, and very little friction–and it works on my iPad mini, albeit still slowly.
Another thing I’ve been working on is porting the Python site builder to Go for both speed and maintainability—the current codebase has some 20-year old hangovers that I wanted to get rid of, and some kind of reset has been long overdue, so I have been slowly poking at this for the past few months.
As it happens, the overall indexing and rendering process was pretty trivial—the real challenge has been to make sure that it looks exactly the same, especially given that my engine has some pretty specific Wiki-linking rules and I’ve accumulated a bunch of rendering helpers and custom plugins over the years.
Plus everything related to HTML rendering has changed: parsing, link resolution, templating, the works. And that’s enough to juggle already, so I don’t want to change the front-end design at all (yet).
I decided to be ambitious and aim for full rendering parity. So what did my little army of AI helpers do?
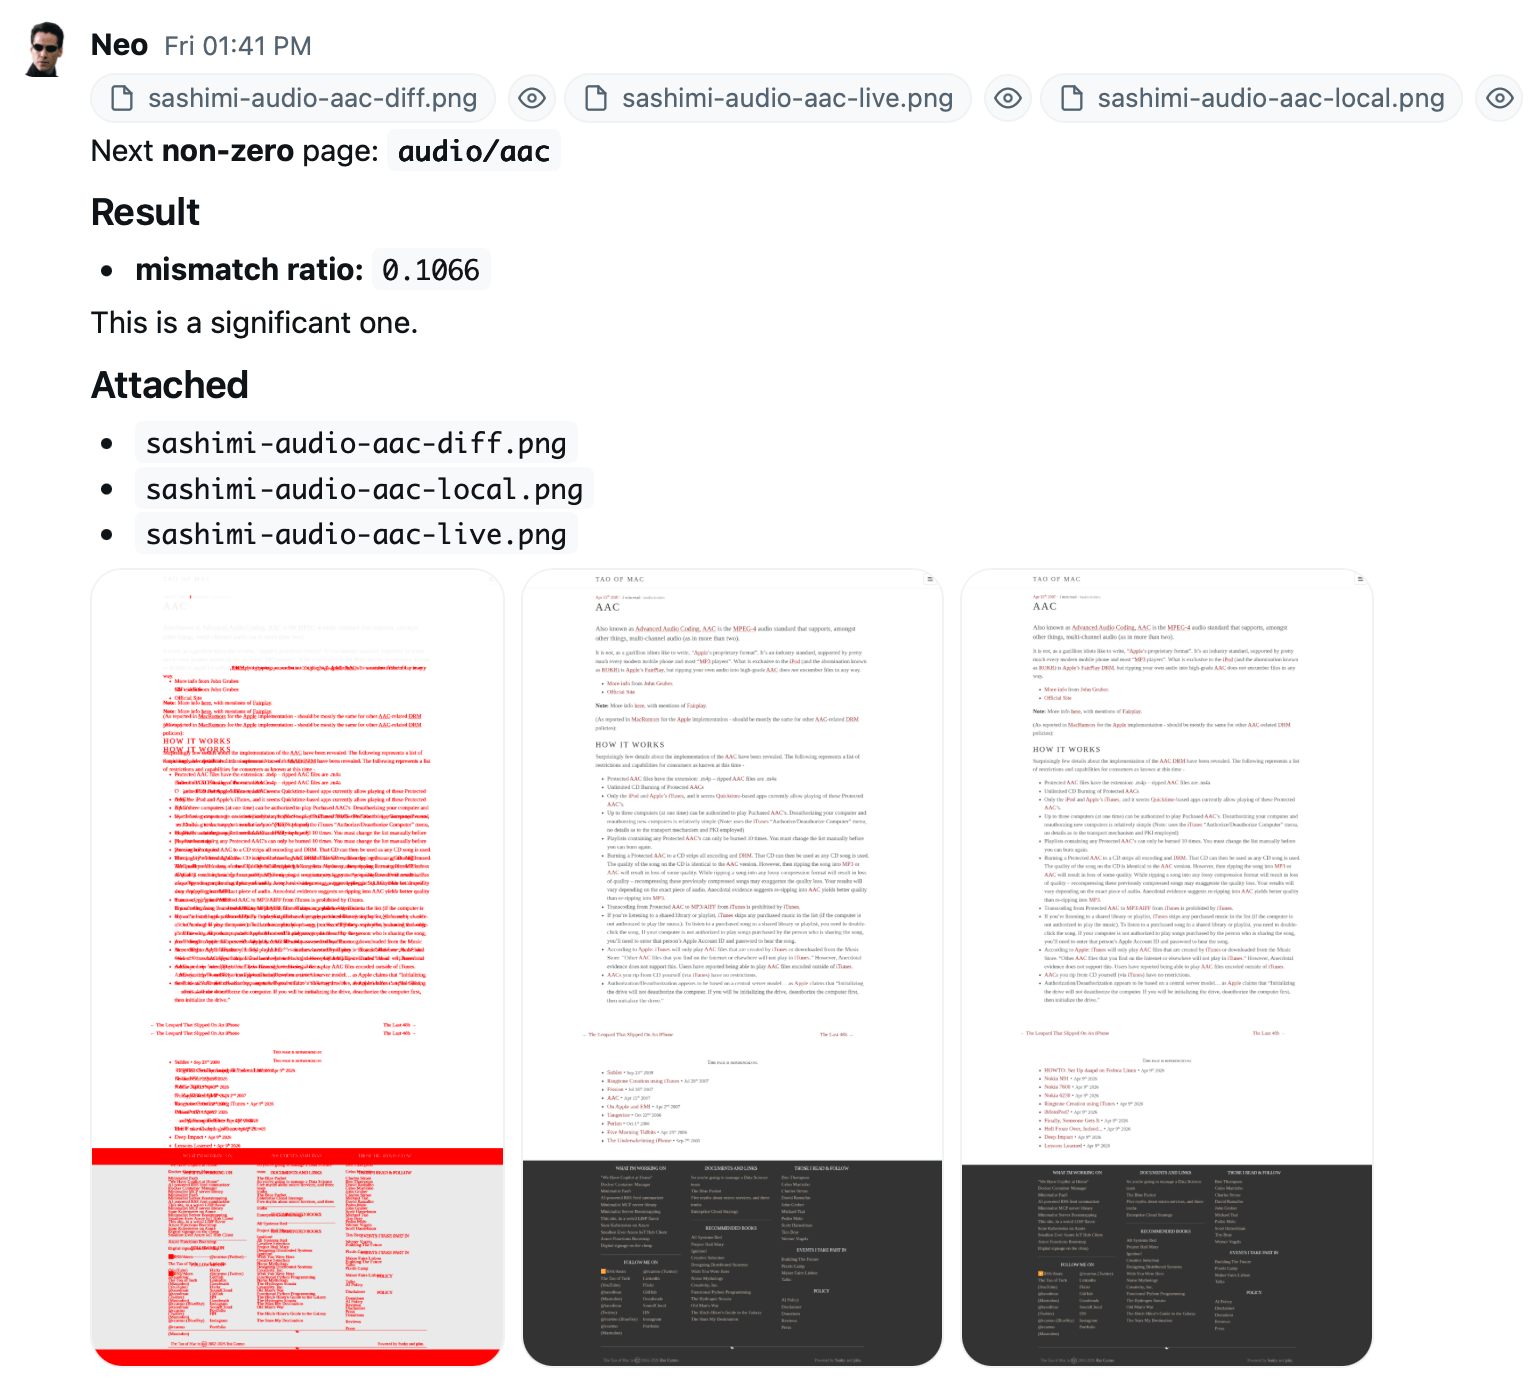
It converged on doing visual diffs out of random sampled pages: Take a locally rendered version, look at the public page, and generate an image that it can easily rate as “close” or “broken” by just counting the ratio of red pixels:
This is both brilliant and scary at the same time
The process is greatly streamlined: sample 100 pages out of the nearly 10,000 we have now, render, batch compare, show me the worst ones, and then discuss and generalize the fixes (which is the only part the LLM is actively involved in). I could probably use autoresearch to automate this, but some of the fixes have to do with legacy rendering logic that no AI could ever figure out.
Still, this has converged very quickly to minor typography and spacing differences, and once I’m happy with the engine I’ll start looking at optimizing the actual blob uploading part–which I aim to standardize via rclone to remove my current dependency on Azure storage accounts, but greatly optimize with deltas.
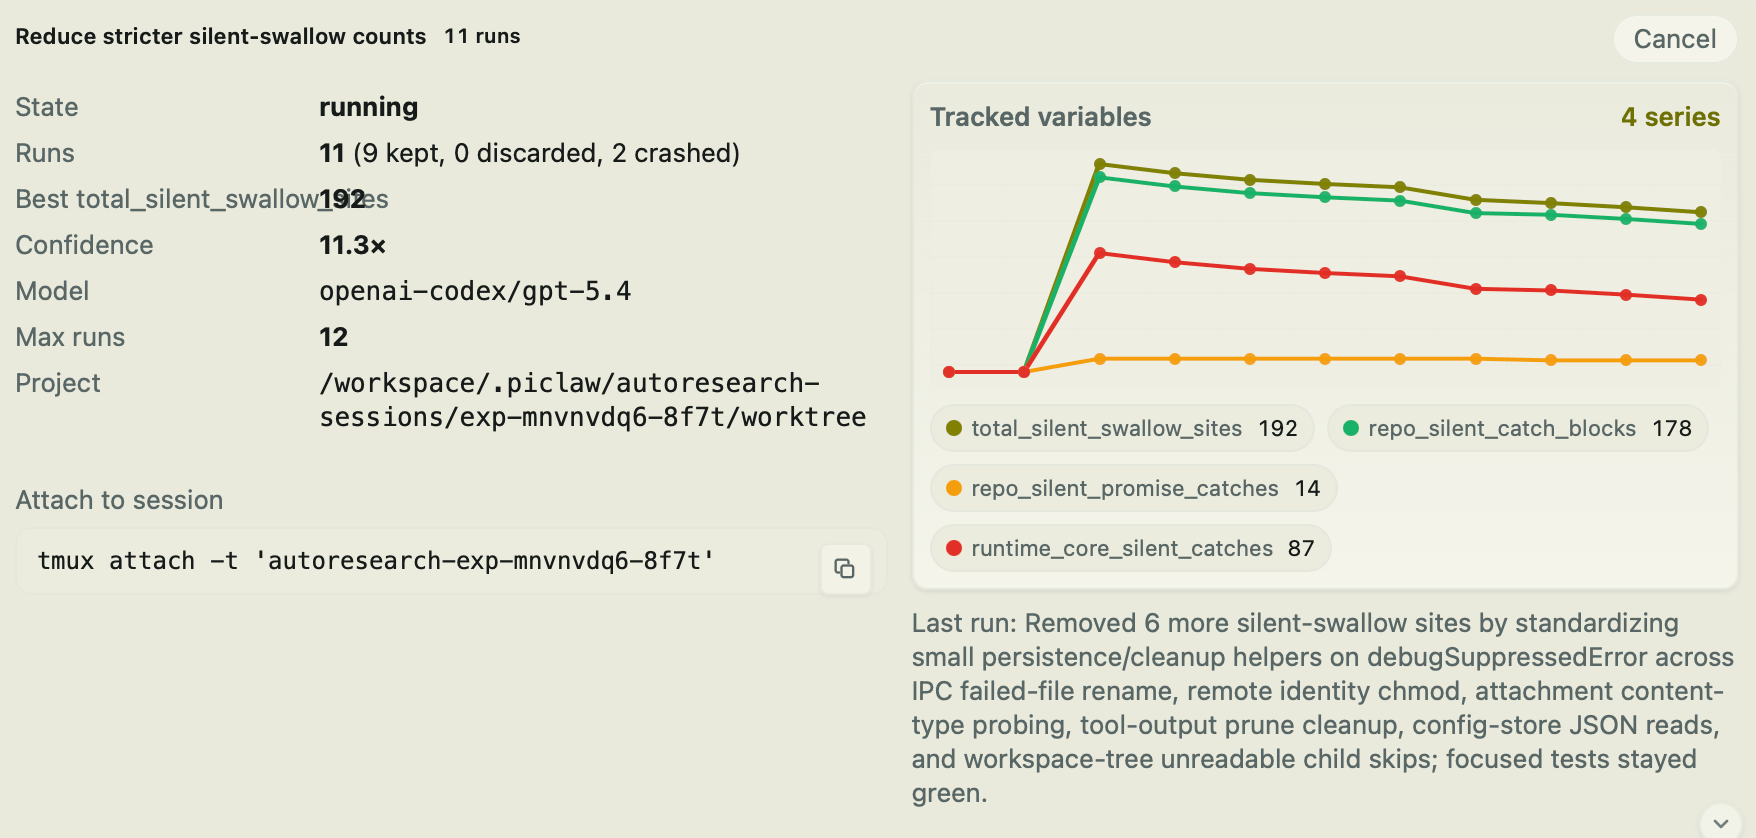
It turns out that if you tell an AI that empty catch blocks are forbidden, the thing will just… go and add comments inside them, instead of doing something useful like a warning log message…
I’m now doing another code audit pass over the entire piclaw codebase, and this kind of mechanical fix is trivial to set up and do reliably with autoresearch:
An autoresearch session doing a code audit pass
Now to see if I can get some reading and 3D printing done as well, since the whole point of using AI in the first place was to have more free time… right?
]]>Apple, Stillhttps://taoofmac.com/space/blog/2026/04/12/1330?utm_content=atom2026-04-12T13:30:00+00:002026-04-12T13:30:00+00:00Rui Carmohttps://taoofmac.comI have been having feelings about Apple lately. This blog may have drifted a fair way from its original focus on macOS, but I am still, first and foremost, an Apple user – just not an exclusively Apple user, and perhaps not even a particularly obedient one anymore, since I use both Windows and Linux every day and have grown used to judging platforms by what they let me get done rather than by whatever story they are trying to tell about themselves.
That makes the current moment a little awkward. Apple is still extraordinarily good at making hardware I want to pick up and use, and still more coherent than most of the industry in the broad strokes, but it also feels increasingly prone to sanding off the wrong edges, reinventing the UX wheel, and constantly adding paper cuts to their software.
The iPhone is probably the clearest example of that tension. It is still the phone I would rather carry, and the one whose hardware I trust most, but iOS has become steadily more fussy without becoming proportionally more capable.
A lot of it has been the constant UI friction and pointless balkanization of features like screen mirroring, which I would very much like to have – I see zero point in using Messages on my Mac or futzing around with Handoff and AirDrop when I could just, you know, pull up a window into my phone and type stuff in.
And I know Apple could indeed engineer a way to make those features DMA-compliant if it really wanted to – I suppose breaking the user experience across the board with Liquid Glass had enough priority to preempt allocating engineering resources to, you know, proper features.
Sharing things, moving files around, background activity, browser limitations, the endless little inconsistencies in system UI and the ungainly bloat in Settings – that friction accumulates. None of it is fatal on its own, but the aggregate effect is that the platform feels far less light than it used to, even while Apple keeps insisting that everything is becoming more seamless.
I’m going to say it outright: I found Liquid Glassinsulting. Not just visually, but also because it tells me that instead of fixing glaring gaps in things like automation (Shortcuts is definitely not in good health, and AppleScript is pretty much dead) that could actually have put Apple in the forefront of automation and AI (never mind the miserable failures in Siri and Apple Intelligence), someone at Apple actually decided breaking visual affordances took priority over stability and providing consistent application intents and hooks across the board.
Even then, macOS is in a better place than iOS, but mostly because it still retains enough of its older character to be workable. Remember, I can just patch the visual inconsistencies away.
There is still a proper filesystem, there is still a shell (even if Apple seems intent on breaking the userland in very small increments across releases), there are still enough escape hatches to route around bad decisions, and Apple Silicon has papered over a remarkable amount of software bloat simply by being absurdly fast and power-efficient.
But the cracks are visible there too. System Settings remains a mess, cross-platform application quality keeps declining, and the old Mac assumption – that a user might actually want to understand how their machine works – seems to matter less every year. Meanwhile iOS keeps borrowing bits of the Mac’s vocabulary without acquiring the Mac’s actual flexibility, which leaves both platforms feeling oddly misaligned.
The iPad remains the device I most want to use more than I actually do. I may pick one up every morning to read the news and get drafts started, but the Neo nullifies any interest I might still have in upgrading my iPad Pro. The hardware is excellent, the battery life is still absurd, the pencil is useful, and for reading, sketching, note-taking and casual browsing it remains hard to beat. Fine.
But every time I try to push it into being a serious general-purpose computer, it reminds me that Apple still has not decided what it wants the iPad to be. It can approximate a laptop for stretches at a time – and sometimes very convincingly – but the moment you need proper peripheral support, predictable file handling or sustained tool switching, the abstraction turns into safety glass – and I’m back to my long-held opinion that the only good iPad is the iPad mini.
That’s what I intend to upgrade this year, even if Apple comes out with a decent foldable iPhone (and, by the way, I really like the “leaked” form factor, because phones have become stupidly tall and unwieldy).
And this is where Fedora comes in, because it has become my most useful point of comparison. Linux on the desktop is still Linux on the desktop – gloriously inconsistent, occasionally infuriating, and always willing to expose its plumbing at the worst possible moment – but my experience over the past few years is very conclusive: Fedora has reached a point where, for a lot of everyday work, it is simply easier to reason about than either macOS or iOS.
That does not make it better in every respect. It is not. But it does mean that a lot of the breakage in Apple software now has a reference point, and even considering I was always a UNIX user and deeply technical, the creature comforts that Linux now provides give me a lot more confidence than Apple’s software.
If Qualcomm wasn’t so obtuse about only supporting Windows and ARM laptops were more open, things would be very interesting indeed.
I still like the hardware, still prefer the overall ecosystem in a number of places, and still find myself evaluating a lot of the rest of the industry by standards Apple set years ago.
But I also think it is getting harder to ignore how much of the original appeal has been traded away due to sheer mismanagement of software QA and Apple’s refusal to acknowledge the gaps across iPad, macOS core applications, and a consistent user experience.
Come on, Tim, get your people in line.
]]>Emulationhttps://taoofmac.com/space/emulation?utm_content=atom2005-06-09T09:38:12+00:002026-04-15T07:48:42+00:00Rui Carmohttps://taoofmac.comEmulation and hardware virtualization software of various descriptions, most of them obsolete by now:
Error: Could not parse 'table.yaml'
while parsing a block mapping
  in "<byte string>", line 2, column 1
did not find expected key
  in "<byte string>", line 421, column 1
]]>The Orange Pi 6 Plushttps://taoofmac.com/space/reviews/2026/04/11/1900?utm_content=atom2026-04-11T19:00:00+00:002026-04-15T06:13:27+00:00Rui Carmohttps://taoofmac.comThis was a long one–I spent a fair bit of time with the Orange Pi 6 Plus over the past few months, and what I expected to be a quick look at another fast ARM board turned into one of those test runs where the hardware looks promising on paper, the software is wonky in exactly the wrong places, and you end up diving far more into boot chains, vendor GPU blobs and inference runtimes than you ever intended.
The Orange Pi 6+ on a corner of my desk
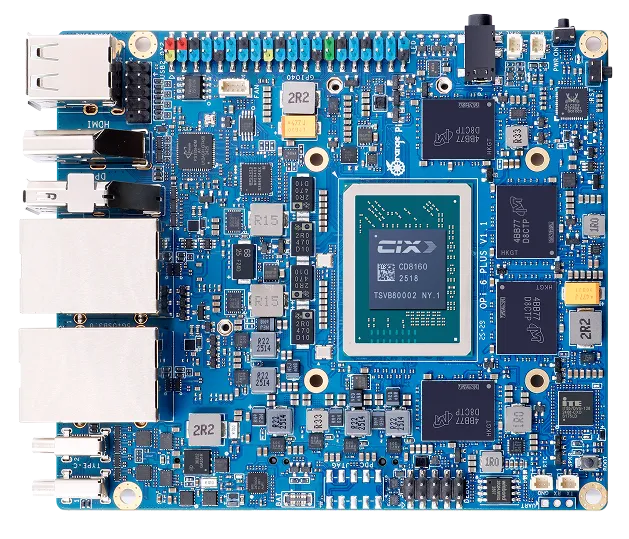
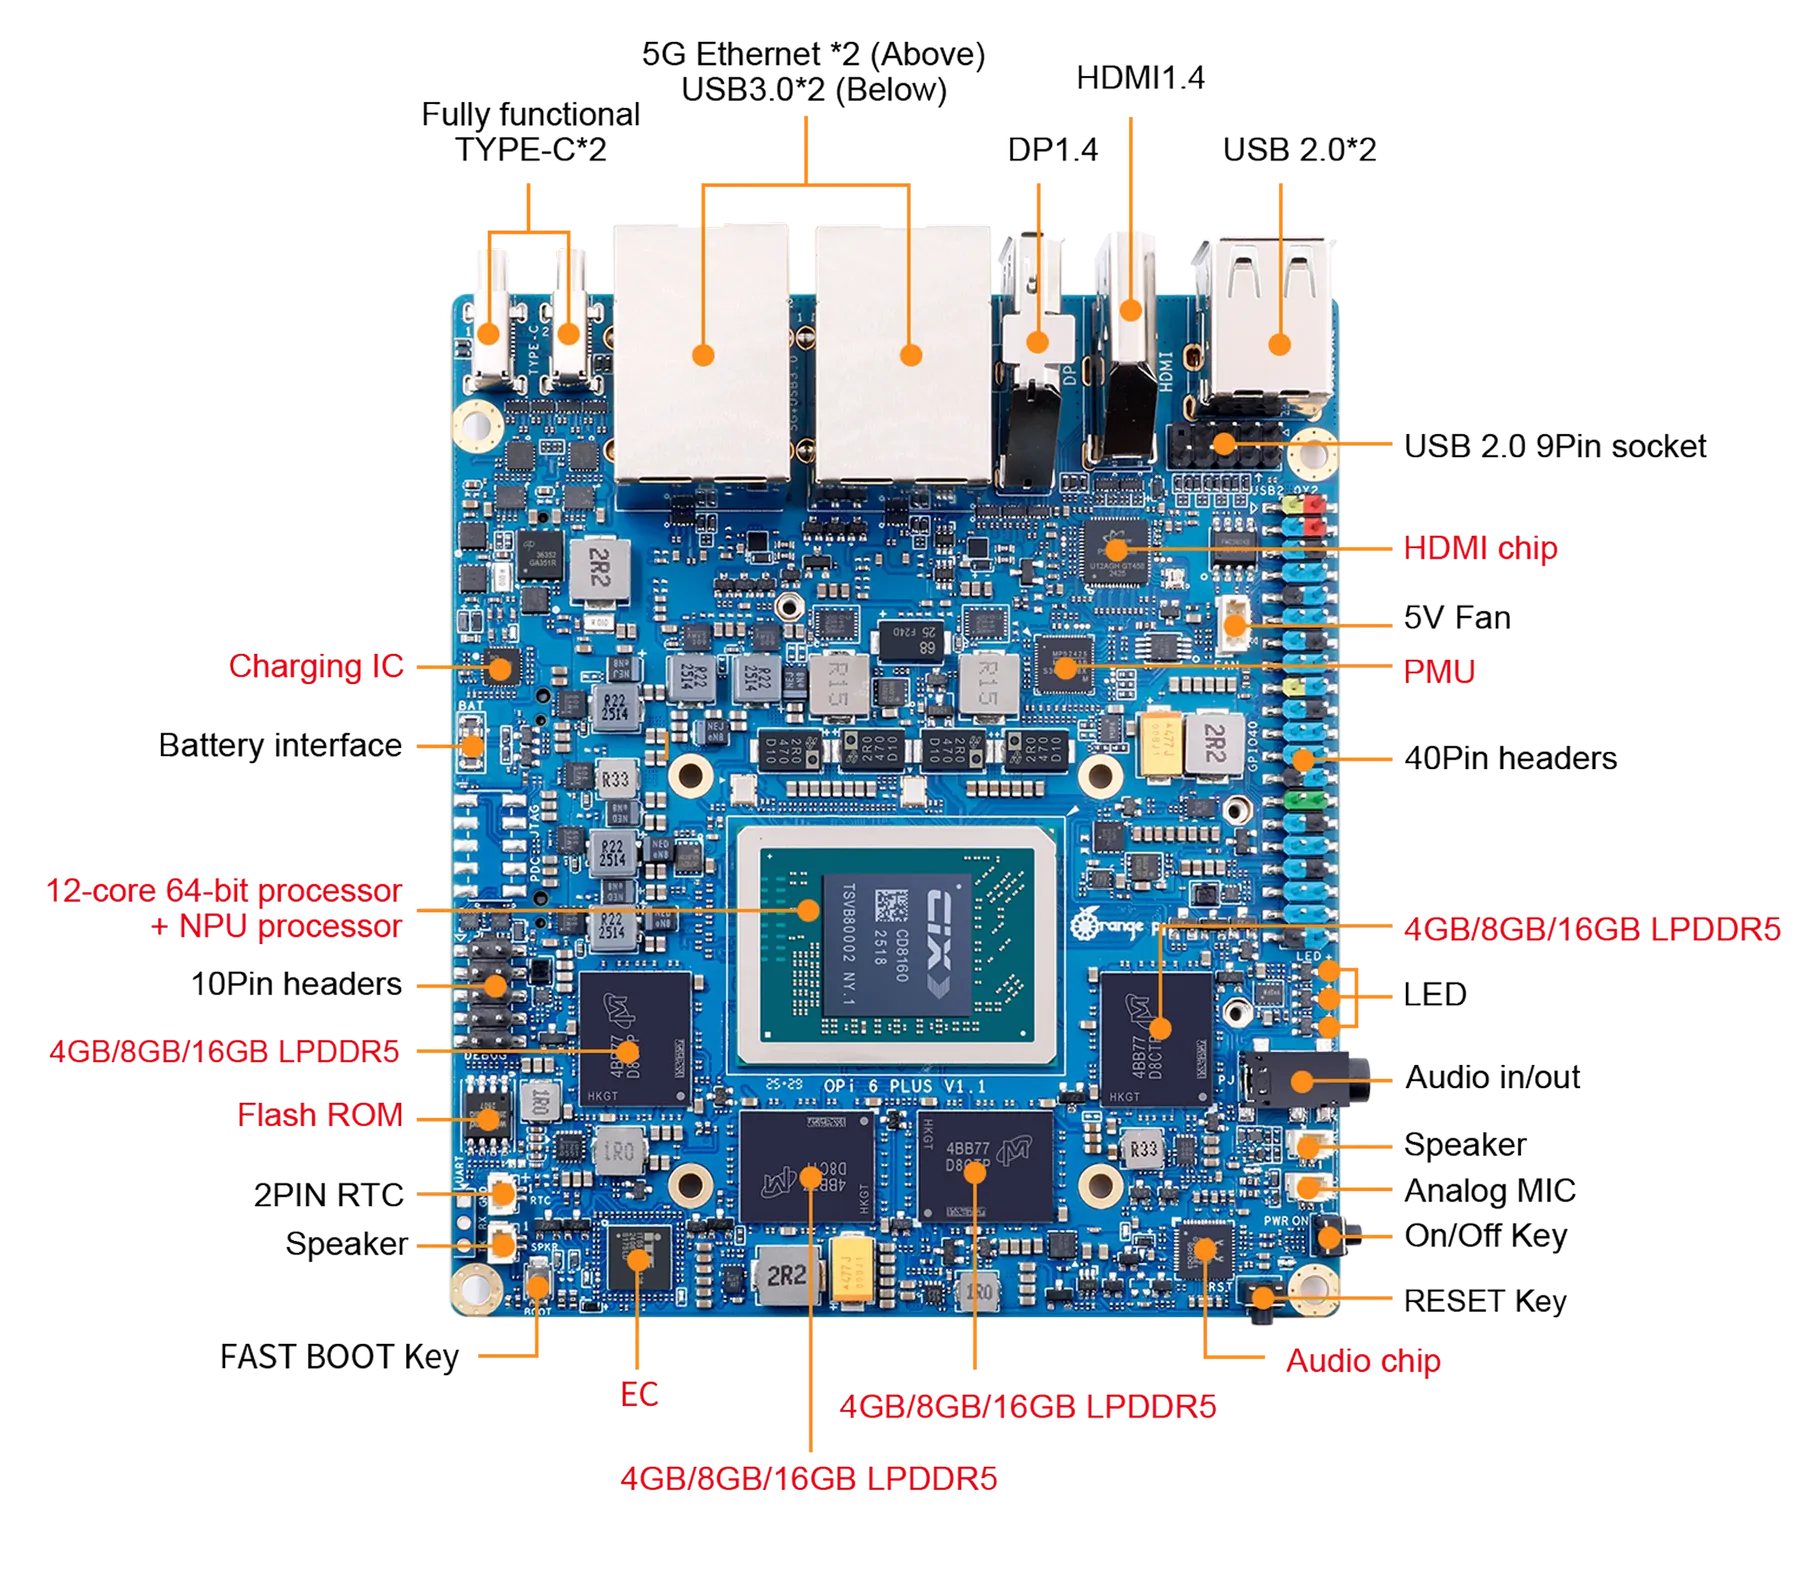
Unlike most of the ARM boards I’ve reviewed until now, this one is not an RK3588 board: The Orange Pi 6 Plus uses the CIX P1 (CD8180/CD8160), with 12 CPU cores, a Mali G720 GPU, a dedicated NPU and a wild set of specs for the form factor. Boards like this promise everything at once–homelab, edge AI, dual 5GbE, low power–but they only matter if the software gets out of the way.
Disclaimer:Orange Pi supplied me with a 6 Plus free of charge, and, as usual, this article follows my review policy.
And, for a change, I decided to make sure the software did exactly that, and made it my concern from the start–i.e., I built my own OS images for it (a fork of orangepi-build) and went in a bit deeper than usual, spending around two months taking notes, benchmark logs and even Graphite telemetry as I went along.
One of the reasons I wanted to test this board is that the SoC is the CIX P1, which Orange Pi bills as a 12-core part with a combined 45 TOPS across CPU, GPU and NPU. The machine I tested came with:
CIX P1 (CD8180/CD8160), 4×Cortex-A520 plus 8×Cortex-A720 cores
16GiB of RAM (roughly 14GiB visible to Linux)
dual Realtek RTL8126 5GbE
Realtek RTL8852BE Wi-Fi and Bluetooth card
Mali G720 / Immortalis-class GPU
A three-core Zhouyi NPU
And if you’ve been paying attention to all my homelab testing, those two 5GbE ports alone make this more interesting than most hobbyist SBCs. But, of course, there is a lot more to expandability than that:
The CPU is interesting in itself–the fastest A720 cluster reaches about 2.6GHz, the A520s top out around 1.8GHz, so like many other big.LITTLE ARM architectures you get asymmetric clusters rather than a uniform twelve-core machine:
lspci is a bit more revealing, especially because you get to see where the dual 5GbE setup and Wi-Fi controller are placed–each seems to get its own PCI bridge:
Nothing exotic, which I rather like. And, by the way, the board ships with Cix Technology Group UEFI, version 1.3, so setting up boot devices and managing (very) basic settings was trivial.
This is where I took a very large detour from my usual approach: I decided early on that I wasn’t going to use a vendor image for this board.
Vendor images for SBCs like this always tend to be good enough to boot, occasionally good enough to do basic benchmarks, and almost never something I want to build on–especially if I’m doing local AI work, host-native services, or anything that requires me to trust package sources, first-boot behaviour and upgrade paths.
I wanted a server-first layout, reproducible fixes and a place to bake in GPU/NPU prerequisites, so I forked orangepi-build and started from there, with a fairly high bar:
I wanted a fully reproducible Debian 13 / Trixie build with features like /dev/kvm present, not a vendor image with stale software and missing features I wanted.
The build needed to stop treating Ubuntu as the only real target–add-apt-repository, PPA logic and software-properties-common had to be cleaned out.
Boot fixes had to be baked in from the start, not applied as post-flash rituals.
First boot had to be deterministic. If the root filesystem resize requires me nearby with serial and patience, the image isn’t finished.
I needed a clean place to stage GPU firmware, vendor userspace and NPU packages.
The Orange Pi repository included kernel 6.6.89-cix, so a lot of the above was already “there”–I just needed to hack at it, but instead of doing it entirely by hand I got piclaw to set things up on an Ubuntu 22.04 VM.
Over a few weeks (this took a while), the above list translated into a fairly concrete set of changes in the build tree:
added Trixie configs under external/config/{cli,desktop,distributions}/trixie
patched scripts/distributions.sh for Debian 13 support
fixed the board config to allow trixie under DISTRIB_TYPE_NEXT
removed Ubuntu-only dependencies from the package lists
forced standard Debian mirrors
made the kernel build non-interactive
started baking in GPU/NPU prerequisites and development tooling for later testing
The package side needed archaeological work too. I patched orangepi-config to stop behaving as though it were on Ubuntu, removed software-properties-common from the Trixie dependency chain, forced regeneration of cached packages, and went hunting through component_cix-next for whatever vendor bits still existed and matched my kernel, taking notes throughout.
My first boot-related note on this board was short: I flashed my custom Trixie image, got as far as GRUB, and it fell over because the EFI stub was wrong. The image did contain the right DTBs (SKY1-ORANGEPI-6-PLUS.DTB and friends), but the build scripts somehow commented out useful menu entries and the default pointed at the ACPI path.
But getting past GRUB was only half the battle. The first real boot surfaced another annoying issue: the partition resize worked, the root filesystem resize didn’t, and the machine failed to reboot cleanly at the handoff. I had piclaw trace the resize helper, found it was disabling itself before the second stage could run, and patched that too.
The whole thing made for a pretty intensive couple of weeks:
Build and fix timeline
In parallel, I made sure to include GPU/NPU support:
firmware symlink so panthor could find mali_csffw.bin
baked in cix-noe-umd and cix-npu-onnxruntime
and a big pile of dev tooling so the board could bootstrap AI experiments without turning into a scavenger hunt
Once the image was booting reliably, I wanted the board off SD entirely. I had a 512GB NVMe drive sitting about, so I had piclaw handle the migration–even though it had just finished patching orangepi-config, the actual cutover was done manually: partition the NVMe into EFI, root and swap, rsync everything across, patch GRUB.CFG to point at the new PARTUUID, reboot, verify, remove the SD card.
So, to recap, I had to fix these things for my custom image:
Boot chain: initially broken because GRUB defaulted to the wrong path; stable once DTB boot was forced
GPU / Vulkan: initially llvmpipe fallback or panvk failure; working with vendor Vulkan ICD on mali_kbase
OpenCL: not useful at first, functional once the vendor userspace was in place
NPU kernel side: visible from the beginning, probe messages reporting three cores
NPU userspace: present only in fragments, inconsistent package references, a lot of manual validation needed
But after the first few steps were done, I had zero issues installing or building software on this–GCC 14.2 from Trixie, Bun as the primary scripting runtime, and the usual complement of build-essential, cmake, clang and ninja for C/C++ projects.
Python 3 and pip are present for the inevitable bits that still need them, and Docker runs cleanly, plus I made sure I had /dev/kvm available for virtualised workloads–and with the CIX patches for the P1 SoC, everything went swimmingly. The kernel is PREEMPT-enabled, which is pleasant for interactive work and inference latency, though I haven’t tested RT workloads.
I even got Proxmox to run reliably on this with zero issues (including creating ARM VMs on it) before wiping the NVMe to do some AI testing.
The one area where the software story gets awkward is the vendor-specific GPU and NPU userspace–covered in the next two sections. Everything else about running Debian on this board is unremarkable, which is a compliment.
Out of the box, the Linux graphics story was absent. The kernel side was in a half-state that looked superficially encouraging–/dev/dri/* present, both panthor and mali_kbase around, the system clearly aware of a Mali GPU, etc.
But Vulkan fell back to llvmpipe, and forcing the Mesa Panfrost ICD produced Unknown gpu_id (0xc870) errors. So I had piclaw go through the Orange Pi and component_cix-next package sources and find the missing pieces: vendor userspace for the CIX stack–cix-gpu-umd, cix-libglvnd, cix-libdrm, cix-mesa and a Vulkan ICD pointing at libmali.so.
Installing those got me partway–the userspace reported No mali devices found, because the board was still on the wrong kernel path. Once I rebound the GPU from panthor to the vendor mali/mali_kbase stack, /dev/mali0 appeared and Vulkan reported actual hardware:
deviceName = Mali-G720-Immortalis
driverID = DRIVER_ID_ARM_PROPRIETARY
OpenCL also came up correctly afterwards, again via the vendor path.
This was pretty good news as far as typical SBC testing goes, since it means you can get decent (if vendor-specific) GPU support working–but getting there involved driver rebinding, vendor package archaeology and a persistent module policy to keep the machine on the right stack across reboots.
The NPU story was, if anything, even more typical of this class of hardware.
Linux clearly knew there was an NPU–dmesg reported three cores during probe–but the userspace was absent or incomplete and the package references inconsistent enough that I had to validate URLs by hand. One package version was simply gone, another worked, and I only reached a coherent install because component_cix-next still had enough usable artifacts lying about.
Not to say the NPU is fake or useless–it isn’t. But the tooling has that familiar feeling of being assembled by several teams who weren’t speaking to each other as often as they ought–and if your interest in a board like this is local AI, that matters more than any TOPS figure on a product page.
This is where the board started being interesting.
Since I have been getting more and more involved in low level AI work, I spent most of my time testing local inference–the Orange Pi 6 Plus is not a universally good AI box, but it is surprisingly usable within a narrow envelope of models and runtimes.
And to make it usable for a few use cases, I needed a model-and-runtime combination that felt like an actual working stack rather than a demo. I ended up trying four inference runtimes–[PowerInfer], [ik_llama][ikl] (which is a CPU-optimized version of llama.cpp), vanilla llama.cpp, and my own Vulkan-patched version of llama.cpp that for the Orange Pi 6 Plus’s GPU (the NPU, alas, like many other ARM SoC NPUs, is designed more for vision processing than LLM work, and I spent a few evenings trying).
I ended up running well over a dozen different combinations of models and runtimes, and these five were the ones I invested the most time in, since I wanted a model that was powerful enough for “production” use even if it was a little slow in practice:
Inference performance by model and runtime|669
The dark bars are generation speed, the lighter bars are prompt processing. The verdicts on the right reflect what happened when I pushed each model through a real agent pipeline with tool calls, not just a short benchmark prompt–and that is where the gap between “fast on paper” and “actually works” showed up.
The Liquid models posted impressive raw tok/s figures but broke down in practice with blank responses and formatting failures. The 35B sparse model was surprisingly fast under ik_llama.cpp but ate all available RAM and failed roughly 40% of the time.
Only the Qwen 4B on Vulkan held up as something I would actually leave running and the best all-round result was Qwen3.5 4B Q4_K_M on Vulkan:
Metric
Value
Runtime
llama.cpp Vulkan
Prompt t/s
8.4
Generation t/s
9.7
Typical response time
6-25s
RSS
~5.3GB
Stability
10/10 pass at -ub 8
Not desktop-GPU territory, but enough to move the board from “cute” to “useful”. More importantly, it was stable–it followed my coding assistant’s AGENTS.md prompt correctly, handled tool calls, and didn’t chew through all available memory.
The production configuration I eventually settled on was:
Every flag has a story–especially (-ub), the micro-batch size, which controls how many tokens llama.cpp tries to process per Vulkan dispatch.
It turns out that the Mali Vulkan backend had a descriptor-set exhaustion issue that needed patching upstream before it stopped crashing (yes, I spent a while debugging Vulkan…), and I ran a set of benchmarks specifically for that:
Vulkan micro-batch tuning sweep|695
Bigger batches should mean better GPU utilisation and faster prompt ingestion, but the Mali G720’s Vulkan driver has a hard limit on descriptor sets–exceed it and the backend either crashes or silently degrades.
The green bars are stable configurations, the orange ones are not–and the dashed box marks where I landed for production. At -ub 16, prompt speed collapsed because the driver was already struggling; at 64+ it fell over entirely.
The tuning sweep showed where the practical ceiling was rather than the theoretical one:
At -ub 2, the setup was stable but underwhelming: about 4.3 prompt tok/s and 9.7 generation tok/s.
At -ub 4, prompt speed improved to 5.9 tok/s with the same 9.7 generation rate.
At -ub 8, which is where I eventually landed, prompt speed climbed to 8.4 tok/s and generation stayed at 9.7 tok/s.
At -ub 16, the whole thing became temperamental and prompt throughput actually collapsed to around 2.0 tok/s.
At -ub 32, it could survive a test run, but not in a way that inspired confidence.
At 64+, it was simply crashy.
So the practical production setting was not some elegant theoretical optimum–it was simply the highest value that stopped the Vulkan backend from crashing. That, in a sentence, sums up a fair bit of the experience of using this board.
llama.cpp on Vulkan was the best all-round practical setup, but only after patching and tuning.
llama.cpp on CPU was useful as a baseline and for sanity checks, but too slow once model size started to climb.
ik_llama.cpp on CPU turned out to be dramatically better for some 2-bit and sparse-ish workloads than I had expected, to the point where it occasionally made GPU offload look silly.
[PowerInfer] remained interesting mostly in theory; in practice it was too awkward and too far behind the other options to matter.
GPU offload was not always the right answer. A lot of the marketing gravity around boards like this points you toward the GPU or NPU as the only interesting path, but once you start timing things, the answer is much more conditional.
Qwen3.5 35B-A3B IQ2_XXS was instructive. Under stock llama.cpp, far too slow. Under ik_llama.cpp, dramatically faster on CPU–to the point where it occasionally behaved like a real system rather than a cry for help. But it had a roughly 40% empty-response rate, consumed nearly all RAM and swap, and was slow enough end-to-end that I would only call it “working” in the same tone one might describe a vintage British car that has just completed a short journey without shedding visible parts.
For that model, the runtime comparison was actually rather stark:
Upstream llama.cpp on pure CPU (-ngl 0) managed about 0.63 prompt tok/s, 1.07 generation tok/s and took 76.67s end to end.
Upstream llama.cpp with a token amount of offload (-ngl 8) was, if anything, slightly worse at 80.03s total.
ik_llama.cpp on CPU was the surprise winner by a ridiculous margin: 16.24 prompt tok/s, 5.24 generation tok/s and 12.75s total.
ik_llama.cpp with -ngl 8 promptly ruined that advantage and fell back to a miserable 71.33s total.
That is one of the more useful things I learned here: for some quantized models on this machine, CPU inference with the right runtime was not just competitive with GPU offload, it was much better.
The Liquid models were interesting for a different reason. LFM2 8B-A1B Q4_K_M managed roughly 46.7 tok/s prompt and ~32 tok/s generation on Vulkan–objectively impressive for the active parameter count–and LFM2.5 1.2B pushed generation to around 45 tok/s. On paper, these look like the hidden sweet spot. In practice both failed when pushed through the full agent pipeline: blank output, formatting failures, over-eager obedience to internal conventions. Useful to know, but not deployable.
For reference, the ranking I ended up with:
Qwen3.5 4B Q4_K_M on llama.cpp Vulkan at 9.7 generation tok/s was the only setup that felt production-usable.
Qwen3.5 35B-A3B IQ2_XXS on ik_llama.cpp CPU at roughly 5.3 generation tok/s was the most surprising result–impressive, but too flaky and memory-hungry to trust.
LFM2 8B-A1B Q4_K_M on Vulkan at roughly 32 tok/s generation posted a great benchmark number but broke down in real agent use.
LFM2.5 1.2B Q4_K_M on Vulkan at roughly 45 tok/s generation was quick but not dependable enough to matter.
Qwen3.5 0.8B Q4_K_M on CPU at about 46 tok/s sounds good until you ask it to cope with a full agent prompt.
So yes, the board can run local models. It cannot run all of them well, and a distressing amount of the work lies in sorting out which bits of the stack are broken on any given day, but it was a much better experience than with Rockchip boards, and I intend to try out Gemma 4 and more recent models soon.
While the above was going on, I kept tabs on both thermals and memory, since I expected sustained GPU or inference workloads to need active airflow. But I had to deal with the fan first, since the Orange Pi 6 Plus ships with a pretty beefy cooling solution that, sadly, is very on the loud side.
And there’s no fan curve–all you get with the CIX kernel is a sysfs interface via cix-ec-fan with three modes:
mute
normal
performance
The first leads to the CPU reaching fairly high temperatures under even moderate load, the last is unbearably loud, and the normal setting ranges from moderately quiet to annoying, so for most of the testing I moved the board to my server closet.
Again, the CIX P1 has 12 cores, but they are not equal–four low-power Cortex-A520 cores clocked at 1.8GHz and eight faster Cortex-A720 cores spread across four clusters at different peak speeds (2.2 to 2.6GHz). The kernel’s cpufreq subsystem treats each cluster independently, which means that it takes a bit of effort to max out all the cores:
sbc-bench reported no throttling during its run, which was encouraging.
The aggregate 7-Zip score landed around 33k, with the best single A720 core around 3874 and the A520 cluster way behind at about 1617–a nice reminder that workload placement matters on this SoC.
Memory bandwidth on the A720 cores was respectable: libc memcpy in the 15-17 GB/s range, memset often 35-47 GB/s.
The A520 results were dramatically lower across the board.
Memory Bandwidth
An interesting twist I lost some time exploring is that you can actually see some differences per CPU cluster, which is new for me in ARM machines:
Memory bandwidth by CPU cluster
Blue bars are memcpy (read-then-write), red bars are memset (pure write). The A520 cluster is roughly half the bandwidth of the A720s across both. This matters for inference because memory access patterns land on whichever cores the scheduler picks, and a hot path pinned to the efficiency cluster is immediately noticeable.
Thermals
On a quiescent system, sensor readings were good–most blocks hovered in the high twenties to low thirties Celsius:
GPU_AVE: 29°C
NPU: 30°C
CPU_M1: 30°C
CPU_B0: 32°C
PCB_HOT: 33°C
The thermal logs during the benchmarks were more reassuring than I expected:
idle and light-load readings sat mostly around 29-33°C across GPU, NPU and CPU blocks
under the longer benchmark runs, board and package sensors generally rose into the mid-30s to about 40°C range, which is very good (but, as you’d expect, audibly noticeable from outside the closet)
frequency traces showed the active cluster spending long stretches pinned at its target clocks before later dropping back, which looked much more like workload phase changes than panicked throttling
One benchmark artifact I largely ignored was the iozone run, because it was aimed at /tmp and therefore mostly measuring the memory-backed path rather than telling me anything meaningful about persistent storage.
Here’s a new chart that tries to capture thermals and frequency a little better than my old ones:
Thermal and frequency trace during sbc-bench run|653
The above covers the full sbc-bench session–roughly 40 minutes of mixed workloads.
The three shaded phases correspond to what was running at the time: a short iozone burst (memory-backed, not interesting), the main sbc-bench battery (OpenSSL, 7-Zip single and multi-threaded, tinymembench across all clusters), and the trailing cooldown.
The key thing to notice is that frequency stayed pinned at target clocks throughout the heavy phases and only dropped back during transitions–there was no thermal throttling, which is pretty amazing.
Temperature peaked around 43°C during the sustained multi-threaded 7-Zip run, which is well within spec for a board with active cooling. The idle baseline was around 29°C, and it settled back there fairly quickly once the load came off.
One thing I could not track was fan speed, since the cix-ec-fan interface does not expose current RPM or duty cycle, and I had no way to correlate the thermal curve with what the fan was actually doing at each point. I could hear it spin up and settle, but I have no real data to overlay, and even though I considered setting up a dB meter, I never got around to it.
All of the above covers the first week or so. But I’ve been running this board as an always-on machine since March 8, and by now have a month’s data on what it’s like to live with.
The board now hosts a piclaw instance (my personal assistant) that I’ve been using for development and model testing, since I realized that LFM2-8B-A1B made for a faster thing to experiment with (31 t/s generation, 47 t/s prompt on Vulkan) even if it’s effectively not that “smart”.
Alongside the assistant work, I’ve been using the board for a real development project: porting the BasiliskII classic Mac emulator’s JIT to AArch64.
Over the past month that has meant a good deal of compilation, linking, automated experiment runs and testing. The JIT now executes real 68k ROM code with basic optimisations–interrupt delivery and display rendering are the active frontier, but it boots to a Mac OS desktop every now and then. The constant rebuilds around AArch64 JIT bugs I hit (broken optflag inline asm bindings, various register allocation and flag bugs in codegen_arm64.cpp, VM_MAP_32BIT allocation failures, repeated runs at fixing emulated 68k interrupt delivery) were genuine low-level issues that exercised the board’s toolchain and memory subsystem in ways no synthetic benchmark would, and it’s been working great.
One thing that came up in every review of the CIX P1 I read–[Jeff Geerling’s Orion O6 writeup][jg] being the most prominent–is power draw, and I have a month’s worth of data to confirm that it’s higher than average–averaging at 15.5W, rather than the usual 13W that I see quoted in other places:
Orange Pi 6 Plus wall power over 30 days
The flat zeros on the left are the setup period when I was reflashing and debugging offline. Once it came up as an always-on machine the power draw settled into a consistent daily pattern.
Orange Pi 6 Plus wall power over 7 days
Zooming into the last week at 15-minute resolution, the daily idle/load cycle is clearly visible–overnight the board drops to about 15-16W, and during the day it hovers around 20-27W depending on what I am doing. Compilation and inference bursts push it briefly toward 30W; the rest of the time it sits comfortably in the low twenties.
That said, the idle floor of 15-16W is noticeably higher than what I am used to from other SBCs. A Raspberry Pi 5 idles around 3-4W, an RK3588 board typically settles around 5-8W, and even a Mini PC with an N100 can idle below 10W.
The Orange Pi 6 Plus never really gets below 15W even with nothing running, and that appears to be a common trait of the CIX P1 reference design rather than anything specific to this board–the Radxa Orion O6 (same SoC) shows a very similar baseline in the reports I have seen.
Whether that is down to the memory controller, the 5GbE PHYs, the always-on fan or some combination of all three, I cannot say for certain. But it does mean the board is less attractive as a low-traffic always-on appliance than the raw compute-per-watt numbers might suggest. At 15W idle you are paying about 130 kWh/year just to keep it breathing, which is not terrible but is not nothing either.
Orange Pi 6 Plus current draw over 7 days
I checked, and current draw mirrors the power profile and stays well under 0.2A on the 230V circuit. The board’s power supply is not doing anything exotic.
Mains voltage on the office circuit over 7 days
The voltage trace is mostly here for completeness–Lisbon mains hovering around 230-232V with the usual overnight sag and daytime recovery. Nothing that would stress any reasonable power supply, and useful as a sanity check that the power readings are not being skewed by wild grid swings.
Reboots over the month: essentially none that weren’t my doing. The board has been stable in a way I did not expect from the early boot-chain experience.
After all of this, the Orange Pi 6 Plus fits a fairly specific set of roles:
local inference experiments with carefully chosen models
edge-side telemetry or monitoring
compact Linux services that benefit from dual 5GbE
infrastructure roles where you want something denser and lower-power than x86 but more capable than the usual toy SBC
I wouldn’t use it as a general-purpose desktop, and I wouldn’t trust the NPU story for anything LLM-related without more soak time. But I would keep it around for the sort of edge-AI and systems work I usually get drawn into–enough real capability to justify the effort, even if that effort is, right now, unreasonably high.
Even considering that I cut a lot of corners on the software side to get to a usable state, the hardware is still very much ahead of the software.
The GPU works, the NPU stack exists in some recognisable form, and local AI is not only possible but occasionally good, and I like what it can do, even if the power consumption and fan noise are higher than I would like for a board in this class, but compared to Rockchip’s offerings, it’s a much more polished experience–and the fact that I can get it to do useful work at all by myself, with my own OS image, is a testament to the progress ARM boards have made in the last couple of years.
]]>Shottrhttps://taoofmac.com/space/apps/shottr?utm_content=atom2026-04-11T08:27:00+00:002026-04-11T08:43:20+00:00Rui Carmohttps://taoofmac.comShottr is a lightweight macOS screenshot and annotation tool that manages to stay focused on the useful bits while still packing in a surprising number of editing features: quick capture, measurement, redaction, OCR, scrolling screenshots, pinning, pixelation, arrows, callouts and the usual visual markup without turning into a full design app. It has the right kind of small-tool energy, and is one of those utilities that is easy to justify keeping around all the time.
It also has a free trial mode and is available via Homebrew, which makes it particularly easy to install and keep up to date:
brewinstall--caskshottr
]]>Markdownhttps://taoofmac.com/space/markup/markdown?utm_content=atom2007-02-28T21:44:57+00:002026-04-11T08:43:20+00:00Rui Carmohttps://taoofmac.comMarkdown is a text-to-HTML idiom, conversion tool and all-out ecosystem for web writers, content editors and… AI, allowing you to write using an easy-to-read, easy-to-write plain text format, then convert it to structurally valid (X)HTML.
Althought I used to prefer Textile for its table support and other niceties, Markdown has won that war and enjoys indisputably wider adoption, as well as making for slightly more readable text when writing essays.
Amusingly, it became the lingua franca of LLMs and is now the de facto standard for most modern documentation as well.